
3DGS Scene Clipping and Sectioning
The three tools act at different stages: clipping volumes and section planes only change the final rendering, and the data loads as usual; a load volume acts before loading, so excluded areas are never read at all.
| Tool | Stage | Reduces load amount and video memory | Border precision |
|---|---|---|---|
| Load volumes | Filtering before load | Yes | Per node, conservative border |
| Clipping volumes | Final rendering | No | Per splat, precise border |
| Section planes | Final rendering | No | Per splat, precise border |
Clipping Volumes
A clipping volume can be scaled, moved, and rotated freely, which helps developers clip an LCC scene spatially.
- A single Actor supports up to 65536 clipping volumes, limited to 50 in the free edition; see Editions and Licensing
- Box and sphere shapes are supported, and both can be scaled, moved, and rotated
Note: clipping only affects the final rendering. Clipped-away areas still take part in node traversal, load, and video memory upload as usual. Clipping therefore cannot reduce the load amount or video memory usage; use the methods in the Performance Guide to control those costs.
Steps
- Place an LCCActor/LCC2Actor and load the scene.
- Drag
LCC Clipping Volumeinto the scene.
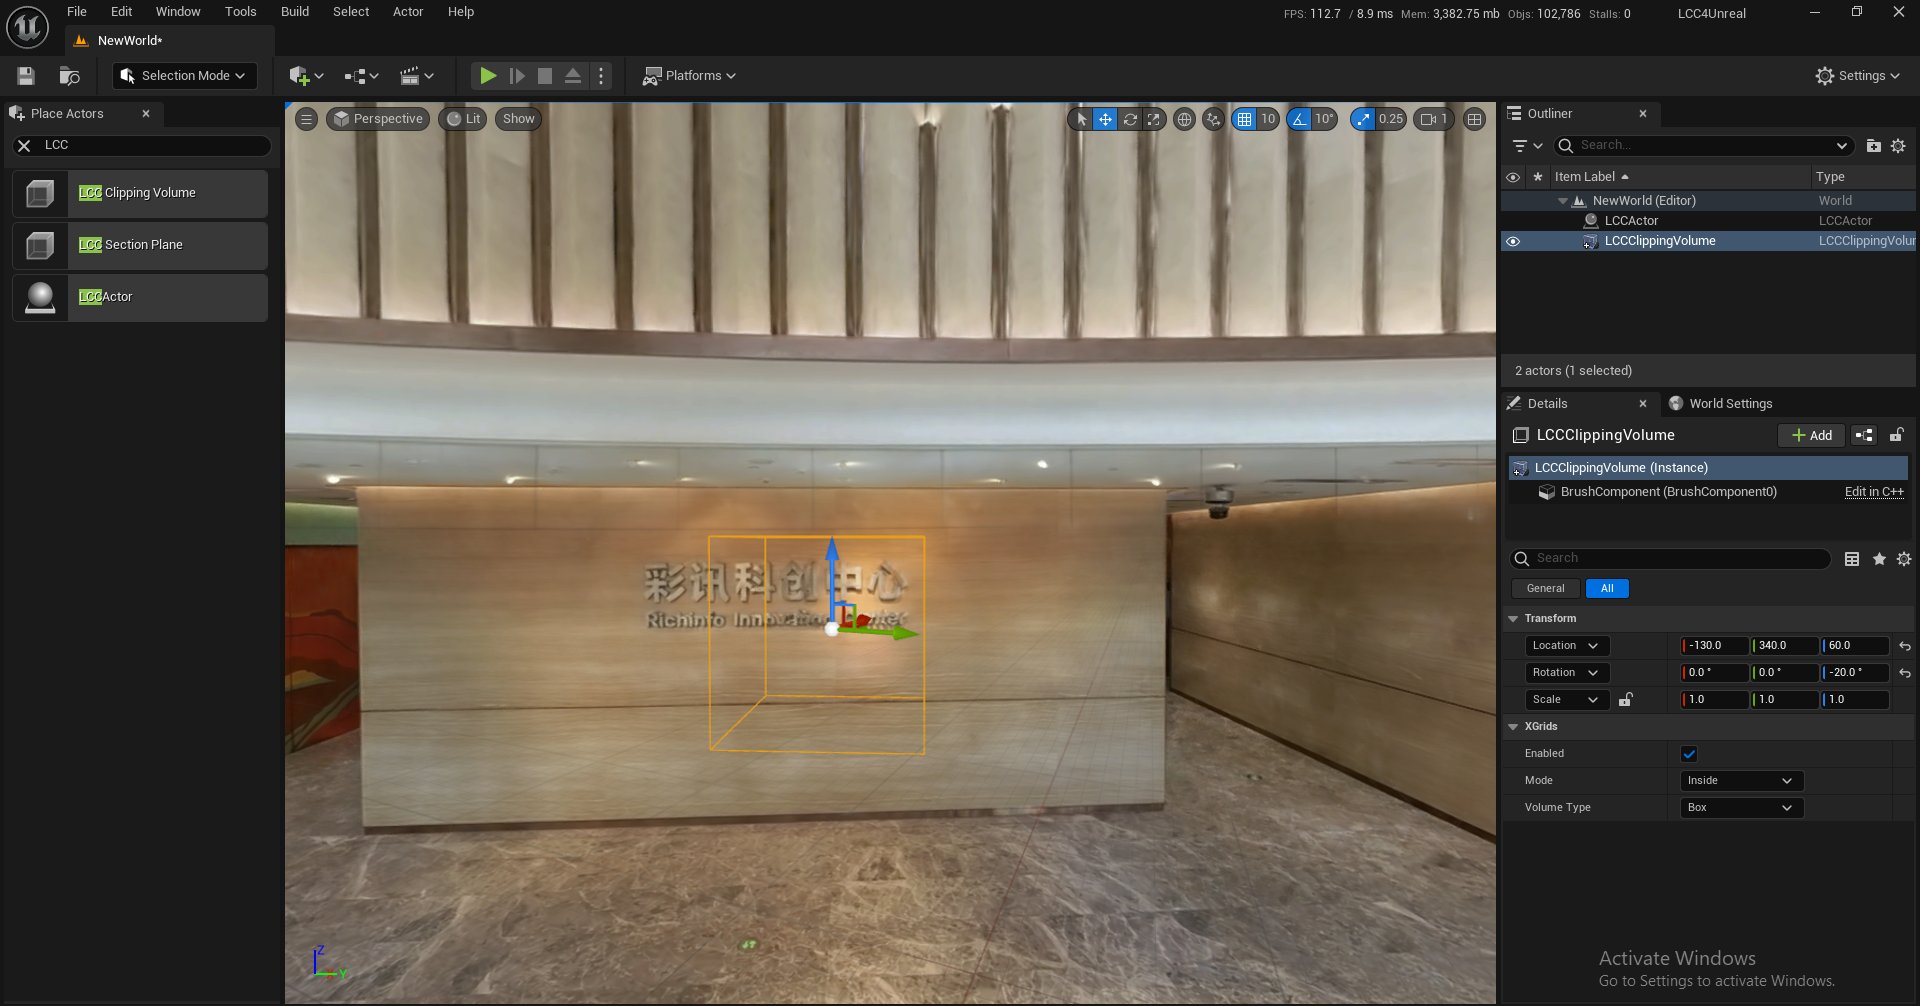
Dragging an LCC Clipping Volume into the scene
- Move the clipping volume to the target position.
- Add the Clipping Volume to the
ClippingVolumesarray in the Details panel of the Actor.
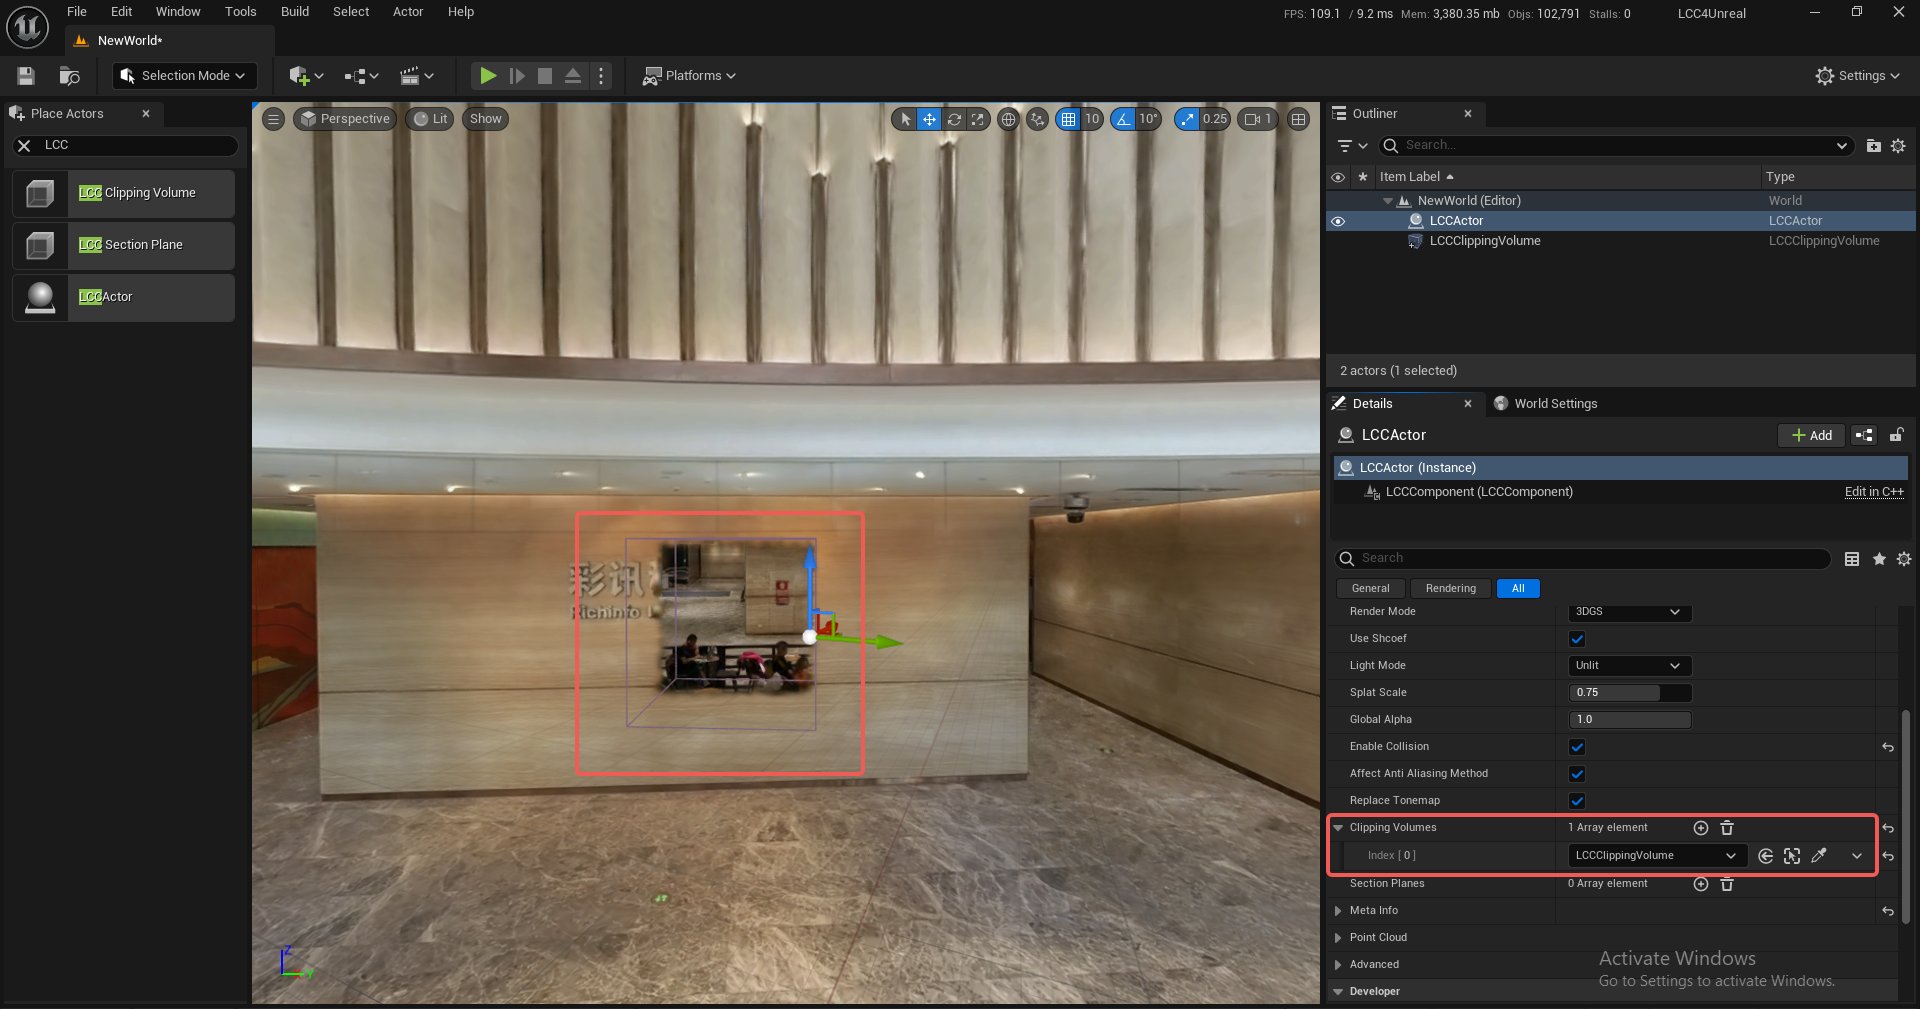
The Inside clipping result of a clipping volume
Demo
Moving a clipping volume and observing the clipping in real time
Properties
| Property | Description |
|---|---|
| bEnabled | Whether it is enabled |
| Mode | Inside (clip inside) or Outside (clip outside) |
| VolumeType | Box or Sphere |
Blueprint Methods
LCCComponent → AddClippingVolume
LCCComponent → RemoveClippingVolume
Note:
RefreshandSetUpdateComponentare deprecated. Clipping data is read every frame, so changing a property or moving a clipping volume takes effect on the next frame without calling them.
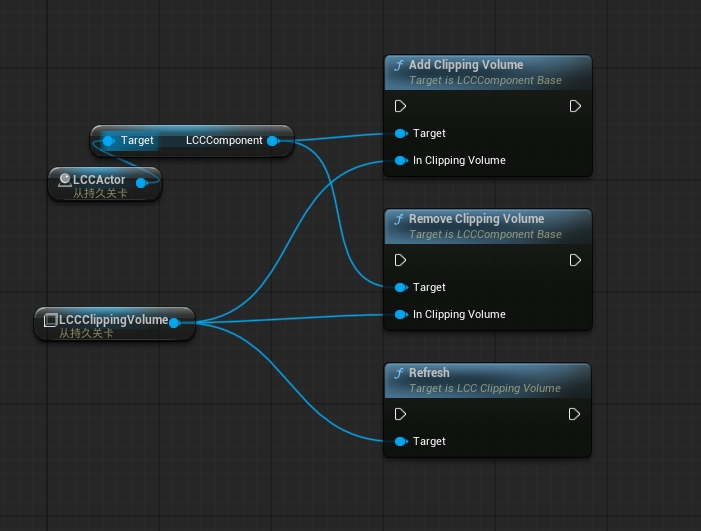
Adding, removing, and refreshing a clipping volume with Blueprint nodes
Section Planes
A section plane can be scaled, moved, and rotated freely to section the scene along a plane.
- A single Actor supports up to 65536 section planes, limited to 50 in the free edition; see Editions and Licensing
- Sectioning upward or downward is supported, and the count is tracked separately from clipping volumes
Note: sectioning only affects the final rendering. Sectioned-away areas still take part in node traversal, load, and video memory upload as usual. Sectioning therefore cannot reduce the load amount or video memory usage.
Steps
- Place an LCCActor/LCC2Actor and load the scene.
- Drag
LCC Section Planeinto the scene.
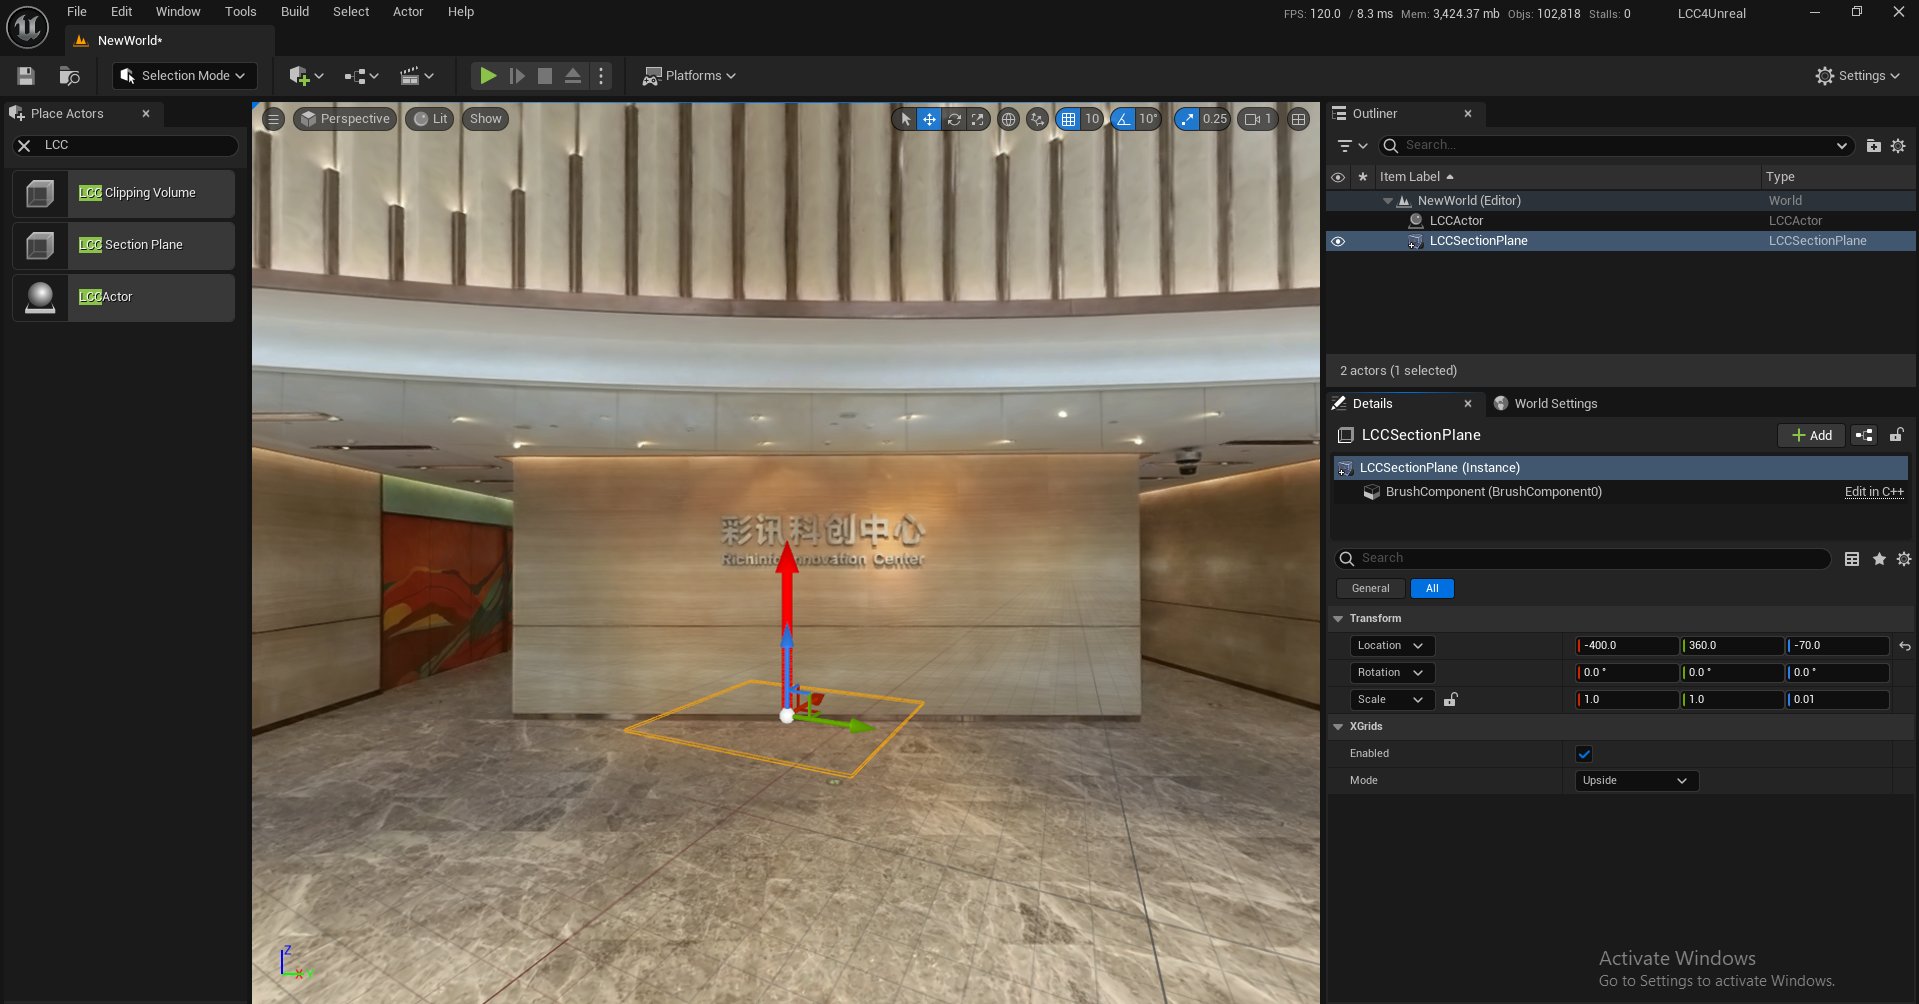
Dragging an LCC Section Plane into the scene
- Move it to the target position.
- Add the Section Plane to the
SectionPlanesarray in the Details panel of the Actor.
Demo
Moving a section plane and observing the sectioning in real time
Properties
| Property | Description |
|---|---|
| bEnabled | Whether it is enabled |
| Mode | Upside (section upward) or Downside (section downward) |
Blueprint Methods
LCCComponent → AddSectionPlane
LCCComponent → RemoveSectionPlane
Note:
RefreshandSetUpdateComponentare deprecated, for the same reason as above.
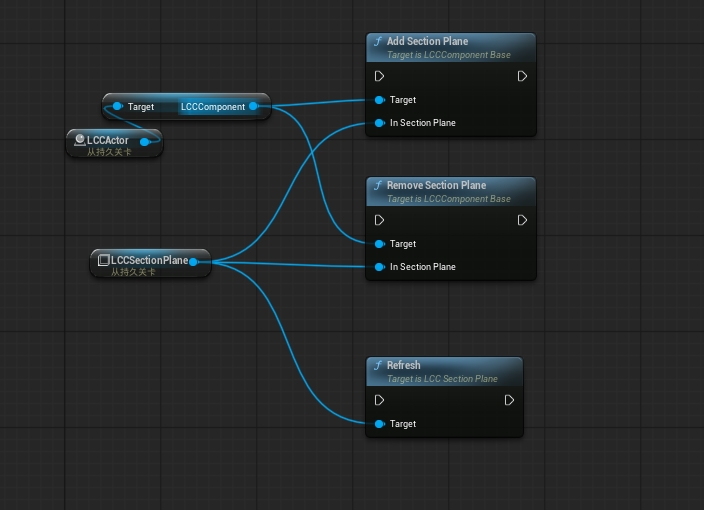
Adding, removing, and refreshing a section plane with Blueprint nodes
Load Volumes
A load volume filters the data before it enters memory: node traversal only keeps the nodes it selects, and the data in rejected areas is never read. It is therefore the only one of the three tools in this document that genuinely reduces the load amount and video memory usage, which suits taking a small part out of a large scene.
- Box and sphere shapes are supported, and both can be scaled, moved, and rotated freely
- One load volume can affect multiple LCC Actors in the scene at the same time
- A Pro edition feature; without a license it has no effect and the data loads over its full extent. See Editions and Licensing
Note: filtering works per node, so the border is coarser than a clipping volume's. When a precise border is needed, stack a clipping volume with the same transform on top: the load volume reduces the load amount and the clipping volume trims the edge.
Steps
- Place an LCCActor/LCC2Actor.
- Drag
LCC Load Volumeinto the scene. - Adjust position, rotation, and scale so the volume frames the range to keep.
- Add the Load Volume to the
LoadVolumesarray in the Details panel of the Actor. - Load the scene.
Note: filtering happens at load time. After loading has finished, changing the load volume requires reloading before the change is visible.
Properties
| Property | Description |
|---|---|
| bEnabled | Whether it is enabled |
| Mode | Inside (load only what is inside) or Outside (exclude what is inside) |
| VolumeType | Box or Sphere |
The two modes use different border tests:
| Mode | Test | Border behavior |
|---|---|---|
| Inside | A node loads only when it lies entirely inside the volume | Edge nodes are dropped, so the kept range is slightly smaller than the volume |
| Outside | A node is excluded as soon as it overlaps the volume | Edge nodes are dropped, so the excluded range is slightly larger than the volume |
Both modes are deliberately conservative, which keeps areas from popping in and out while the camera moves and the LOD switches between parent and child nodes.
Blueprint Methods
LCCComponent → AddLoadVolume
LCCComponent → RemoveLoadVolume