XGRIDSDocs
  • 简体中文
  • English
  • 繁體中文
  • 日本語
  • Deutsch
  • Español
  • Italiano
  • Français
  • Русский
  • 简体中文
  • English
  • 繁體中文
  • 日本語
  • Deutsch
  • Español
  • Italiano
  • Français
  • Русский
  • PortalCam

    • Product Overview
    • Basic Operation
    • Using the LCC Scan App
    • Maintenance and Care
    • FAQ
  • Lixel K Series

    • Lixel K1

      • Product Overview
      • Basic Operation
      • Device Activation and Connection
      • Scanning Workflow
      • Acquire Point Cloud Data with Absolute Coordinate
      • Map Fusion
      • Route Planning Suggestions for Typical Scenes
      • Precautions
      • FAQ
    • Lixel K2

      • Product Overview
      • Basic Operation
      • Device Activation and Connection
      • Scanning Workflow
      • Acquire Point Cloud Data with Absolute Coordinate
      • Map Fusion
      • Route Planning Suggestions for Typical Scenes
      • Precautions
      • FAQ
  • Lixel L Series

    • Lixel L2 Pro

      • Product Overview
      • Basic Operation
      • Device Activation and Connection
      • Scanning Workflow
      • Acquire Point Cloud Data with Absolute Coordinate
      • Measure Point
      • Appendix
      • FAQ
  • Accessories

    • Stick Light

      • Installation Guide
      • Basic Operation
      • FAQ
  • Lixel Studio

    • Version and Copyright
    • Installation and Activation
    • Software Interface
    • File Operations
    • Project Processing
    • Tools
    • 2D Drawing
    • Applications
    • Settings
    • Device Connection
  • Lixel CyberColor

    • LCC Studio

      • Getting Started
      • Version and Updates
      • Download and Installation
      • Interface Overview and Navigation
      • Before Reconstruction
      • Model Reconstruction
      • Single Model Reconstruction
      • Map Fusion
      • Aerial-Ground Fusion
      • Aerial Reconstruction
      • My Models
      • Other Features
      • Settings and Account
      • Converter
      • Video Reconstruction
      • FAQ
    • LCC Scene Editor

      • Version & Updates
      • Account & Login
      • Product Overview & Home
      • Editor Interface
      • Scene Navigation Modes
      • File
      • Settings
      • Edit Operations
      • Window
      • Global Toolbar
      • Assets & Properties
      • Left Toolbar
      • Viewpoints
      • Portal
      • Skybox
      • Annotations
      • Measurement
      • Flythrough
      • Scene Report
      • 3D Layout
      • Mini-Map
      • Preview Mode (Viewer)
      • Help
      • FAQ
      • Spawn Point
    • LCC Model Editor

      • Version and Updates
      • User Guide
      • Overview and Interface
      • File Operations
      • Selectors
      • Editing Models
      • Measurement
      • Color Grading
      • Asset Management
      • Settings and Help
      • FAQ
    • Capture Guide

      • Overview
      • Capture Devices Overview
      • General Capture Principles
      • Indoor Scene Capture
      • Outdoor Scene Capture
      • Large-Scale Capture (Map Fusion)
      • Aerial-Ground Map Fusion Capture
      • Object Capture
      • People Capture
      • Video Reconstruction Capture
      • HD Enhancement
      • Control Points (Lixel P1)
      • FAQ and Troubleshooting
    • LCC Studio Linux

      • Product Overview
      • Architecture Guide
      • Installation and Deployment Guide
      • Container Startup Parameters Guide
      • CodeMeter Offline Licensing Deployment Guide
      • API Reference
      • Appendix - Developer Data Guide
      • Appendix - Error Code List
      • Single-Machine Multi-GPU Cluster Deployment QuickStart
    • Version History
  • Plugin & SDK

    • Unreal

      • Introduction
      • Quick Start - Windows
      • Quick Start - Linux
      • Quick Start - Quest3
      • Editions and Licensing
      • Rendering
      • Tiled Rasterization (Experimental)
      • Visual Settings
      • Normals and Lighting
      • Scene Editing
      • Performance Parameters
      • Performance Guide
      • Third-party and Engine Plugin Integration
      • Proxy Mesh
      • Loading Animation
      • Collision
      • Navigation System Support
      • Single Layer Water Support
      • Localization
      • FAQ
      • Troubleshooting
      • Logging and Diagnostics
      • Contact Us
      • Best Practices

        • Relighting 3DGS with a LixelStudio Mesh
      • API Reference

        • ALCCActorBase
        • ULCCComponentBase
        • ULCCComponent
        • ULCC2Component
        • SOG / SPZ / PLY Actors
        • ALCC2ProxyMesh
        • ALCCClippingVolume
        • ALCCSectionPlane
        • ALCCLoadVolume
        • ULCCUtilLibrary
        • Enums
        • Structs
      • Changelog

        • v3.4.0
        • v3.3.1
        • v3.0.0
        • v2.2.1
        • v1.0.0
        • v0.9.0
        • v0.8.0
        • v0.7.1
        • v0.6.1
        • v0.5.2
        • v0.4.1
        • v0.4.0
        • v0.3.0
        • v0.0.5
        • v0.0.4
        • v0.0.3
        • v0.0.2
        • v0.0.1
    • Web

      • Introduction
      • Rendering Performance Optimization Guide
      • Graphics Configuration
      • FAQ
      • API Reference

        • LCCRender::clearIndexDB
        • LCCRender::dispose
        • LCCRender::load
        • LCCRender::setCamera
        • LCCRender::unload
        • LCCRender::update
        • LCCObject::checkRenderNextFrame
        • LCCObject::clearRenderNextFrame
        • LCCObject::ecef2Prj
        • LCCObject::getBounds
        • LCCObject::getEnvInstancedMesh
        • LCCObject::getInstancedMesh
        • LCCObject::getLodInfos
        • LCCObject::getOriginPosition
        • LCCObject::getProjectionCoordinateSystemInfos
        • LCCObject::hasCollision
        • LCCObject::hasEnvironment
        • LCCObject::hasShcoef
        • LCCObject::intersectsCapsule
        • LCCObject::intersectsRayExt
        • LCCObject::intersectsRayFromOriginExt
        • LCCObject::intersectsSphere
        • LCCObject::lowerToBottom
        • LCCObject::prj2Ecef
        • LCCObject::raiseToTop
        • LCCObject::raycast
        • LCCObject::raycastFromOrigin
        • LCCObject::setAlpha
        • LCCObject::setClipBox
        • LCCObject::setClipPlane
        • LCCObject::setEndLod
        • LCCObject::setLodAutoLevelUp
        • LCCObject::setMaxDistance
        • LCCObject::setMaxNodeSplats
        • LCCObject::setMaxSplats
        • LCCObject::setOriginPosition
        • LCCObject::setPointsColor
        • LCCObject::setRenderState
        • LCCObject::setRotation
        • LCCObject::setScale
        • LCCObject::setSemantic
        • LCCObject::setSemanticColor
        • LCCObject::setSmooth
        • LCCObject::setStartLod
        • LCCObject::setTranslation
        • LCCObject::setVisible
        • LCCObject::togglePointsDisplayMode
        • LCCObject::useEnvironment
        • LCCObject::useShcoef
      • Changelog

        • v0.6.3
        • v0.6.2
        • v0.6.1
        • v0.6.0
        • v0.5.5
        • v0.5.4
        • v0.5.3
        • v0.5.2
        • v0.5.1
        • v0.5.0
        • v0.4.1
        • v0.4.0
        • v0.3.1
        • v0.3.0
        • v0.2.0

Relighting 3DGS with a LixelStudio Mesh

The plugin supports hybrid relighting: pair 3DGS with a mesh of matching scale so the 3DGS picks up a lighting response close to that of a mesh, and can cast self-shadows.

The result depends on the geometric accuracy of the mesh sitting under the 3DGS. The closer the mesh aligns with the 3DGS, the more convincing the lighting response and shadows.

For the underlying mechanism and parameters, see Proxy Mesh. For the tradeoffs between normal modes, see Normals and Lighting.

Which Mesh to Use

Both LCC Studio and LixelStudio can generate meshes, but they serve different purposes.

LCC Studio meshLixelStudio mesh
Surface accuracyRougherCloser to the real shape
File sizeSmallLarge
Suited forCollision detectionRelighting

For collision, the LCC Studio mesh is enough, see Collision. For relighting, use the LixelStudio mesh.

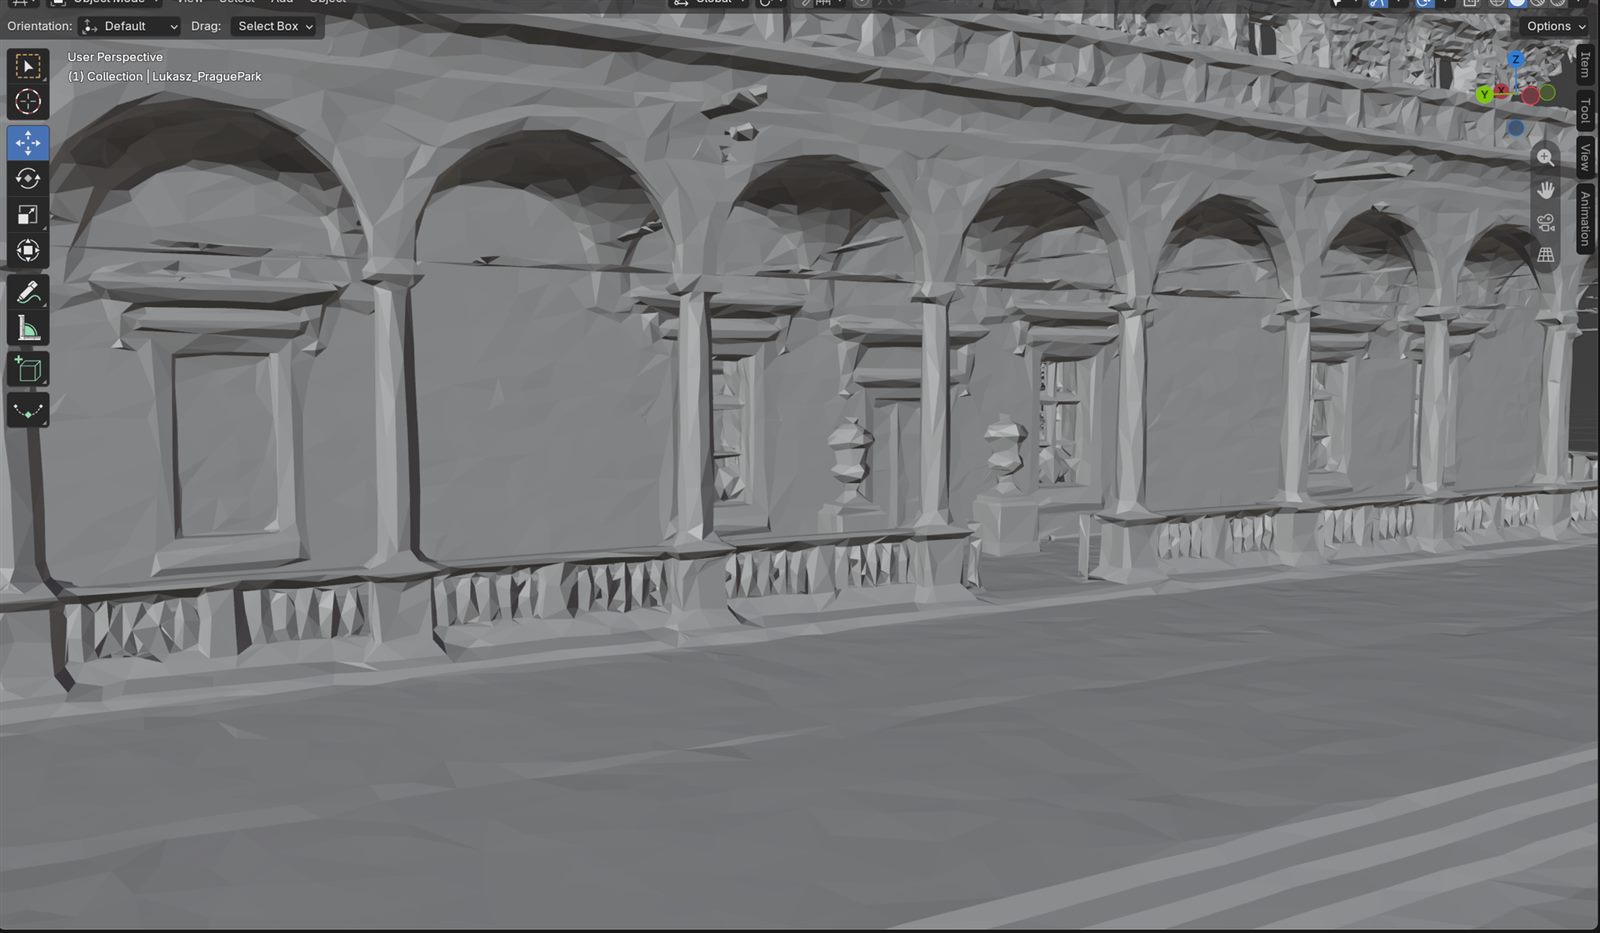
LCC Studio mesh:
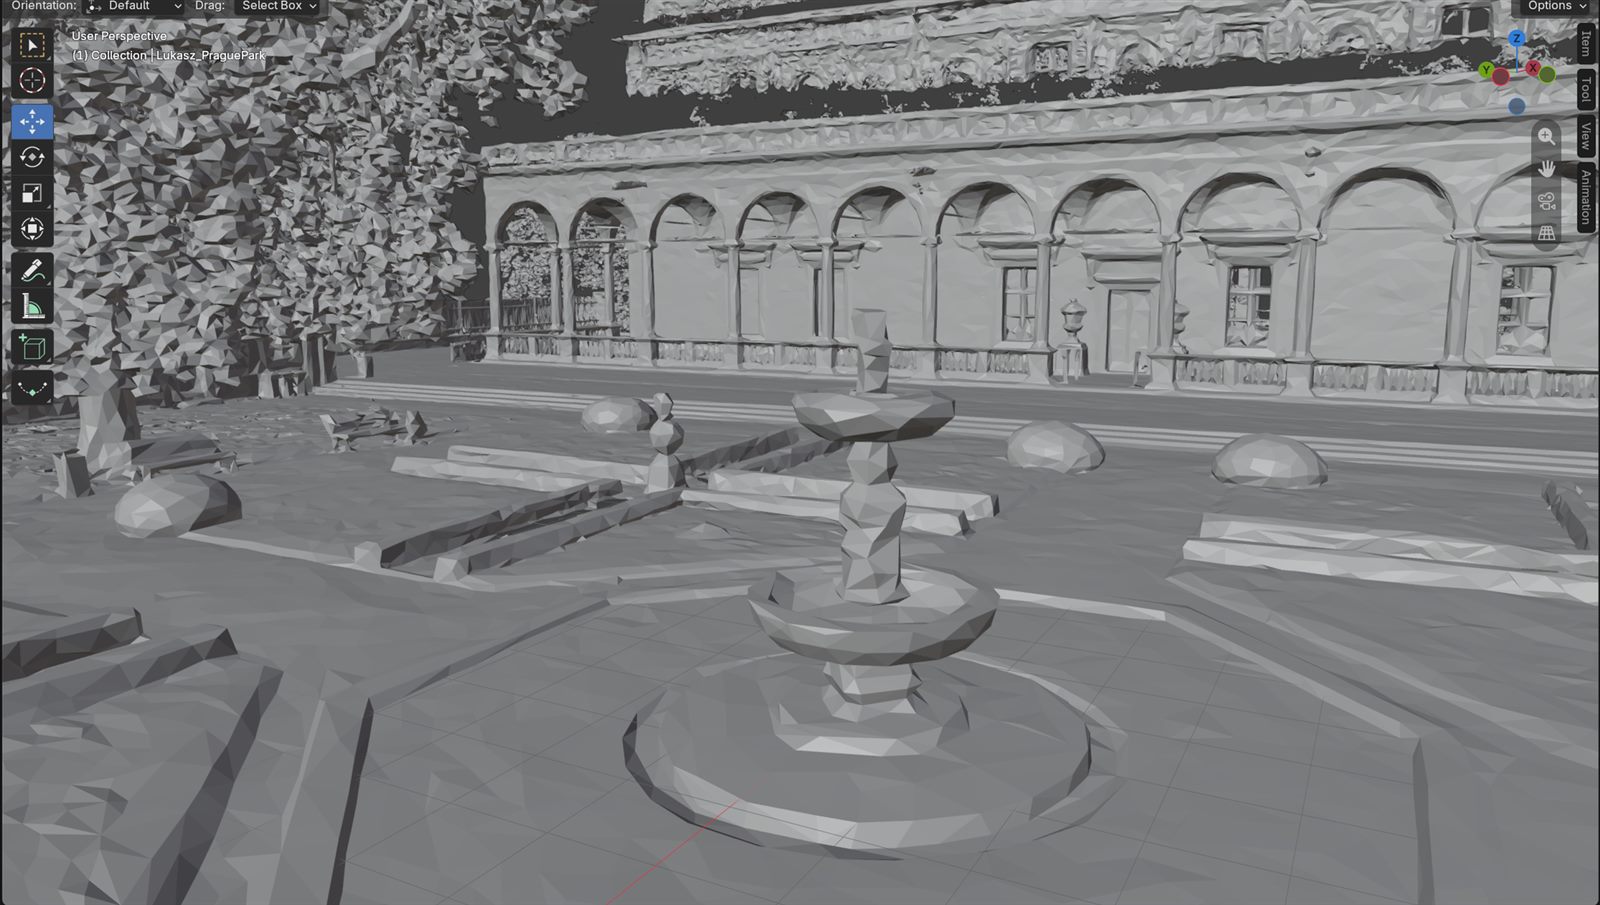
LCC Studio mesh, overall view
LCC Studio mesh, close-up

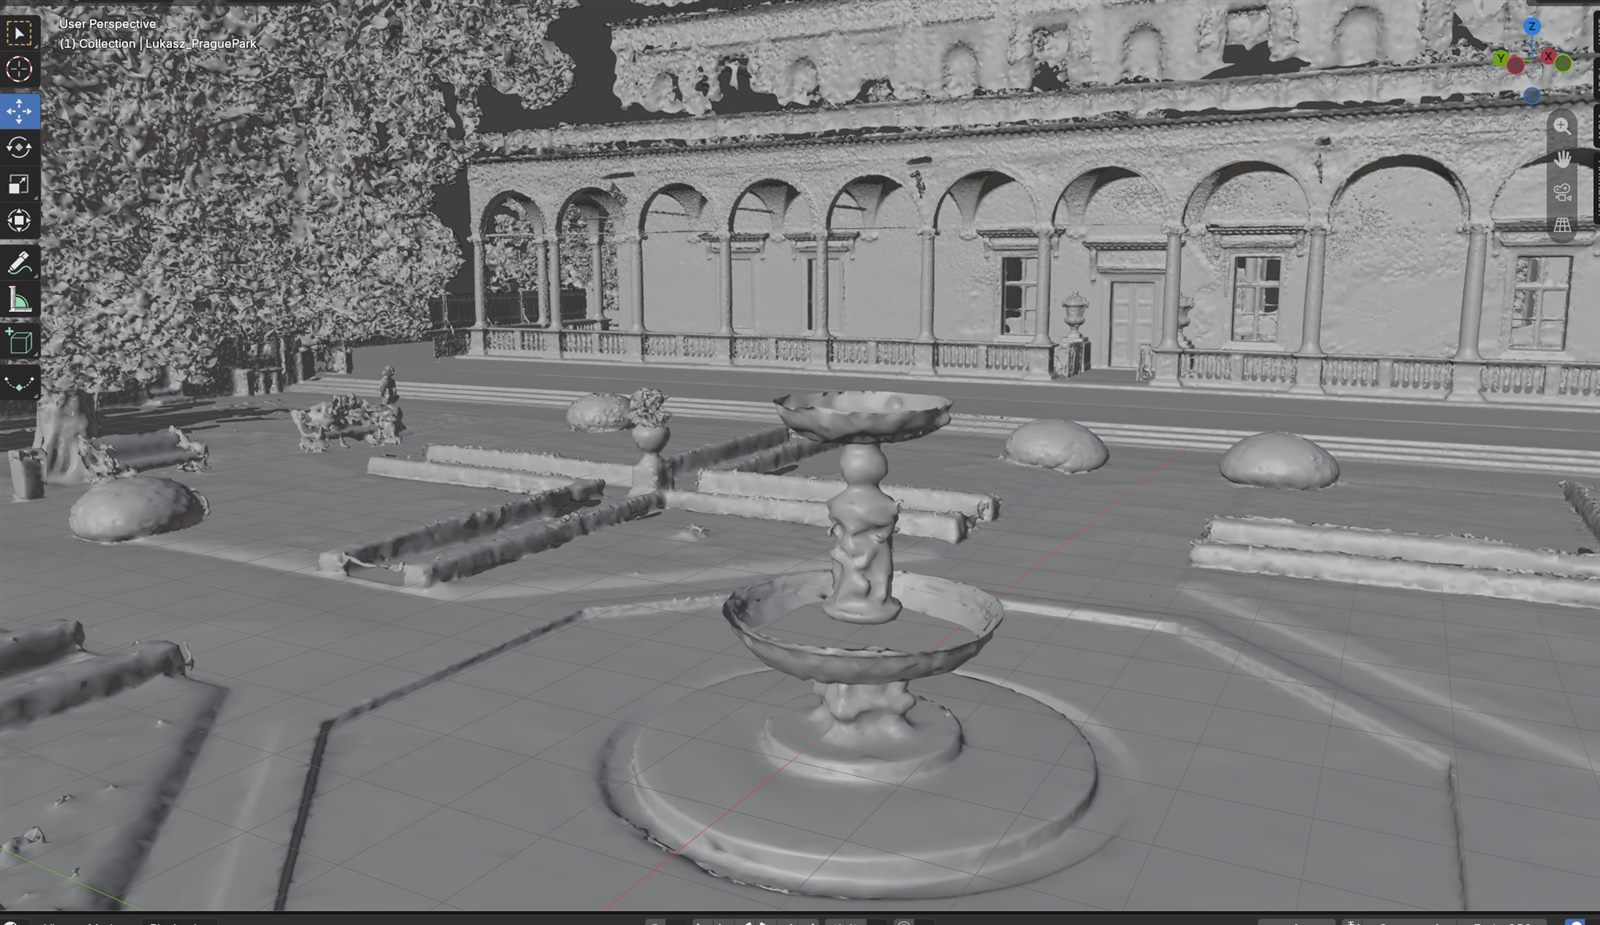
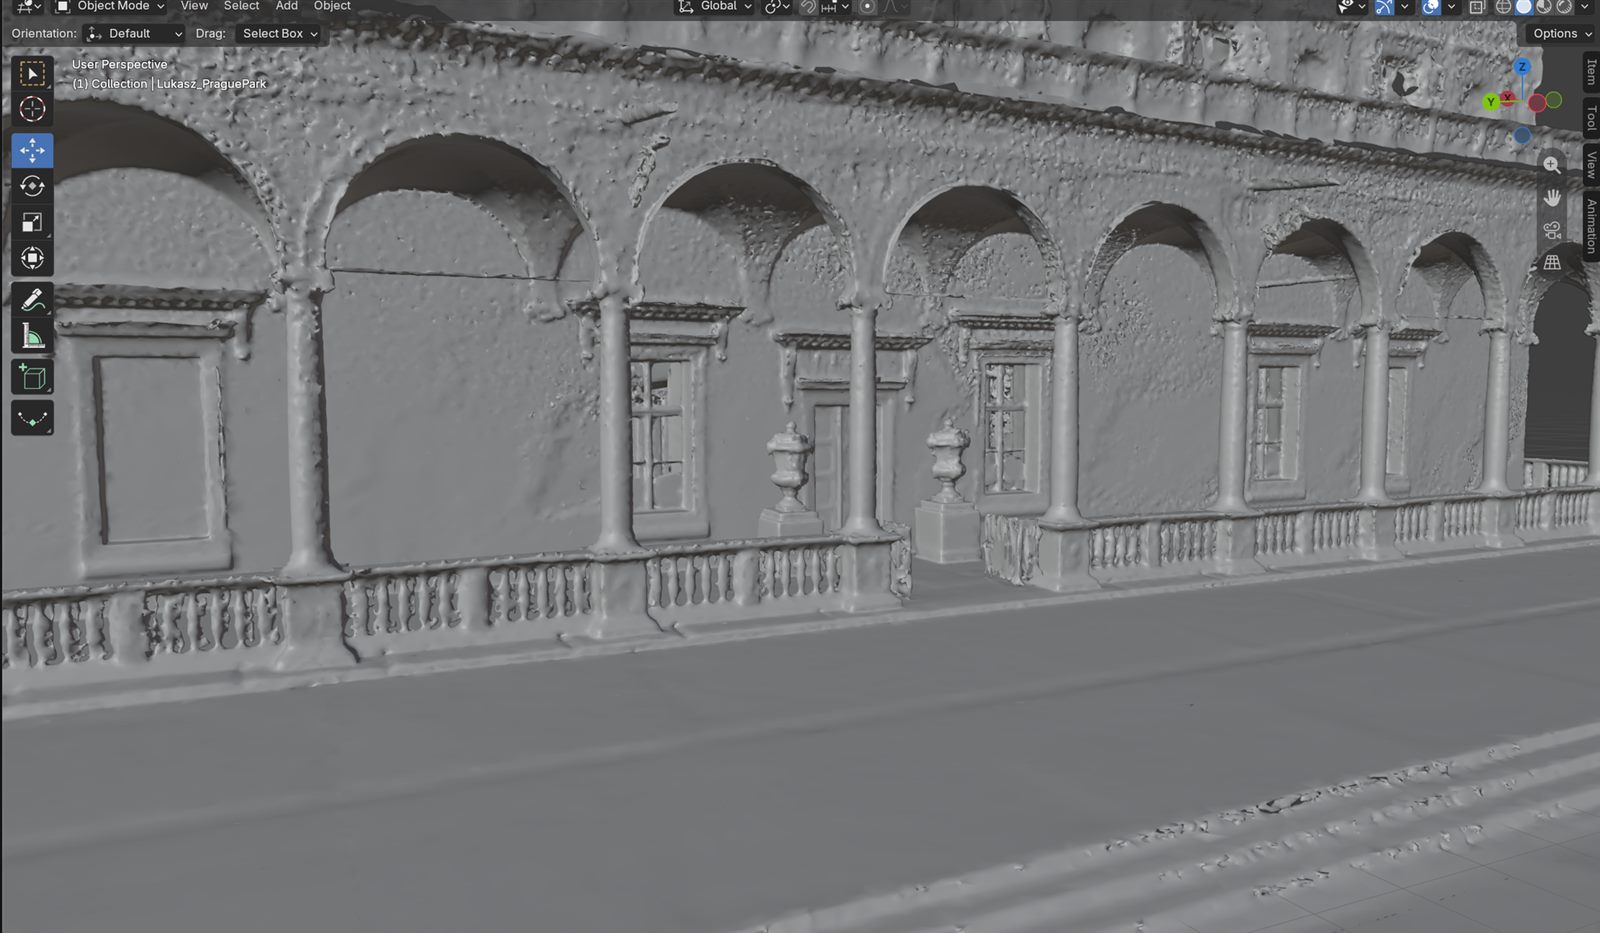
LixelStudio mesh:

LixelStudio mesh, overall view
LixelStudio mesh, close-up

Step 1: Gather the Tiled Models into One Folder

LixelStudio exports meshes in tiles. For a large scene you end up with many folders, each holding one .obj file and its textures. They have to be merged into a single mesh before import, otherwise you get many separate .obj files.

The steps below use Blender; any 3D modeling tool works the same way. Download Blender from the official site.

Blender cannot take a batch of folders dropped in at once, so the .obj files scattered across subfolders have to be pulled up to the same level first. Dragging dozens of folders by hand is not practical, so use a single PowerShell command.

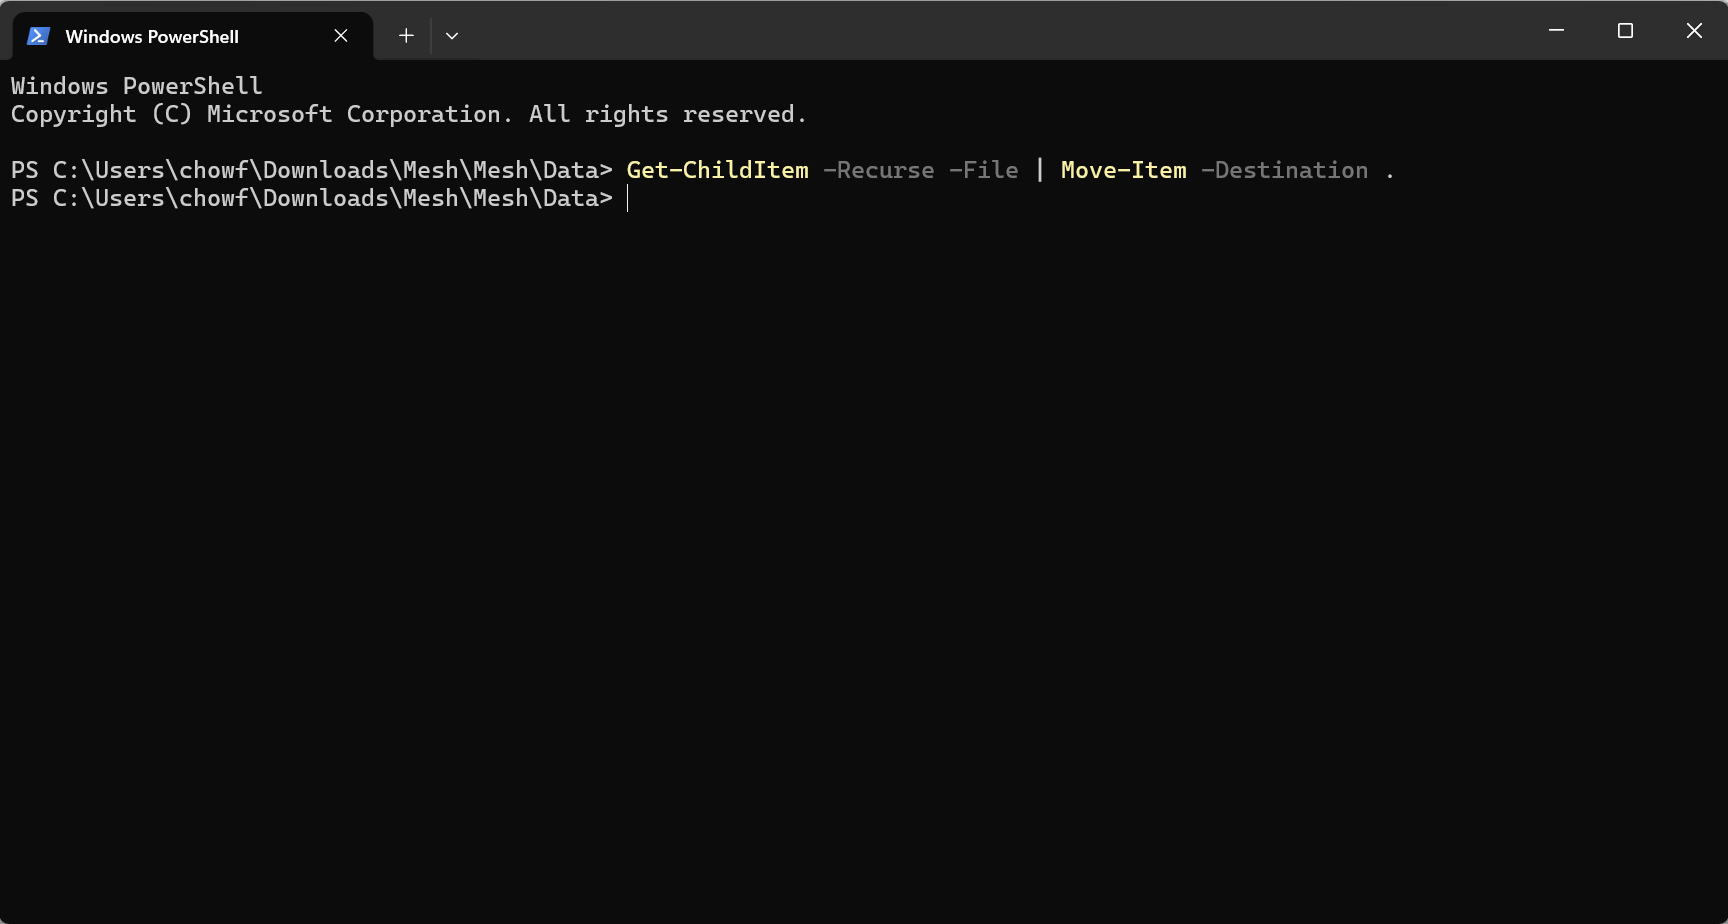
Open the root folder that holds all the subfolders, type powershell in the address bar and press Enter. The terminal opens in the current directory.
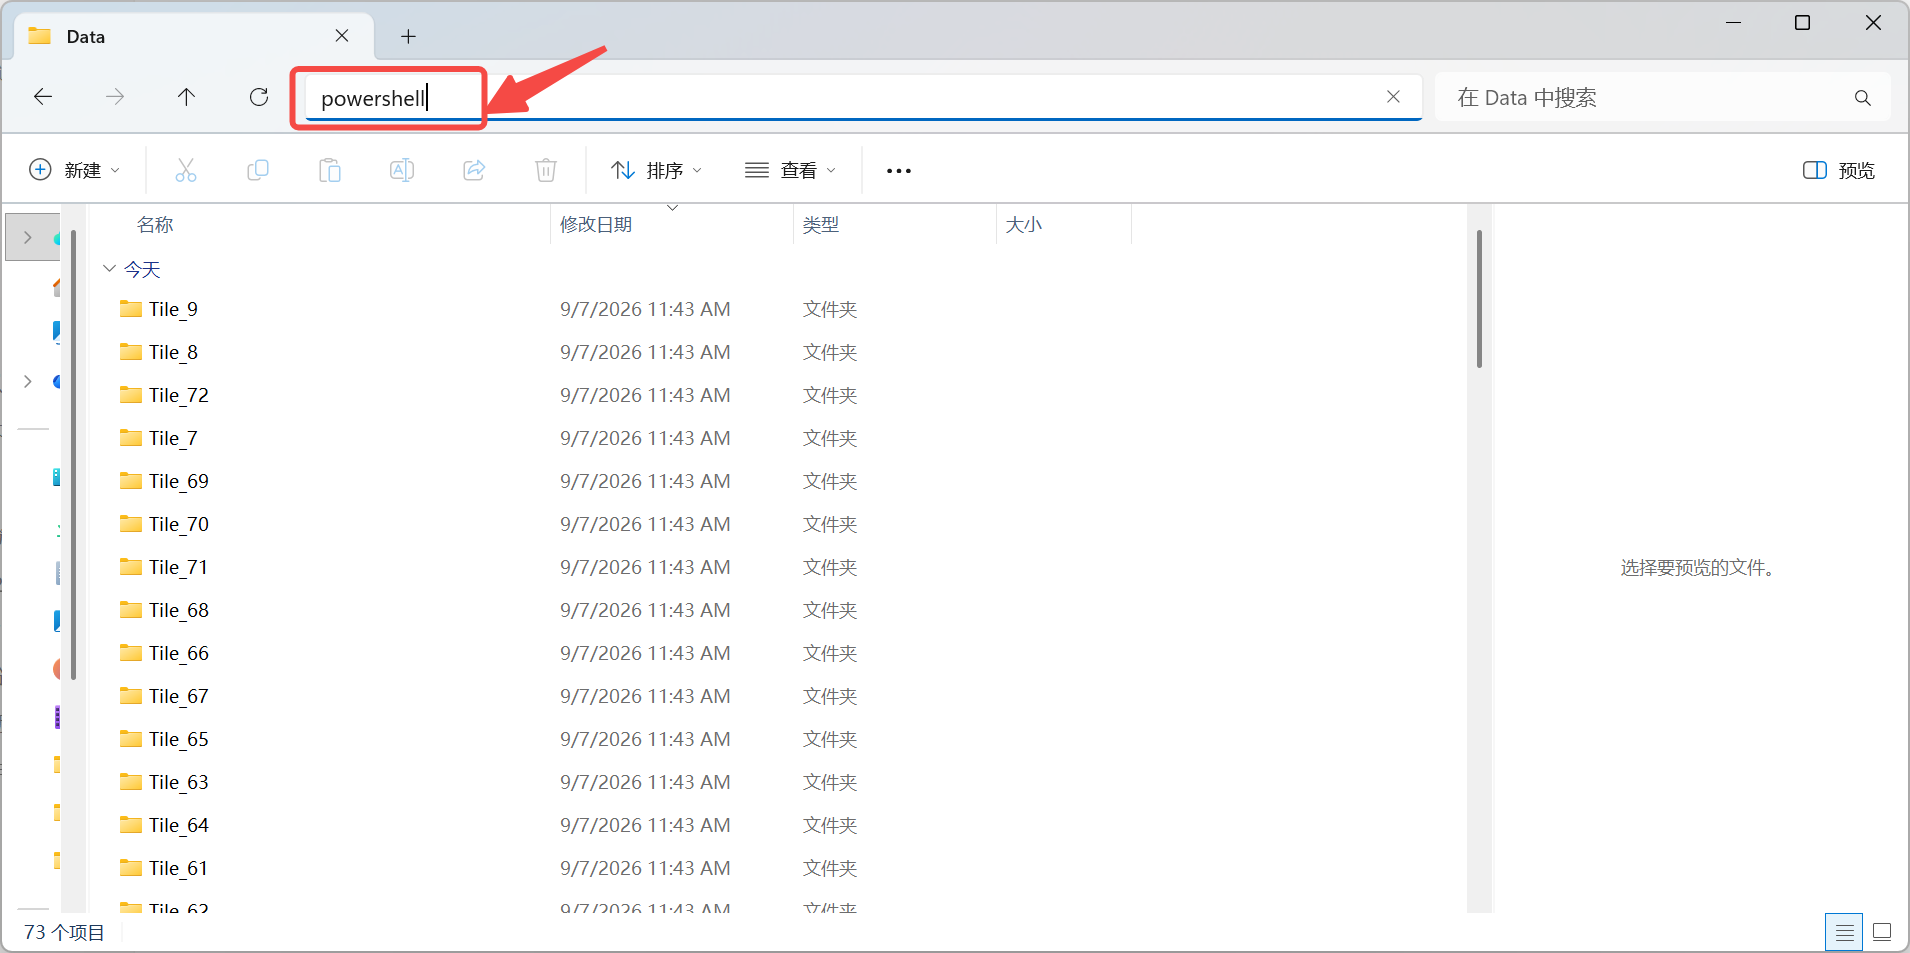
Typing powershell in the address bar

Type powershell in the File Explorer address bar

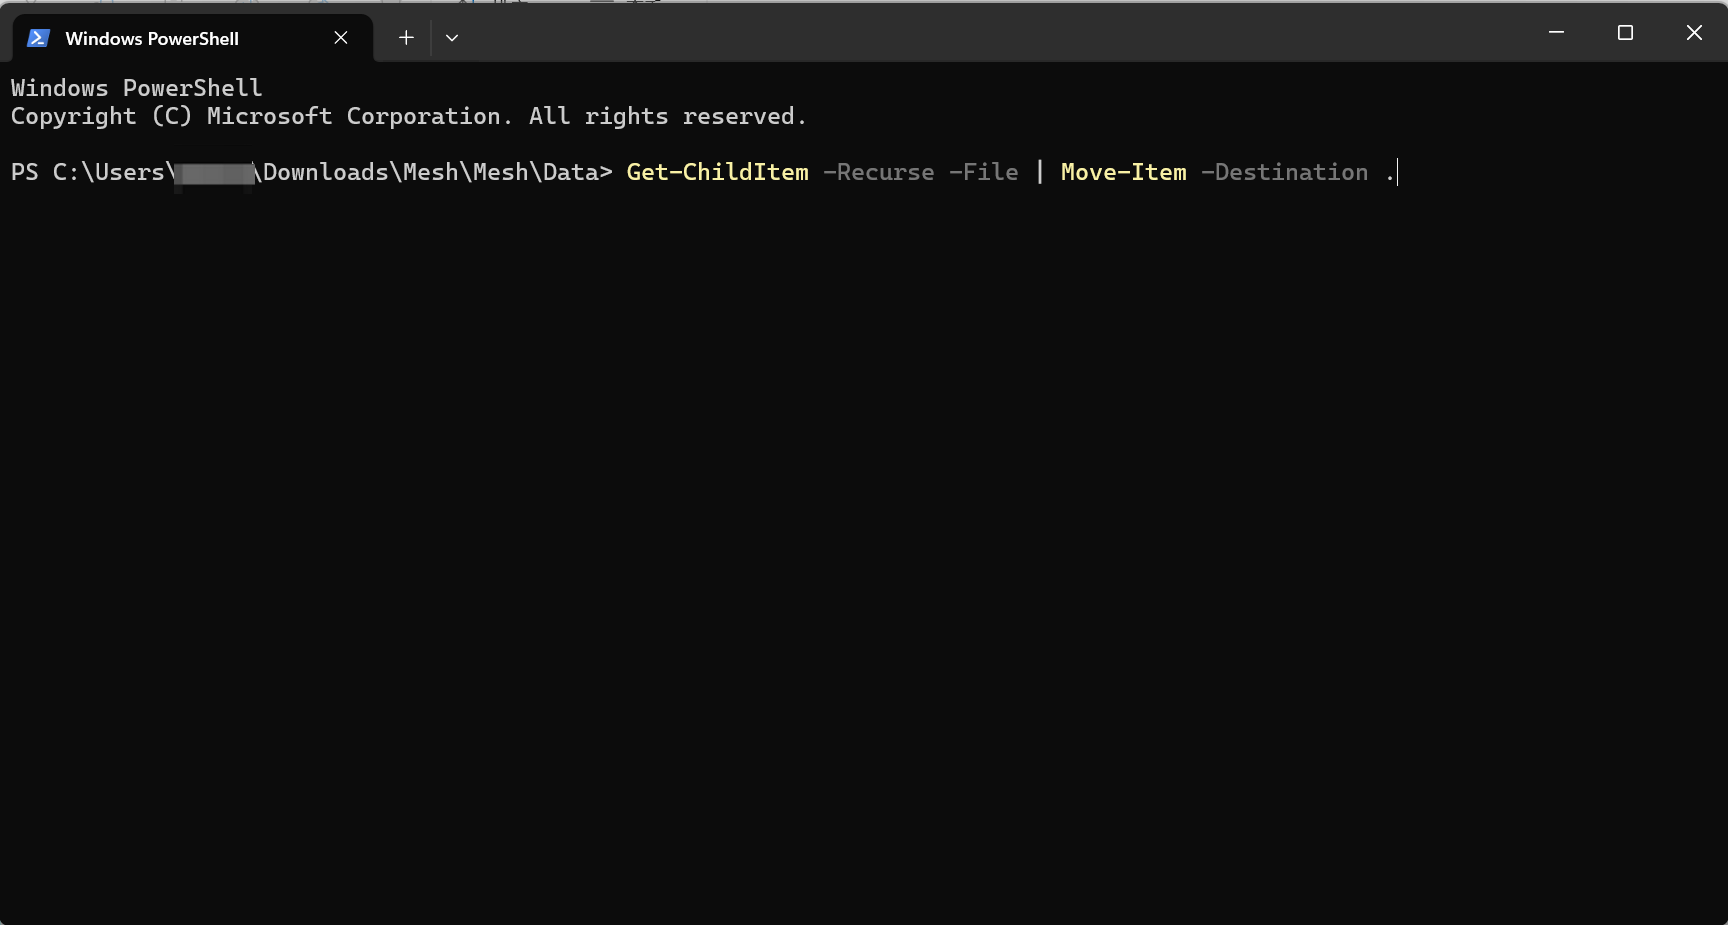
Copy and paste this command:

Get-ChildItem -Recurse -File | Move-Item -Destination .

Note: the command pulls every file from the subfolders into the current directory, so confirm you are in the right folder before running it. For example, if folder A contains B and C, open PowerShell from the address bar of A; after the run, all files from B and C are moved into A.
Subfolders before the run

Folder structure before the run

Pasting the command

Paste the command and run it

Press Enter after pasting. It takes a few seconds. A new prompt means the command has finished.

Everything is now pulled out. Open a few subfolders to confirm they are empty.
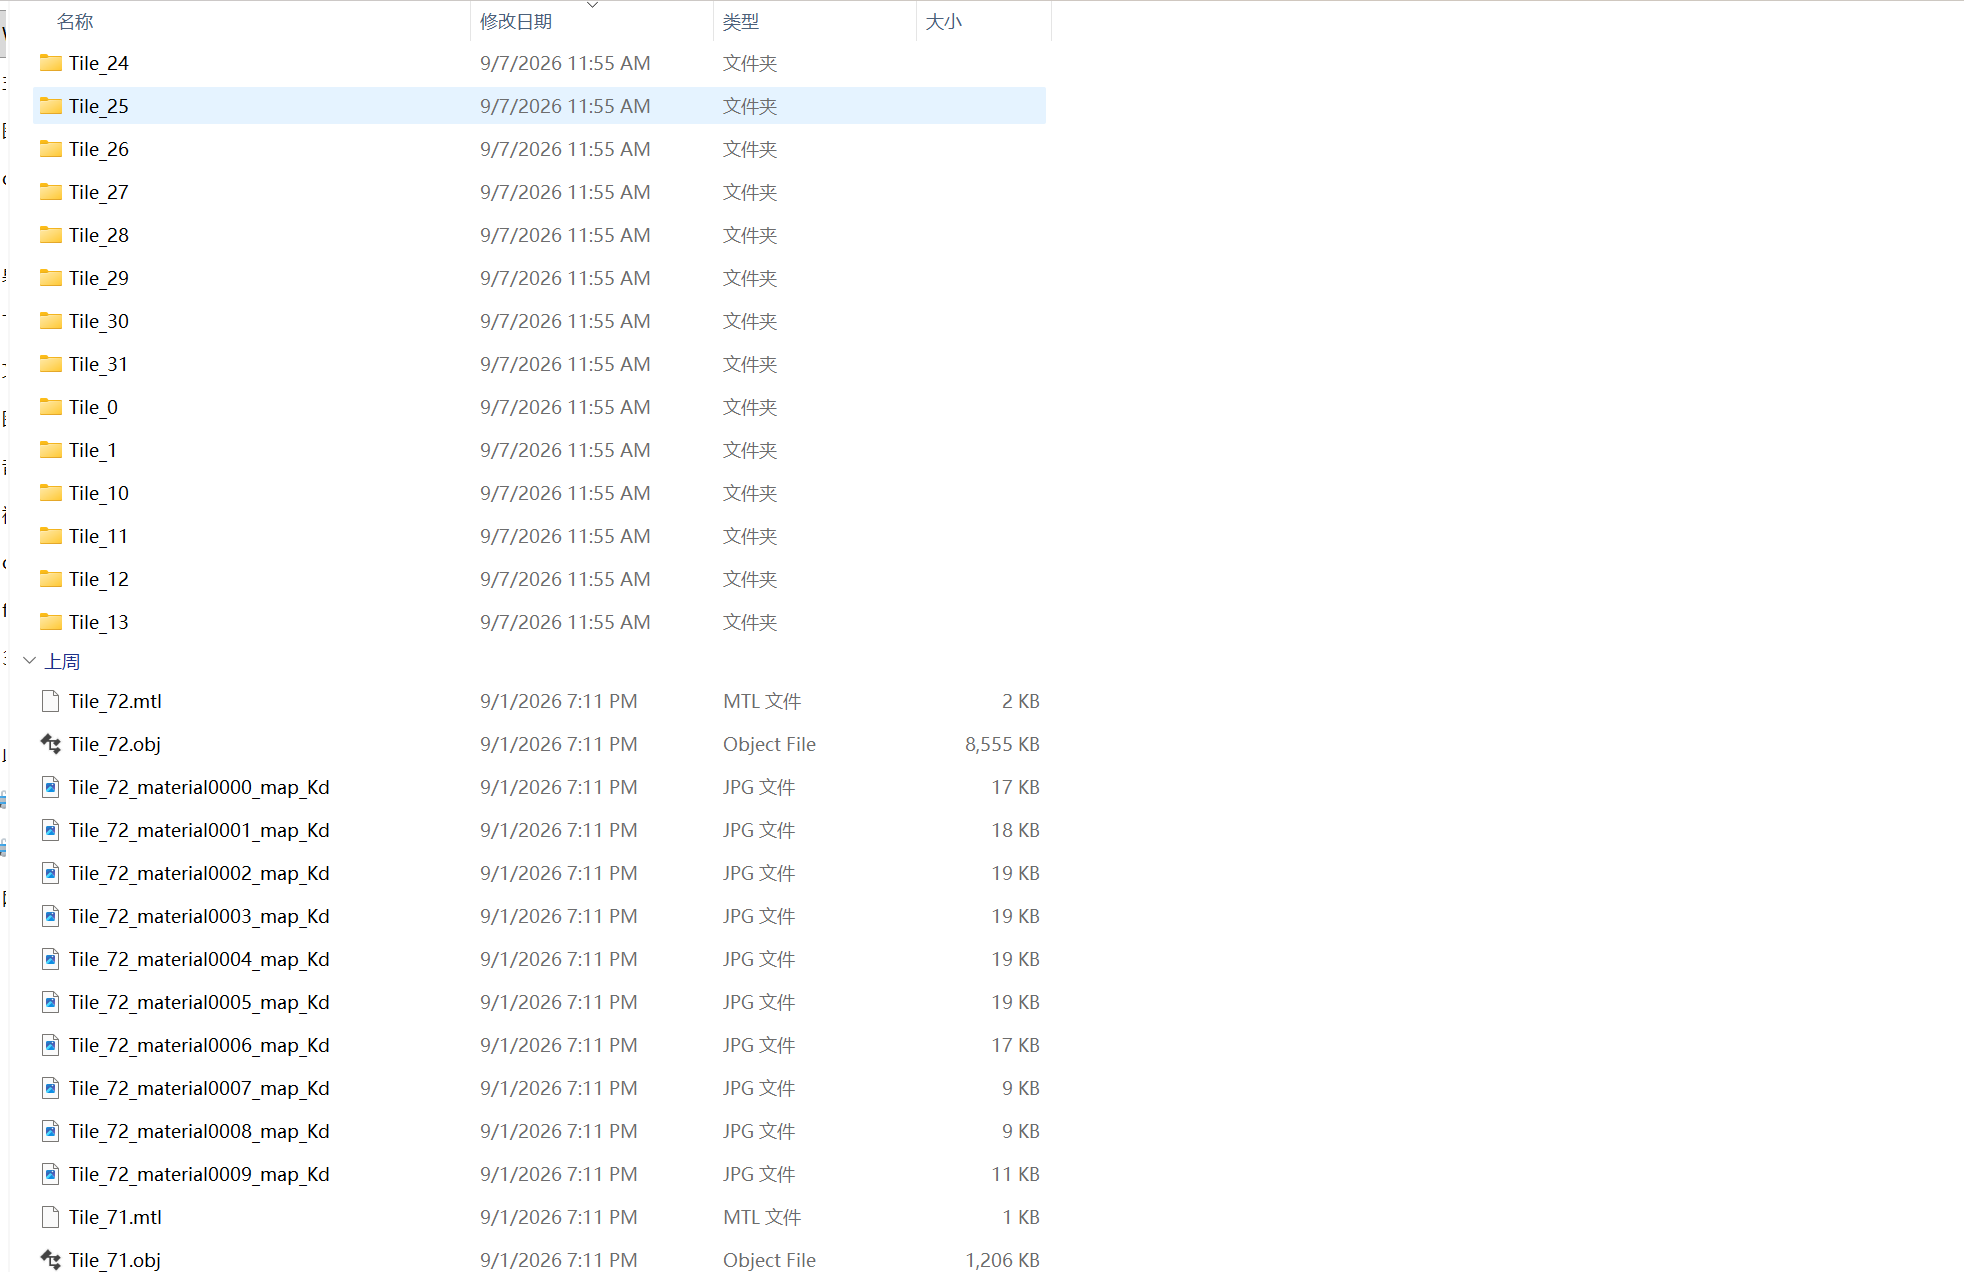
File list after extraction

All .obj files and textures now sit at the same level

Step 2: Merge into One File in Blender

Press Ctrl + A to select all files and drag them into Blender.
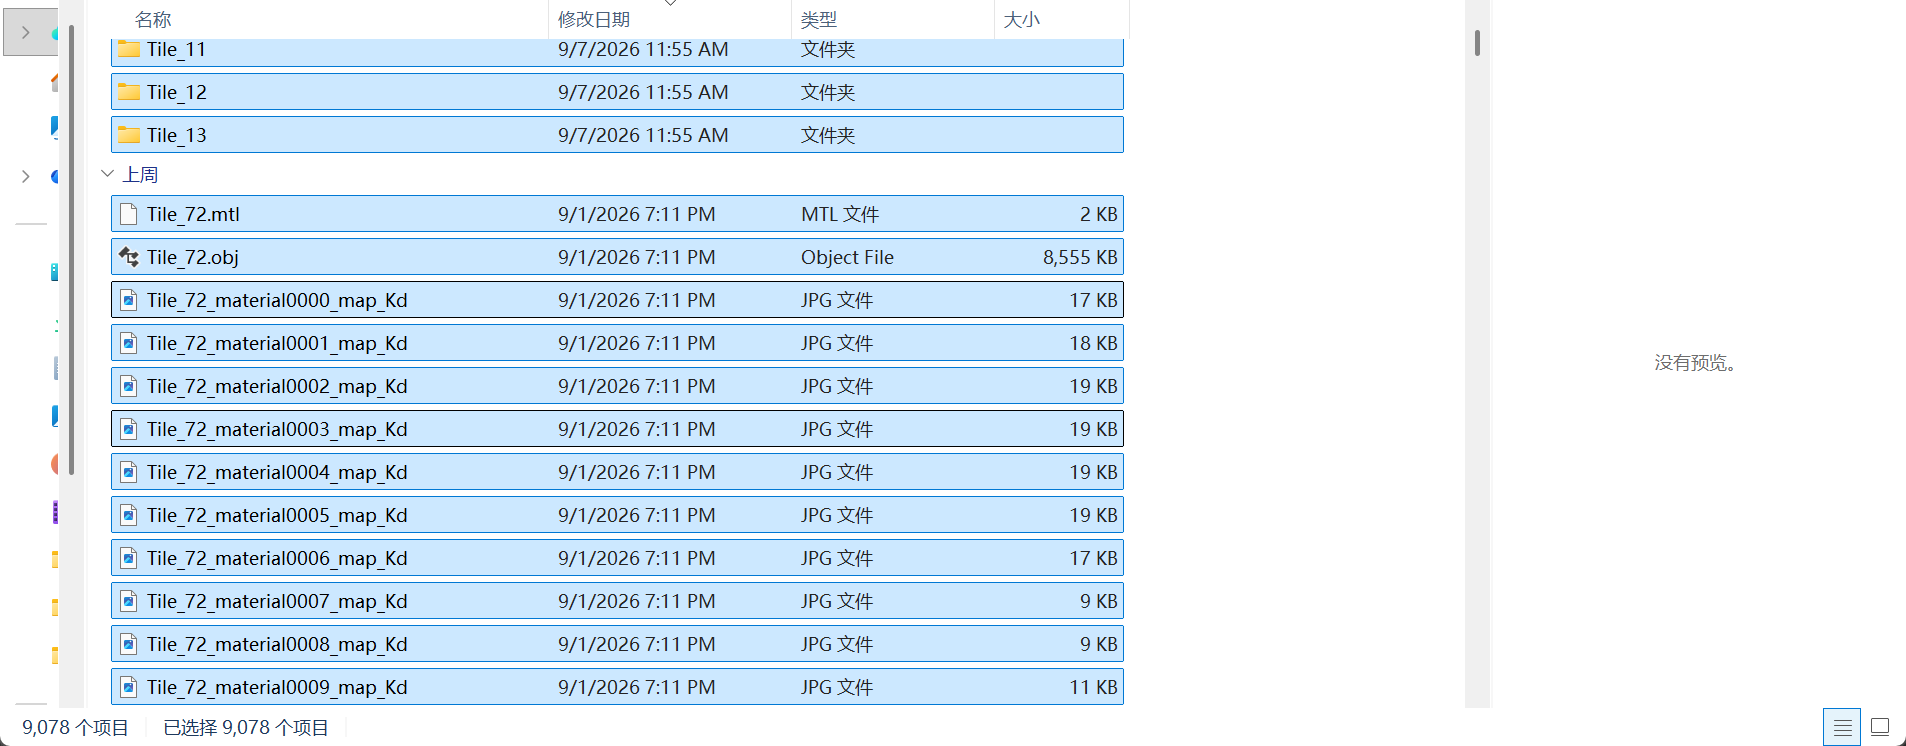
Selecting all files

Select all files

Dragging into Blender

Drag into Blender

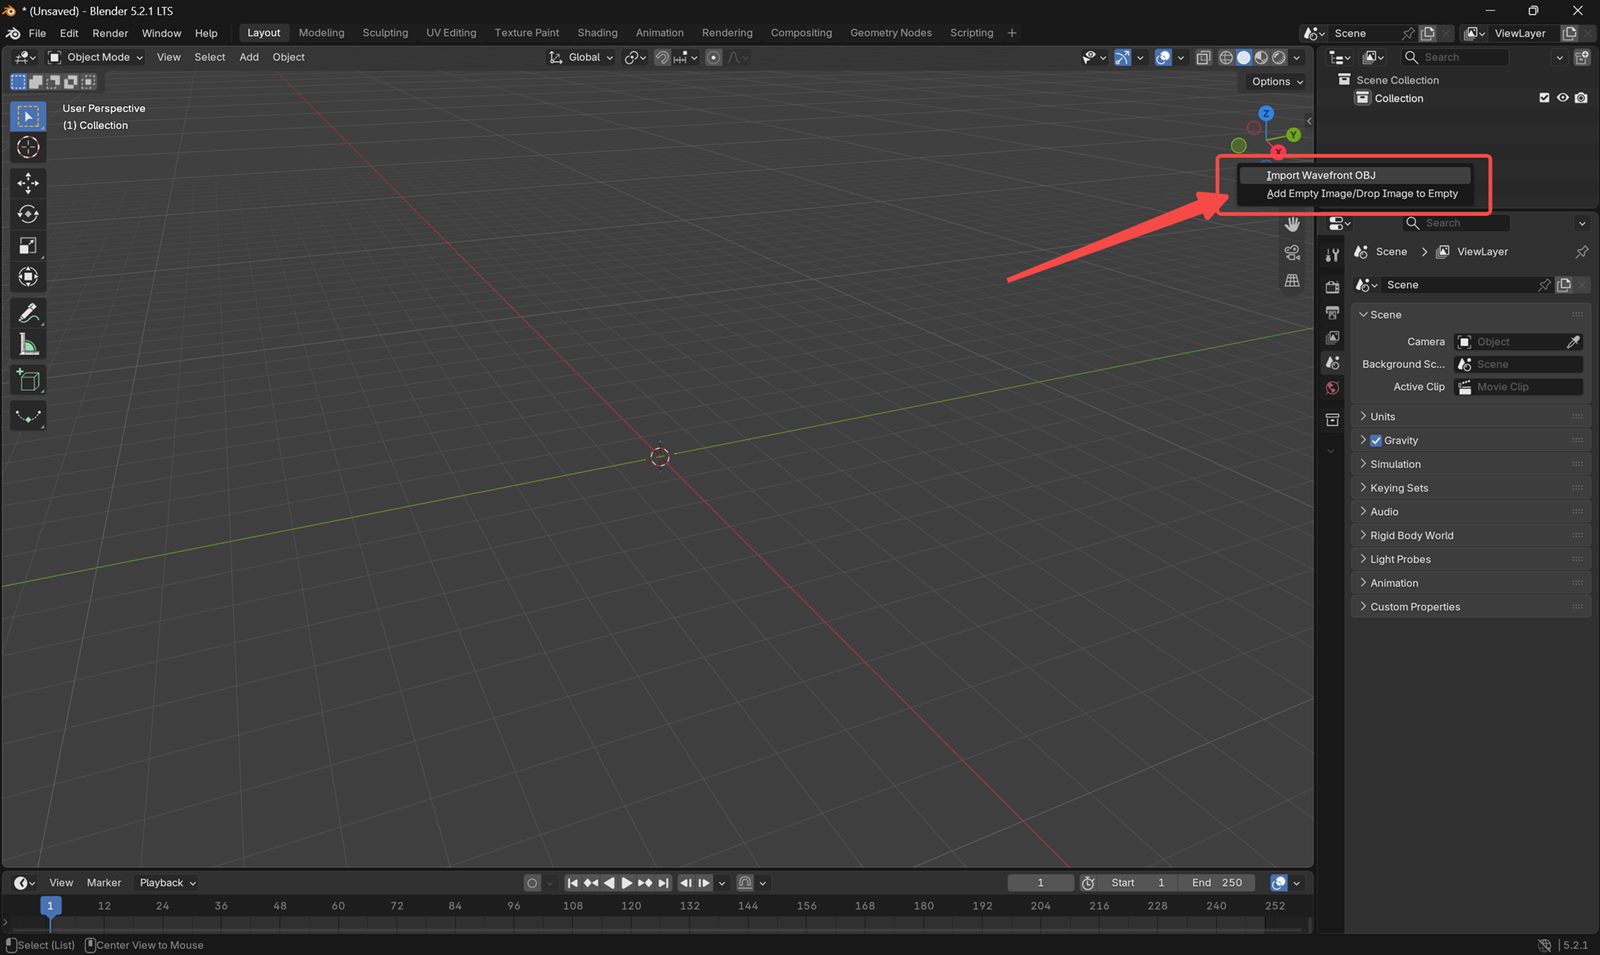
Click Import Wavefront OBJ. To get the orientation right, set Up Axis to Z and Forward Axis to X.
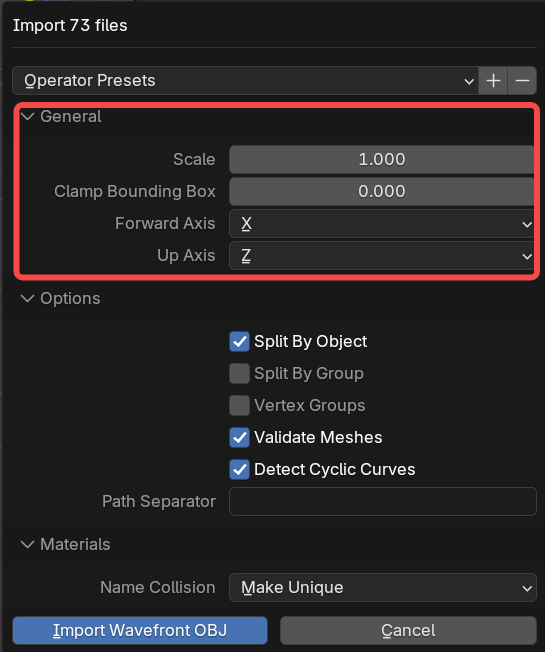
Import orientation settings

Set Up Axis to Z and Forward Axis to X

All tiles are now imported.
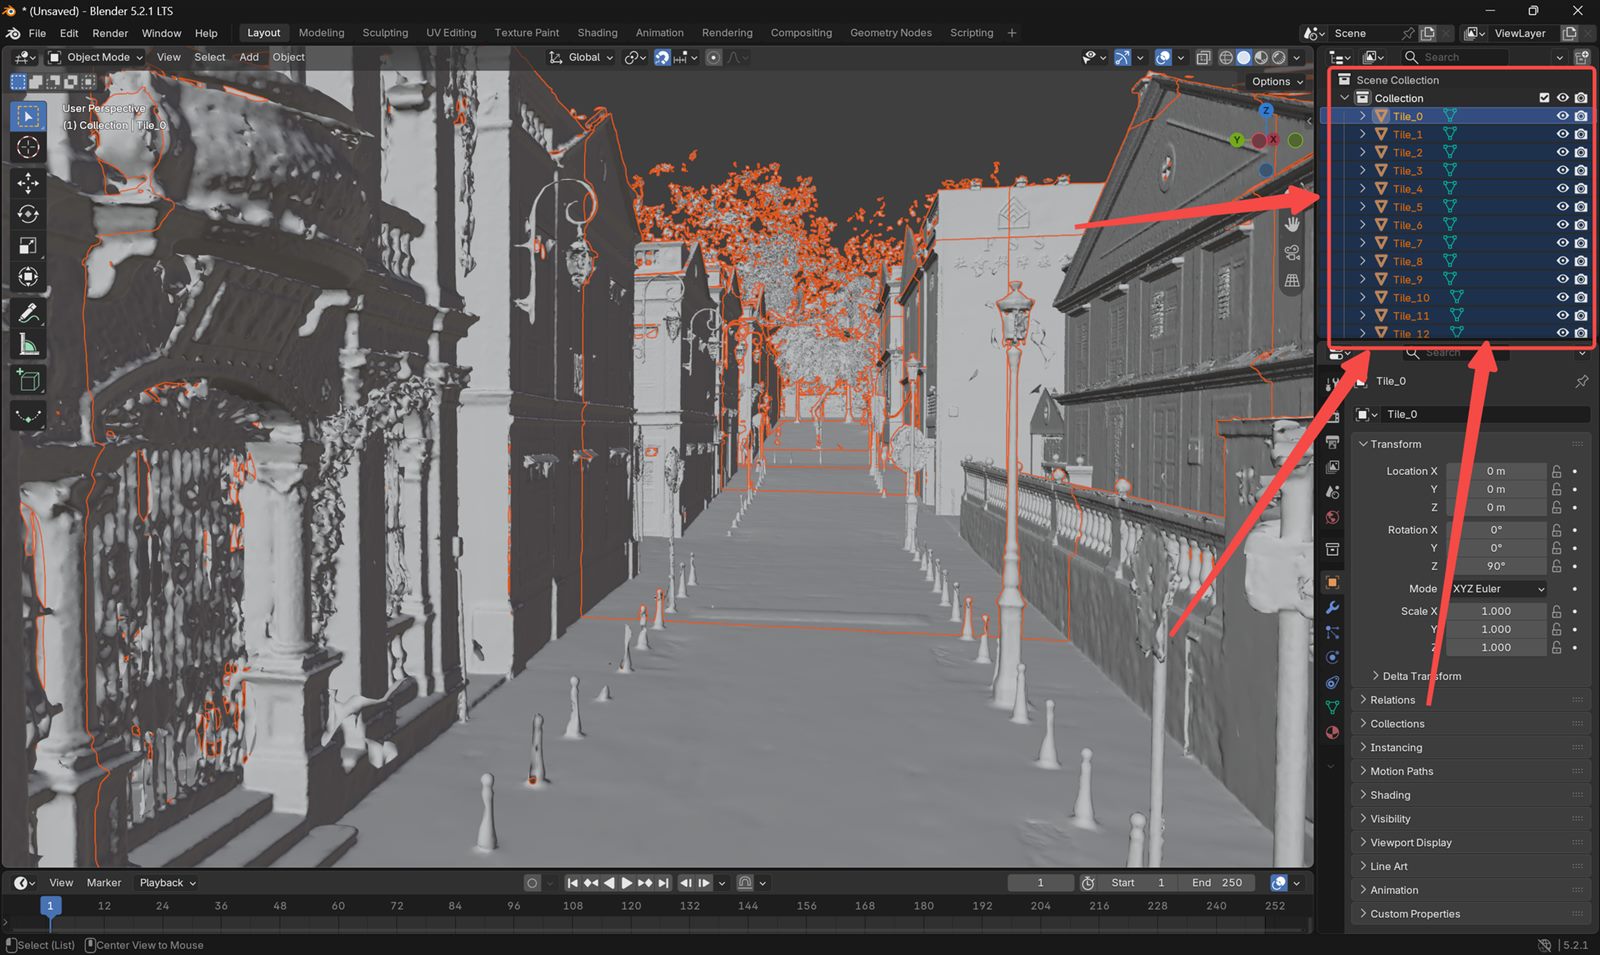
Imported tiles

All tiles imported

Press A to select every tile, then Ctrl + J to merge them into a single mesh. On a large scene this can take about a minute, so let it finish.
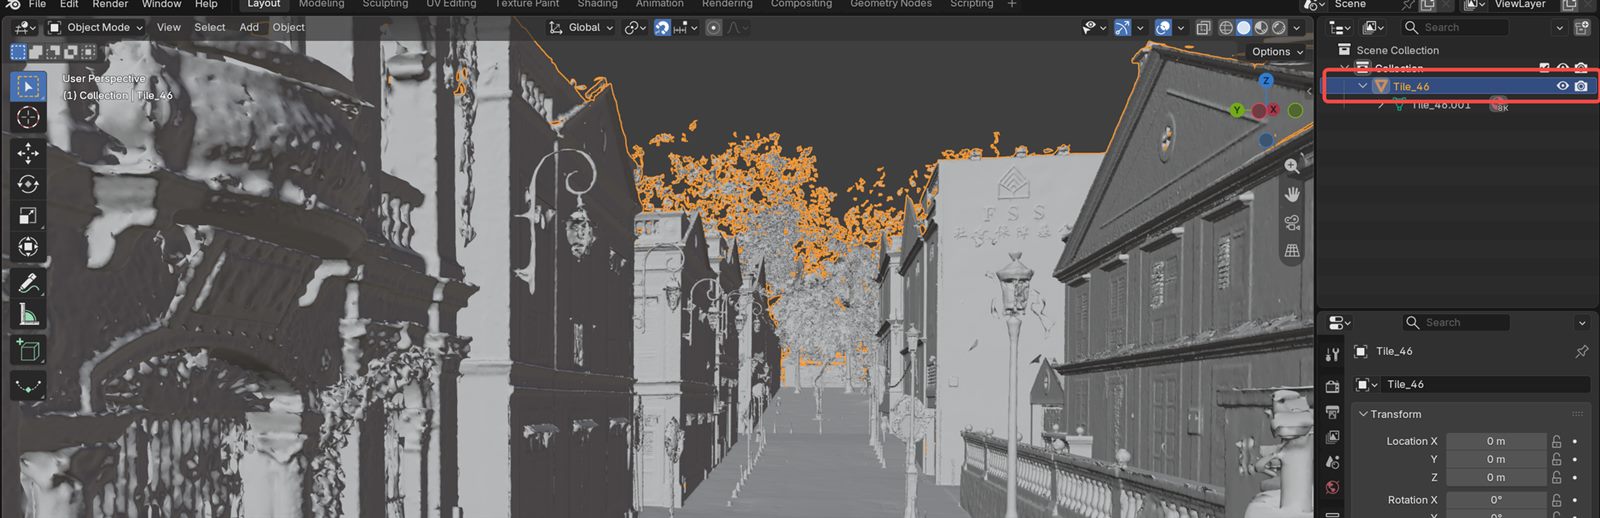
Merged mesh

A single merged mesh

Note: if the whole scene does not need relighting, delete the parts you do not need to gain performance in Unreal Engine.

Step 3: Cut the Draw Calls

Once this mesh goes into Unreal Engine for relighting, none of its materials are needed. The 3DGS handles what you see, the proxy mesh only feeds the calculation, so the materials serve no purpose and cost resources.

Every texture in a LixelStudio mesh is one draw call in Unreal Engine. At scale that adds up to a large number of draw calls, and using the mesh as a proxy directly will stutter.

Select the mesh in the Collection and check the draw call count from Blender's Python console.
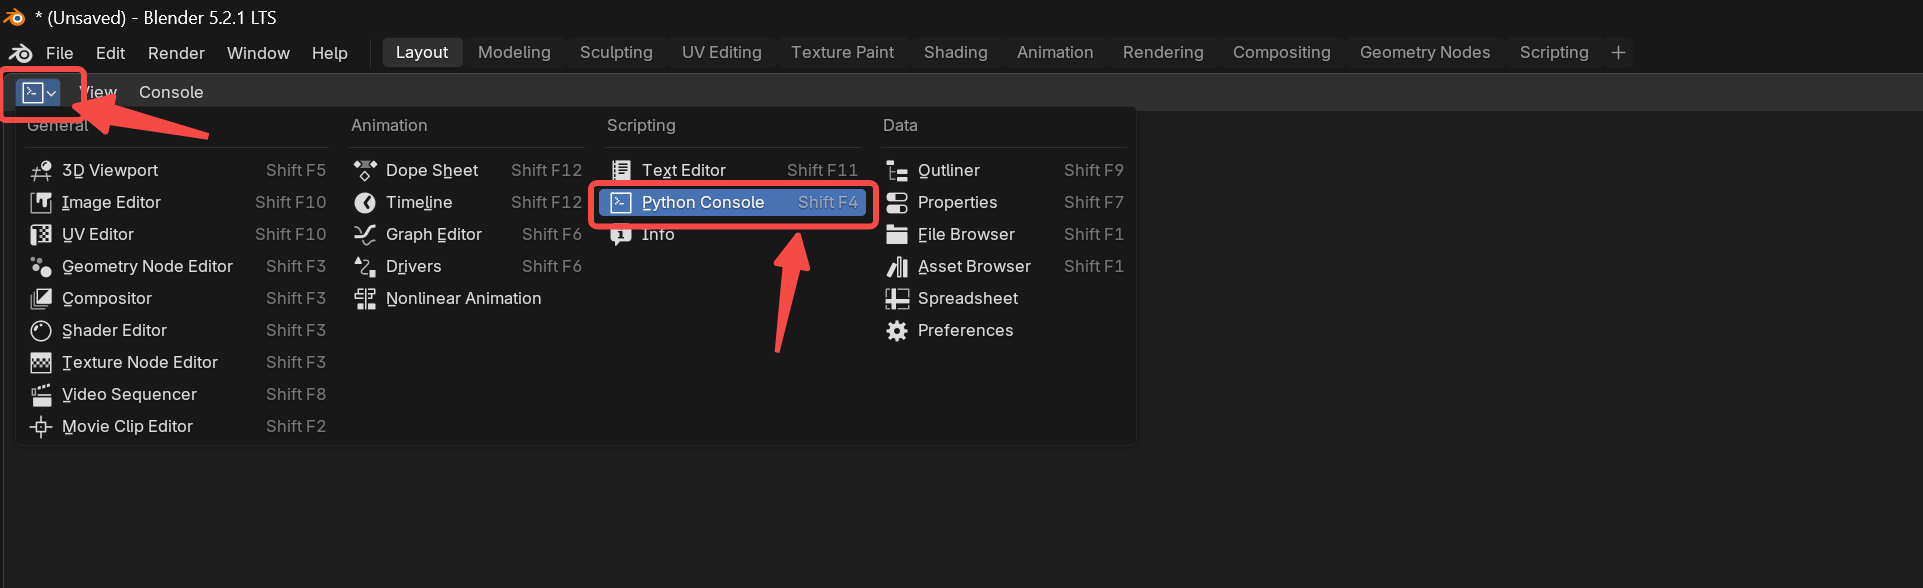
Blender Python console

Switch to the Python console

Paste the command below and press Enter:

obj = bpy.context.object
print("Material slots:", len(obj.data.materials))
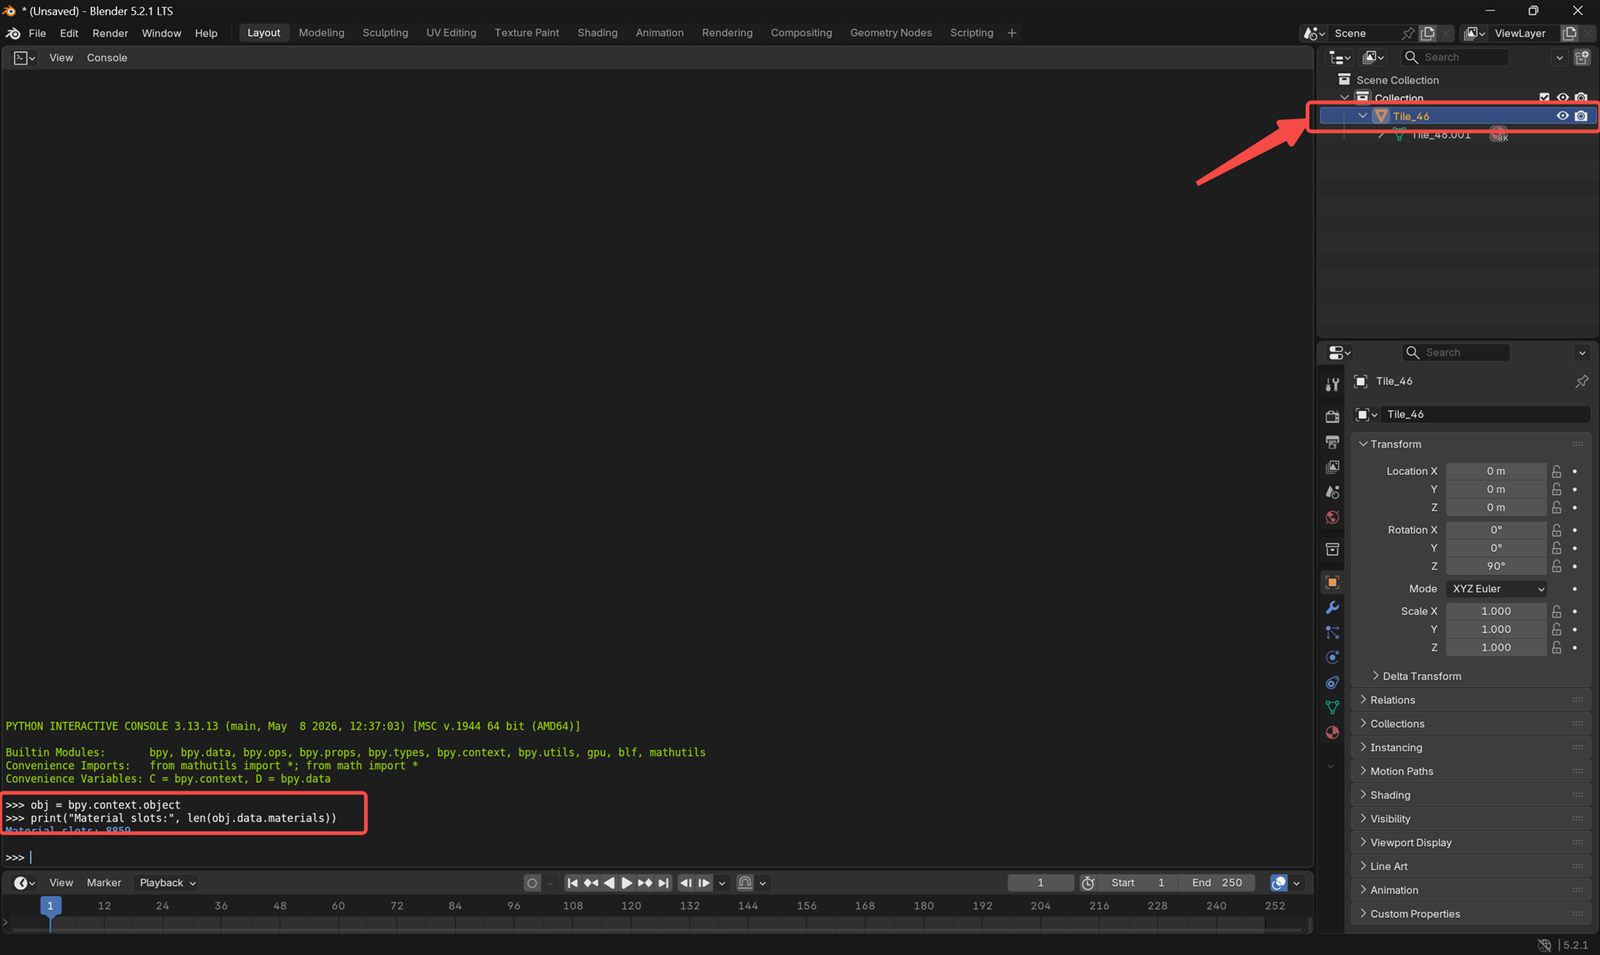
Material slot count output

The printed number is the draw call count

The mesh in the screenshot has 8859 draw calls.

To bring that down, remove all existing materials and replace them with a single one:

import bpy

# Get the currently selected object in Blender
obj = bpy.context.object

# Make sure a valid Mesh object is selected
if obj is None or obj.type != "MESH":
    raise Exception("Please select a Mesh object first.")

# Create a new white clay material
mat = bpy.data.materials.new("M_White_Clay")
mat.use_nodes = True

# Configure the Principled BSDF shader settings
bsdf = mat.node_tree.nodes.get("Principled BSDF")
if bsdf:
    bsdf.inputs["Base Color"].default_value = (1, 1, 1, 1)  # White color
    bsdf.inputs["Roughness"].default_value = 1.0            # Fully rough / matte surface
    bsdf.inputs["Metallic"].default_value = 0.0             # Non-metallic material
    bsdf.inputs["Alpha"].default_value = 1.0                # Fully opaque

# Remove all existing material slots from the mesh
obj.data.materials.clear()

# Add the single new white material
obj.data.materials.append(mat)

# Assign every face to material slot 0
for poly in obj.data.polygons:
    poly.material_index = 0

# Print the result for verification
print("Done")
print("Material slots:", len(obj.data.materials))
print("Used material indices:", len(set(p.material_index for p in obj.data.polygons)))
print("Estimated draw calls:", len(set(p.material_index for p in obj.data.polygons)))

After running it, confirm the draw call count is down to one.

Draw calls reduced to one

Draw calls reduced to one

Step 4: Import into Unreal Engine

Export the mesh as .obj or .fbx and import it into Unreal Engine.
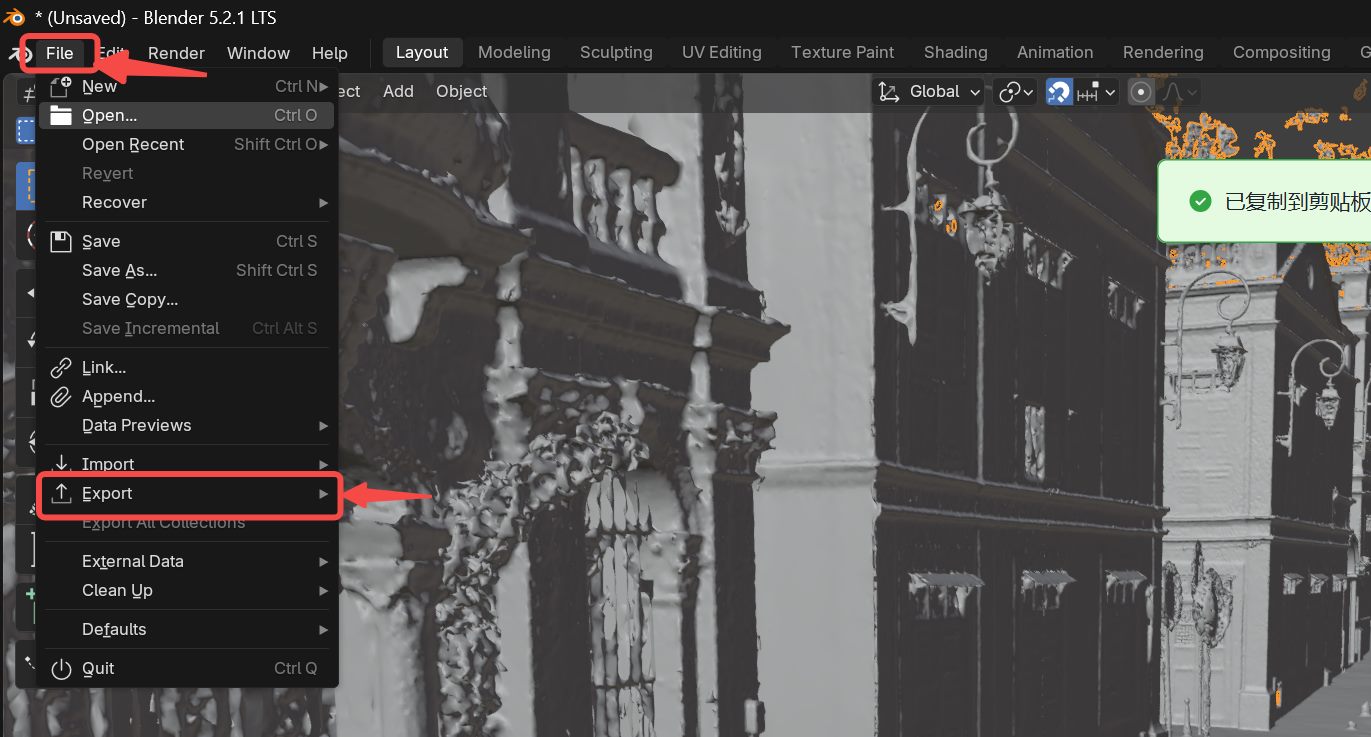
Imported into Unreal Engine

The mesh after import into Unreal Engine

Then follow Proxy Mesh to place the ProxyMesh Actor and set the normal mode to ProxyMesh.

If the result looks wrong, see Proxy Mesh troubleshooting.