
Basic Operation
This chapter covers the Stick Light controls, how to switch power and adjust parameters, recommended capture settings, battery life and safety precautions, and error recovery.
Controls
All Stick Light operations are done with the adjustment knob and the power button. The current status is shown on the display to the left of the knob, and the Type-C port is used for charging.
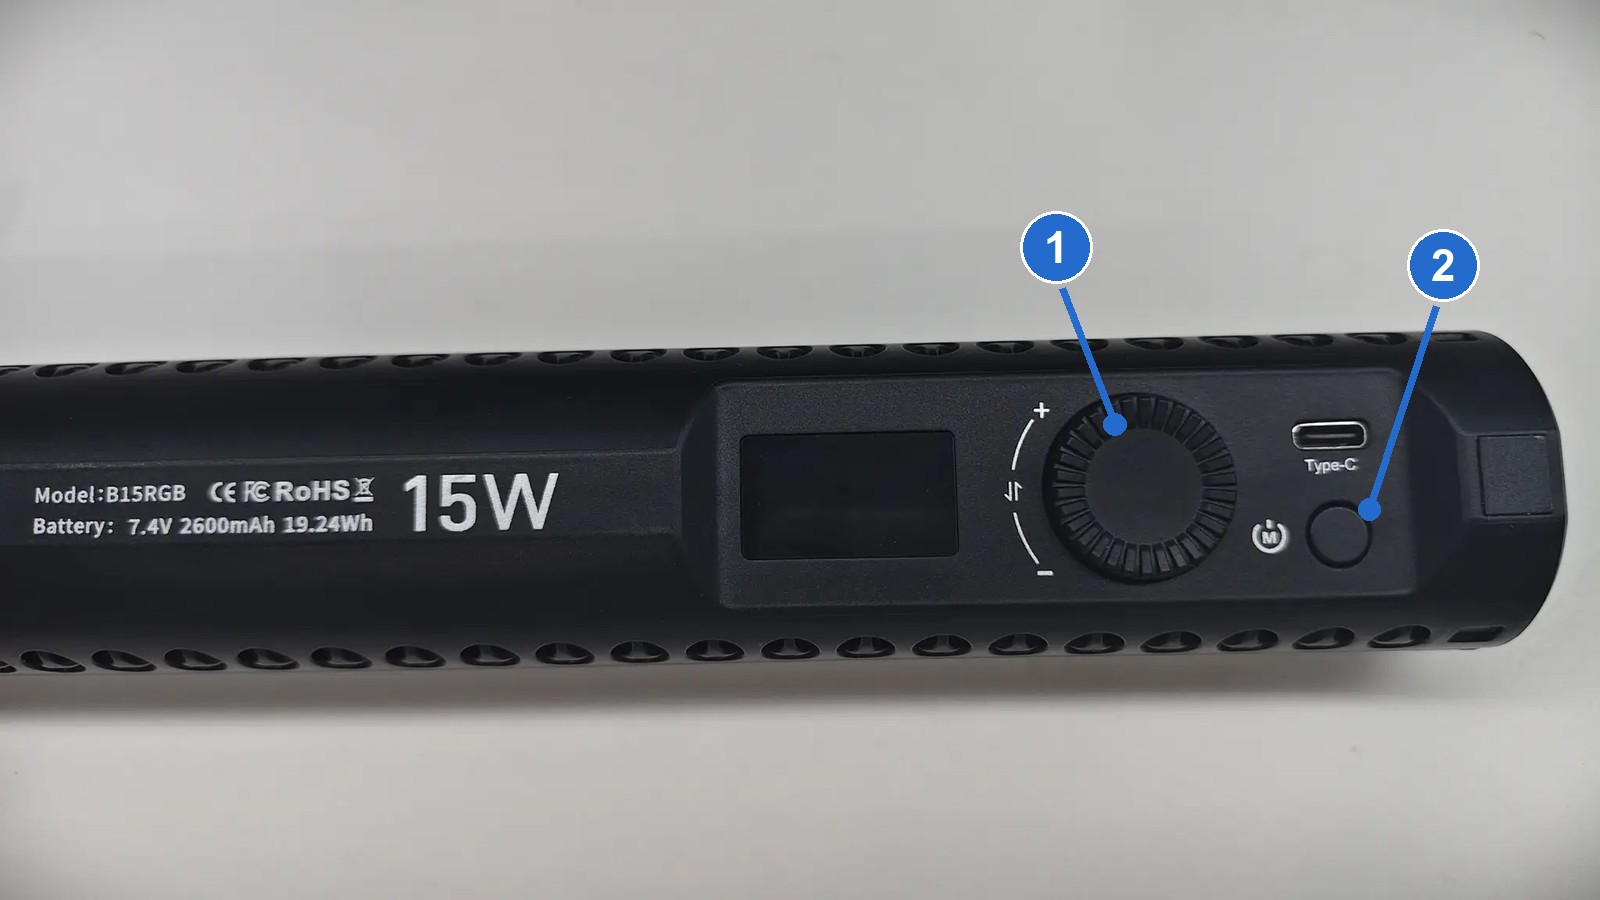
The numbered circles correspond to:
- Adjustment knob
- Power button
| Control | Action | Function |
|---|---|---|
| Adjustment knob | Short press | Switch between color temperature and brightness |
| Adjustment knob | Turn | Adjust the current value; turn right to increase, left to decrease |
| Power button | Long press | Power on or off |
| Power button | Short press | Switch the light color |
| Type-C port | — | Charging |
Note
A short press of the power button switches the light color. Avoid pressing it by accident during capture, otherwise a change in light color will affect the image colors.
Light specifications
| Item | Value |
|---|---|
| Model | B15RGB |
| Power | 15 W |
| Battery | 7.4 V 2600 mAh 19.24 Wh |
Checks before operation
- Confirm the Stick Light is installed as described in the Installation Guide.
- PortalCam: check that the 1/4-inch threads at the adapter bracket, the rotating telescopic handle, and the device connection are all tight.
- K2 / L2 Pro: check that the U-shaped bracket is pushed to the limit of the body slot and that each hinge button has sprung back and locked.
- Confirm the Stick Light, bracket, and magnetic phone holder do not block the lens, LiDAR, ports, or buttons.
- Confirm the light-emitting surface does not face the eyes of anyone nearby.
- Confirm the battery is sufficient for this capture session.
Turning on and adjusting
Step 1: Power on
How to: Long-press the power button until the display lights up and the light body emits light.
Note: Do not look directly at the light-emitting surface before turning it on, and confirm the light body does not shine into the eyes of anyone nearby.
Step 2: Switch the adjustment item
How to: Short-press the adjustment knob to switch between color temperature and brightness; the item with the cursor on the display is the one you can currently adjust.
Note: Confirm the cursor position before adjusting to avoid changing the wrong item's value.
Step 3: Adjust the value
How to: Turn the adjustment knob—right to increase, left to decrease—and confirm the value on the display.
Note: Start from a lower brightness and increase gradually to avoid overexposing nearby highly reflective objects.
Step 4: Confirm the light color
How to: A short press of the power button switches the light color; keep CCT white-light mode for capture.
Note: Do not use colored light during capture, as it will affect the image colors and the reconstruction colors.
Step 5: Power off
How to: After capture, long-press the power button to turn off the Stick Light.
Note: Wait for the light body to cool before removing and storing it.
Recommended capture settings
The light is set to the recommended parameters at the factory. Before each capture, confirm the values on the display are correct before starting.
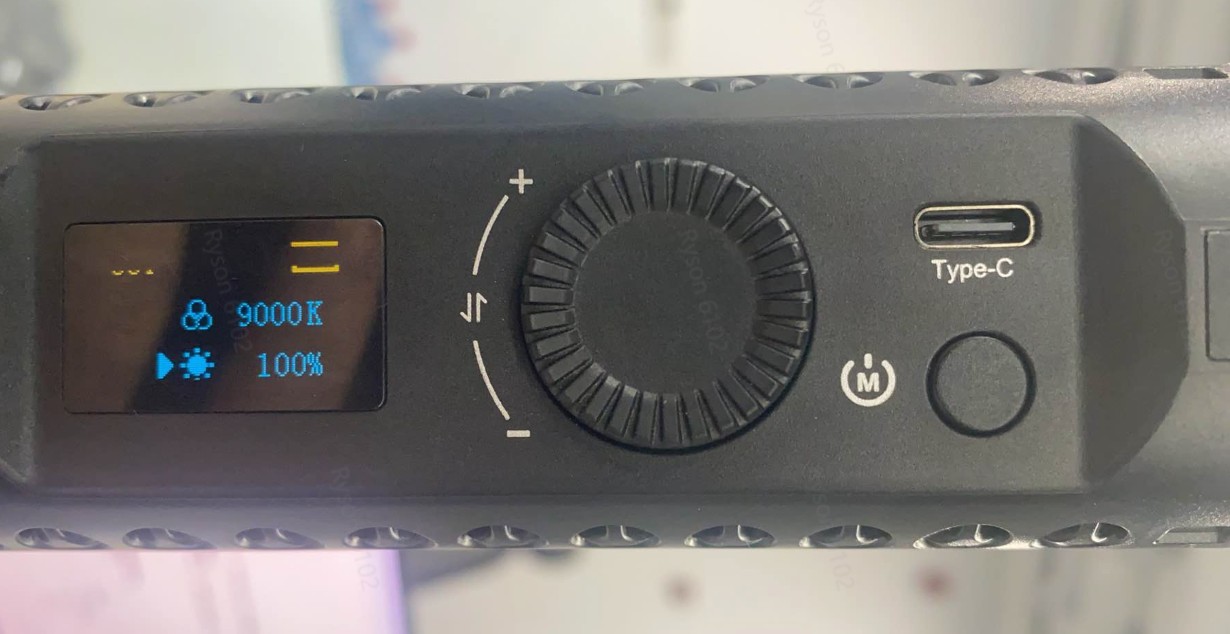
| Item | Recommended setting |
|---|---|
| Working mode | CCT white-light mode |
| Color temperature | 9000 K |
| Brightness | 100% |
Do not change settings during capture
If you need to change a setting, first end the current capture, then start a new capture after finishing the settings.
Battery life
- At 100% brightness, it runs for about 70 min.
- When the expected run time is near its limit, carry a second light for replacement.
- Confirm the battery is sufficient before working. If it runs out and shuts down midway, the brightness may be inconsistent within the same capture segment.
Lighting and scanning boundaries
- Fill lighting improves the imaging quality of 3DGS in low-light conditions, but it cannot replace a proper scanning path.
- Even with fill lighting, you still need sufficient multi-view coverage. Areas that are not lit and are under-covered may show dark blobs in the reconstruction; strengthening the scan coverage of these areas helps.
Recommended usage
- Before starting a capture, check the slot, hinge, threads, and magnetic phone holder to confirm all connections are secure.
- Turn on the Stick Light before starting a capture in a dark area, and confirm the brightness and lighting direction via the live view.
- Fine-tune the output based on on-site reflections to avoid overexposing nearby highly reflective objects.
- When you need to adjust the K2 / L2 Pro arm, first hold the device steady and press the corresponding hinge button; after adjusting, confirm the button has sprung back and locked.
- Before moving the device, check the light body and bracket again to prevent collisions with door frames, walls, or other objects.
- After capture, turn off the Stick Light and wait for the light body to cool before removing and storing it.
Safety notes
Electrical and light safety
- Do not look directly at the light source at close range, and avoid pointing it at anyone's face.
- Lithium battery: do not disassemble, crush, or throw it into fire, and do not store it in a high-temperature environment. Follow lithium battery regulations when shipping.
Error recovery
If the Stick Light or bracket does not work properly, check in the following order:
- Turn off the Stick Light, wait a few seconds, and turn it on again; confirm the display, battery level, and power status are normal.
- Check whether the light body's control area is blocked by the bracket or phone.
- If the displayed color temperature or brightness does not match the recommended value, short-press the knob to switch to that item and readjust.
- If the U-shaped bracket is loose, stop using it immediately, remove the bracket in the direction opposite to installation, clean the slot, and slot it back in as described in the Installation Guide.
- If the hinge cannot be adjusted, confirm the silver button is pressed down; do not force it.
- If the light body rotates, retighten the top 1/4-inch thread and add the supplied base screw rubber pads if necessary.
- If it still cannot be restored, stop using it and do not disassemble the light body, bracket, or device yourself.
For more installation and bracket issues, see the FAQ.