
Installation Guide
This chapter describes how to install, check, and remove the Stick Light bracket on the PortalCam, Lixel K2, and Lixel L2 Pro.
PortalCam
Before installation
Turn off the device and the Stick Light, and place the device on a stable surface. Check and clean the bracket, threads, rail, and slot. Do not lift the device until all connections are tightened.
Parts checklist
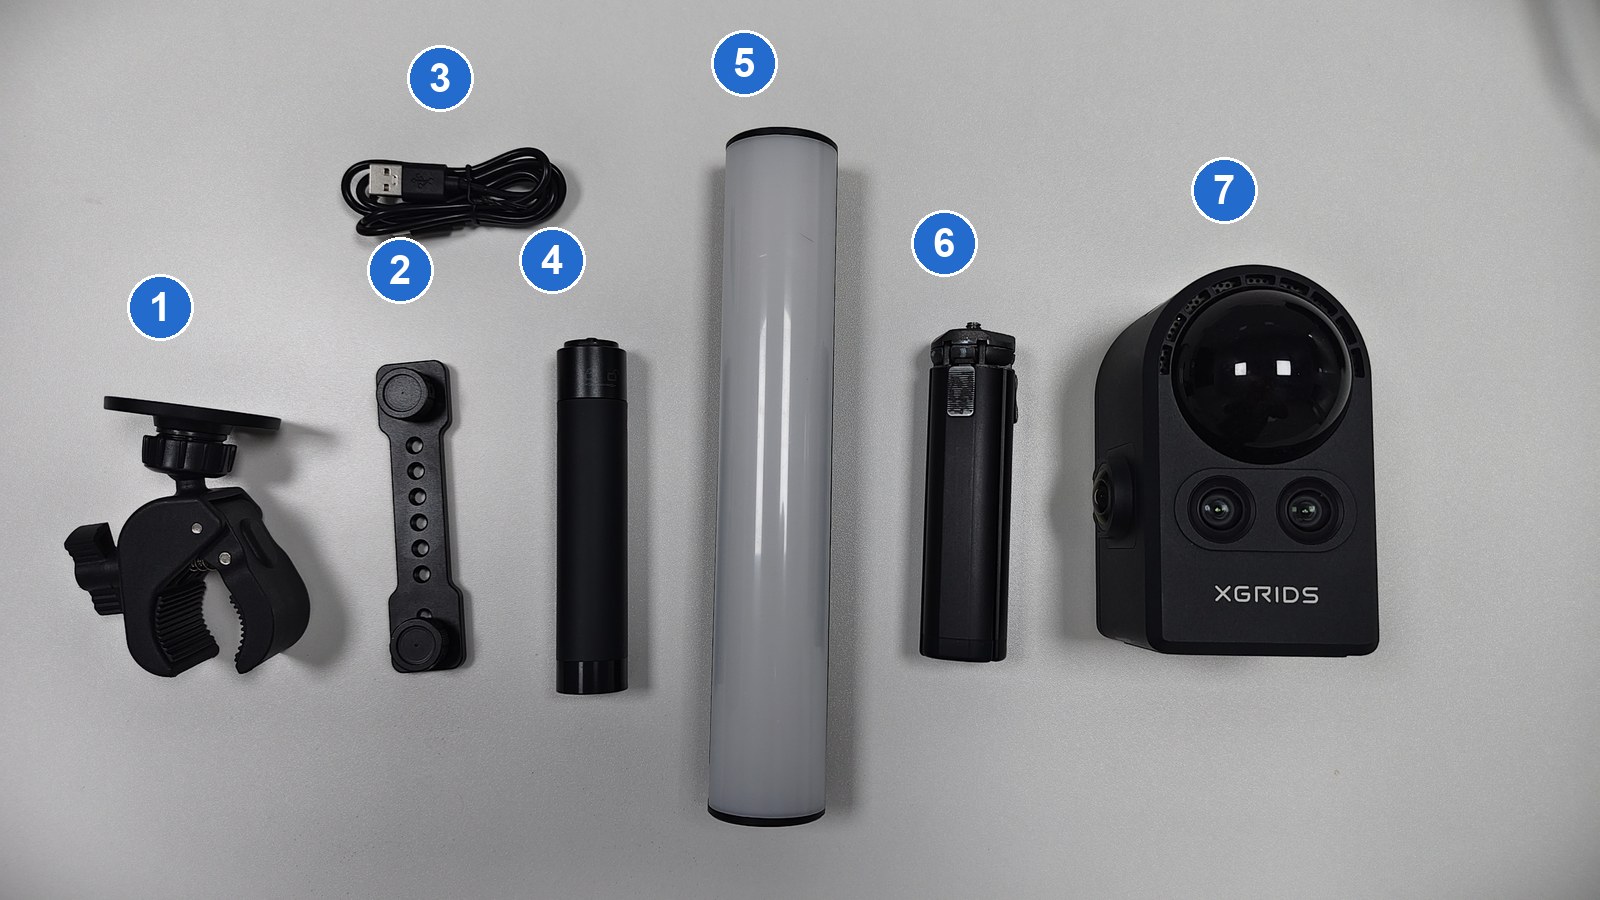
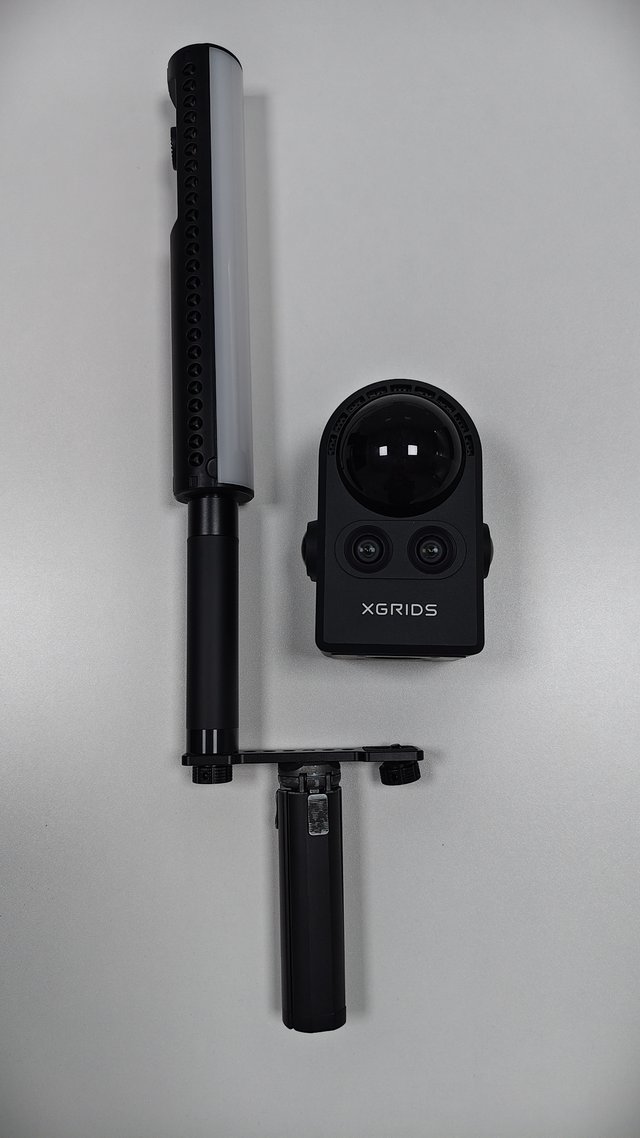
From left to right, the numbered circles correspond to:
- Magnetic super clamp
- Stick Light adapter bracket
- USB-C charging cable
- Rotating telescopic handle
- Stick Light body
- Original grip handle (also serves as a tripod support)
- PortalCam device (the device itself, not an accessory)
Installation steps
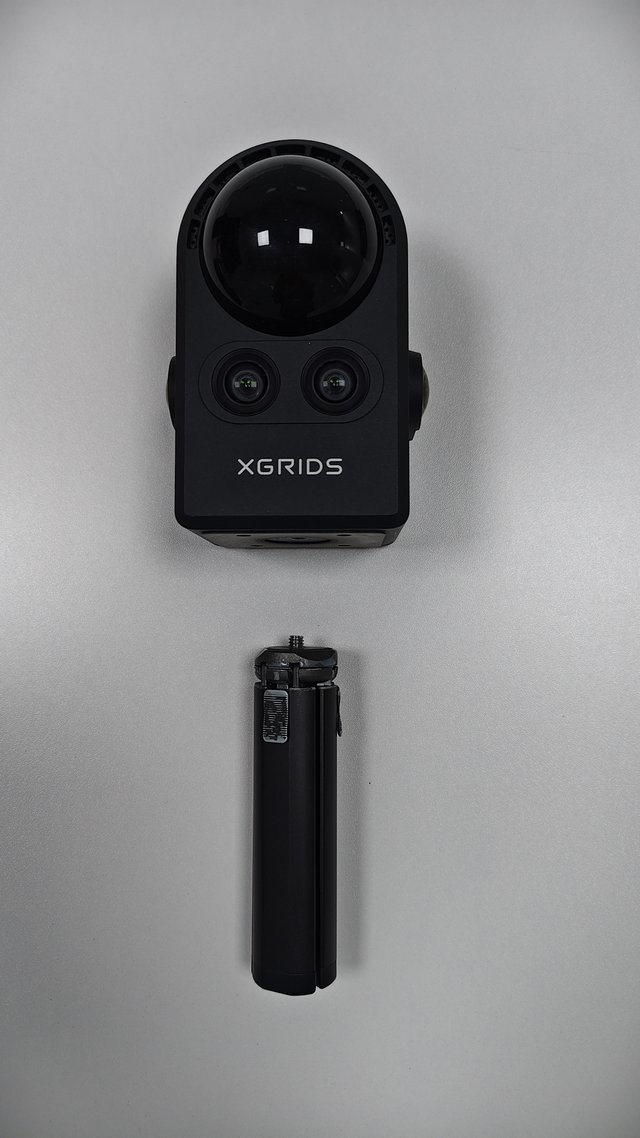
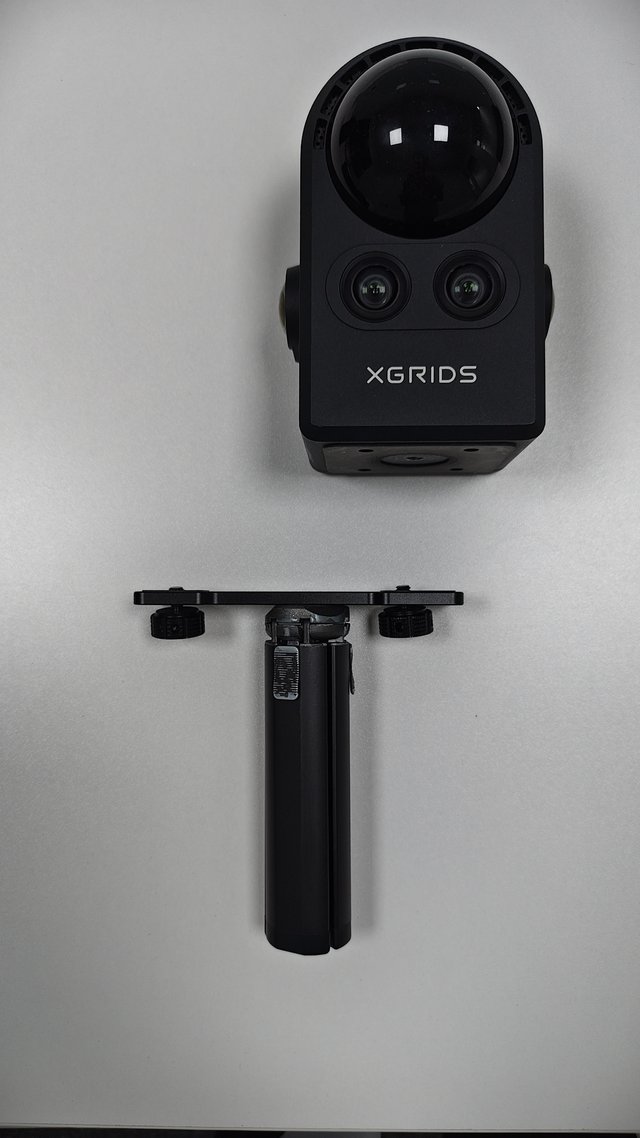
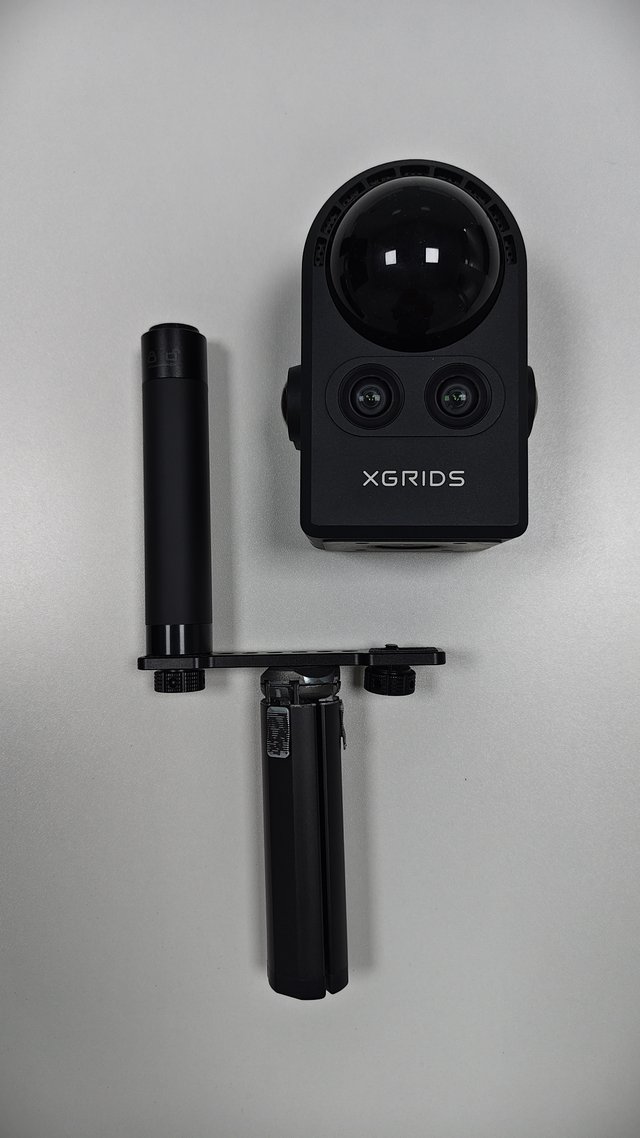
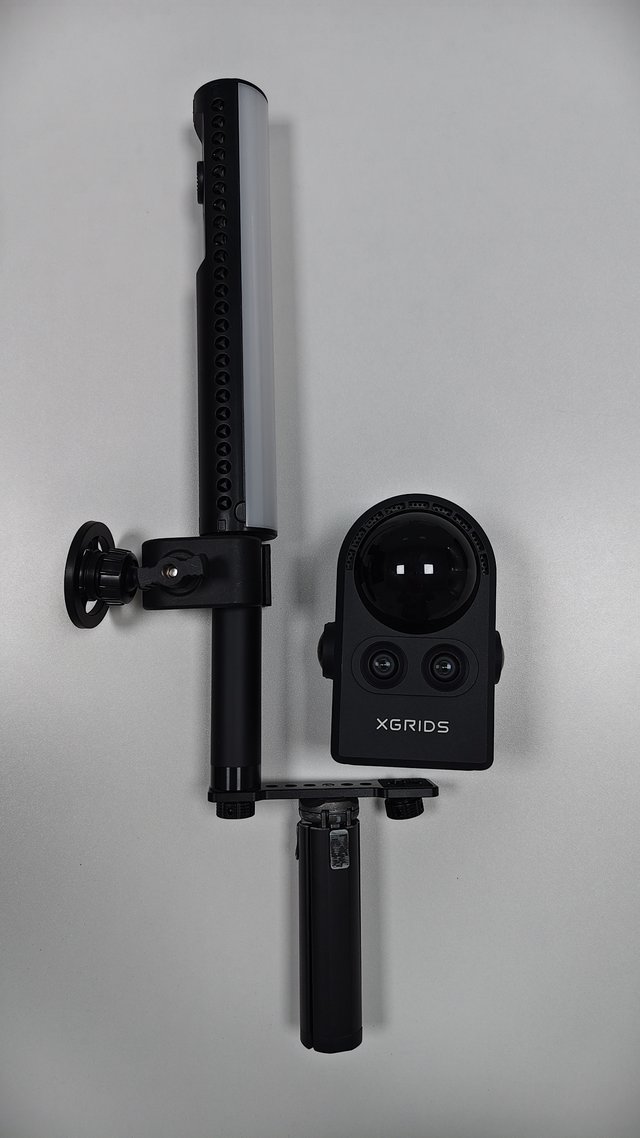
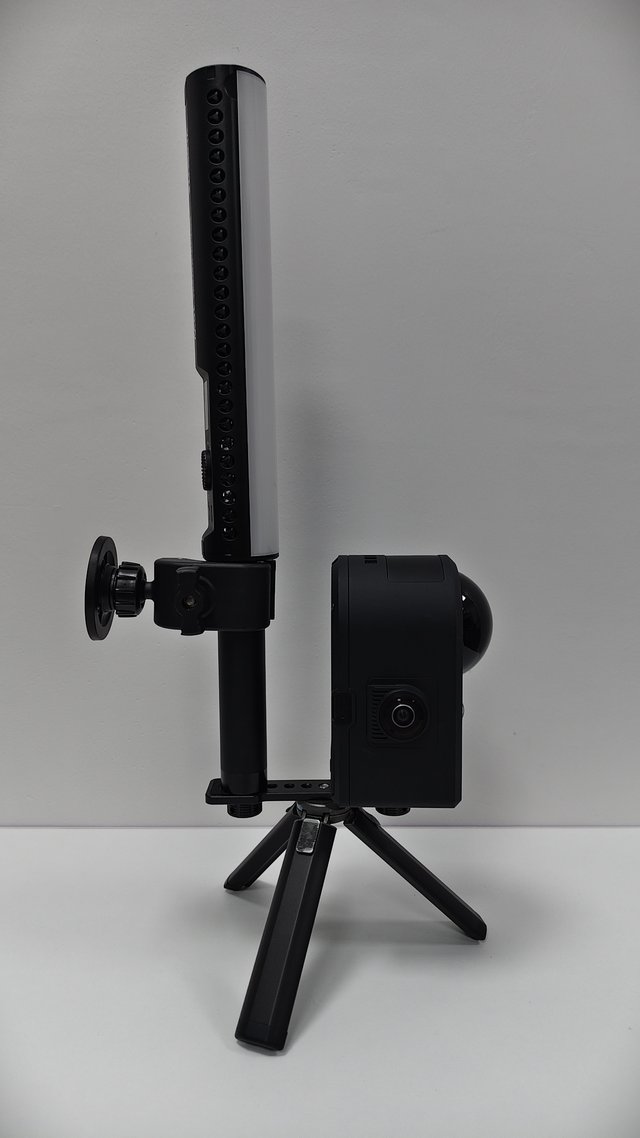
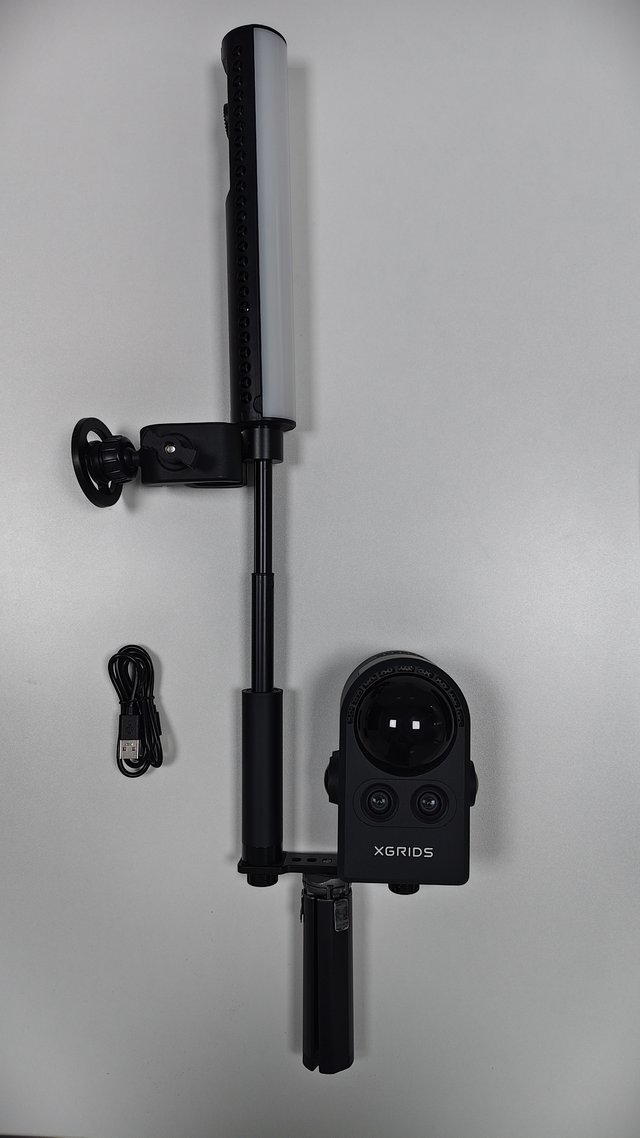
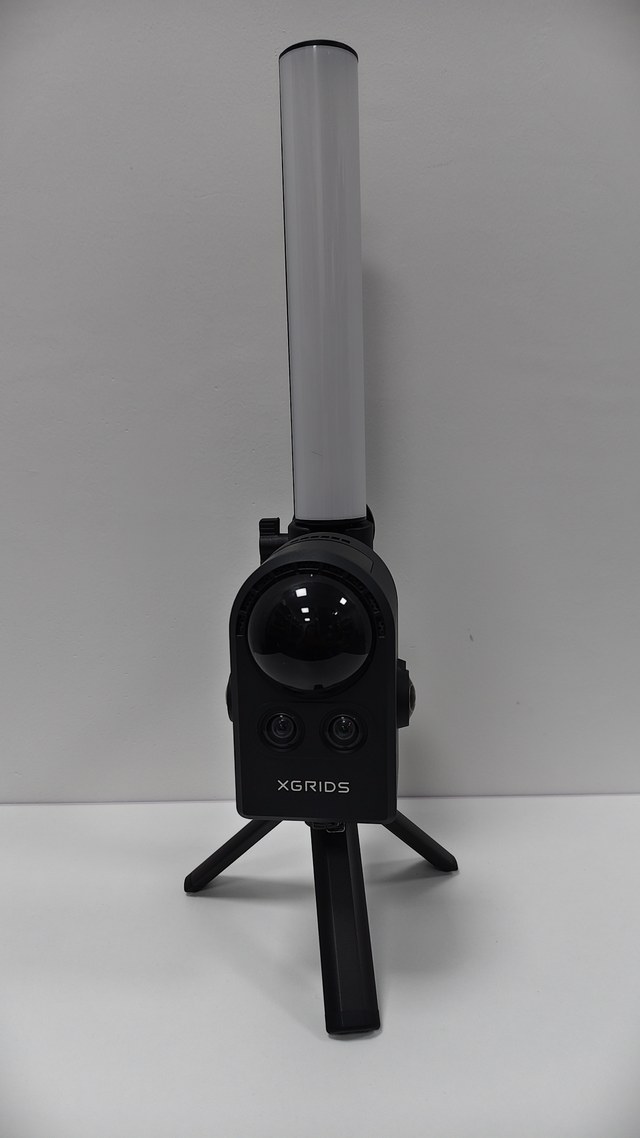
Step details
- Remove the original grip handle
- How to: Hold the device steady and unscrew the original grip handle from the 1/4-inch threaded hole on the bottom of the device.
- Note: Support the device; do not let it hang unsupported.
- Install the Stick Light adapter bracket
- How to: Attach the adapter bracket to the original grip handle in the orientation shown, and tighten the 1/4-inch mount until it is fully seated.
- Note: Do not change the mounting point on your own.
- Install the rotating telescopic handle
- How to: Attach the rotating telescopic handle to the 1/4-inch mount on the adapter bracket and tighten it.
- Note: Gently push the handle to confirm there is no relative movement at the joint.
- Install the Stick Light
- How to: Fix the 1/4-inch threaded hole on the bottom of the light body to the top of the telescopic handle; keep the buttons facing up and the diffuser facing forward, then tighten.
- Note: Hold the light body to avoid hitting the device.
- Install the magnetic super clamp
- How to: Attach the magnetic super clamp to the upper end of the telescopic handle and lock it, making sure the clamp cannot slide or rotate on its own.
- Note: After locking, push the clamp gently to recheck; no sliding or rotation is allowed.
- Install the PortalCam device
- How to: Attach the PortalCam device to the 1/4-inch mount on the adapter bracket and tighten it.
- Note: Confirm the capture direction is consistent and the bracket does not block the lens, buttons, or ports. Also check that the pad on the mating surface is in place and flat.
- Adjust the Stick Light height
- How to: Turn the upper end of the telescopic handle to unlock it, adjust the Stick Light height by extending or retracting, then retighten.
- Note: Confirm the height and angle are fixed.
- Final check
- How to: Gently shake the light body and bracket to confirm the threads, handle, and clamp are all secure, and that the light body, bracket, and phone do not block the lens, LiDAR, ports, or buttons.
- Note: Lift the device and start capturing only after all checks pass.
Removal and storage
Turn off the device and the Stick Light and wait for them to cool. Hold the light body and unscrew the connections in order, remove the adapter bracket, and reinstall the original grip handle. Store the light body, handle, clamp, and bracket separately.
Check before moving
Move the device only after the slot, hinge, threads, and magnetic bracket are all secure. If you find any looseness or the parts cannot be locked, stop using it immediately.
Lixel K2
Note
The Stick Light bracket is installed through the slot on the device body. When purchasing the device, choose a model with this slot. Models without the slot cannot mount the Stick Light accessory.
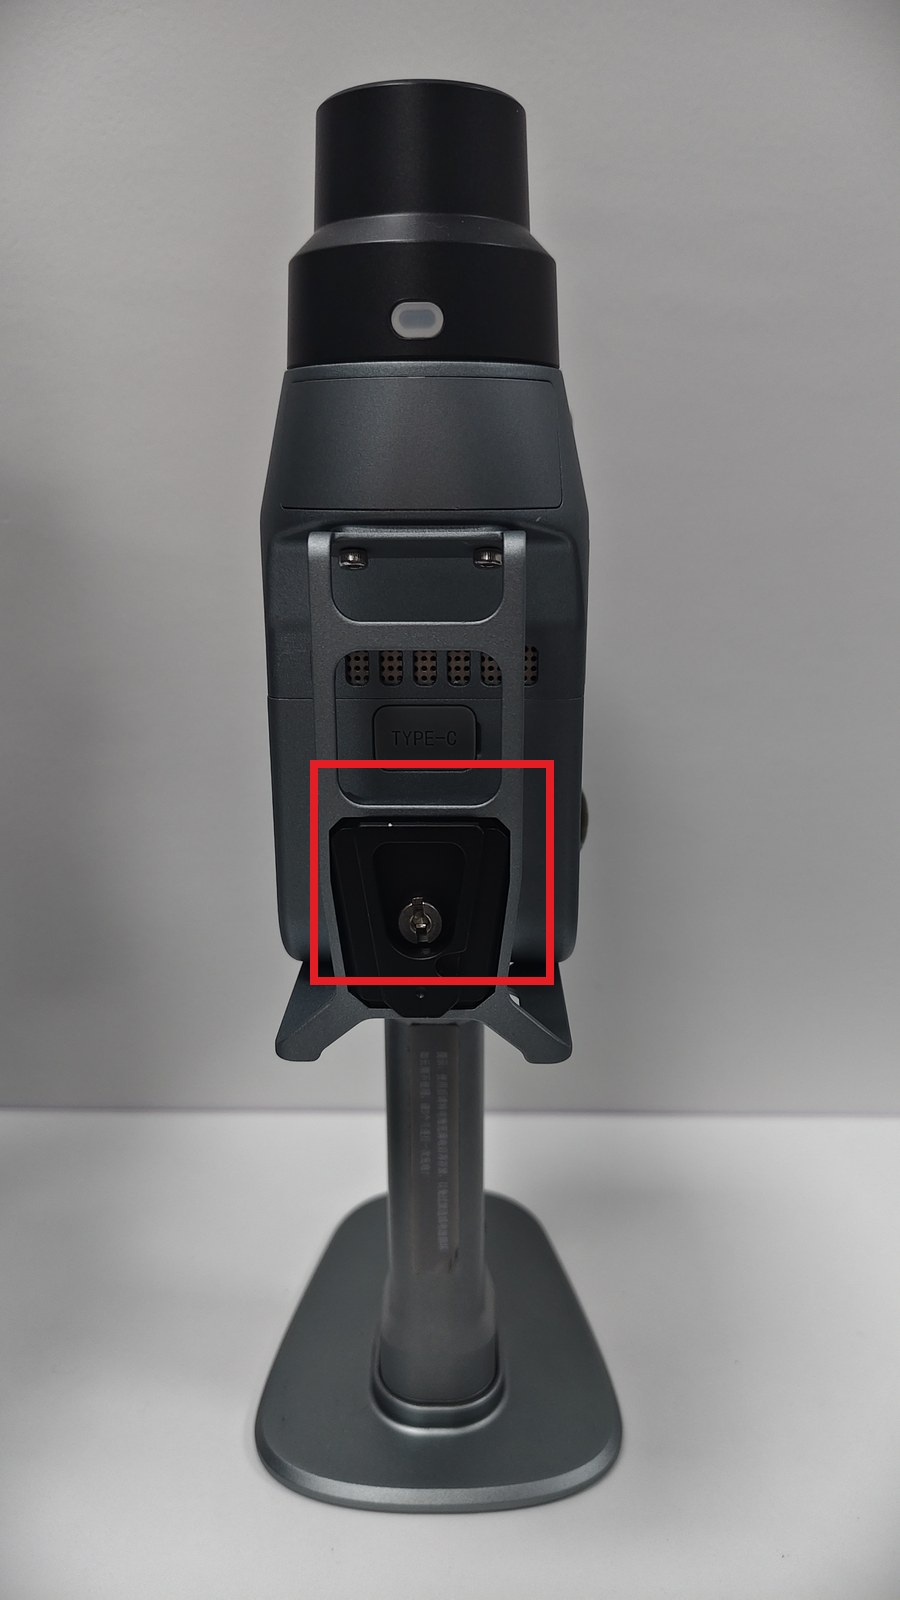
Before installation
Turn off the device and the Stick Light, and place the device on a stable surface. Check and clean the bracket, threads, rail, and slot. Do not lift the device until all connections are tightened.
Parts checklist
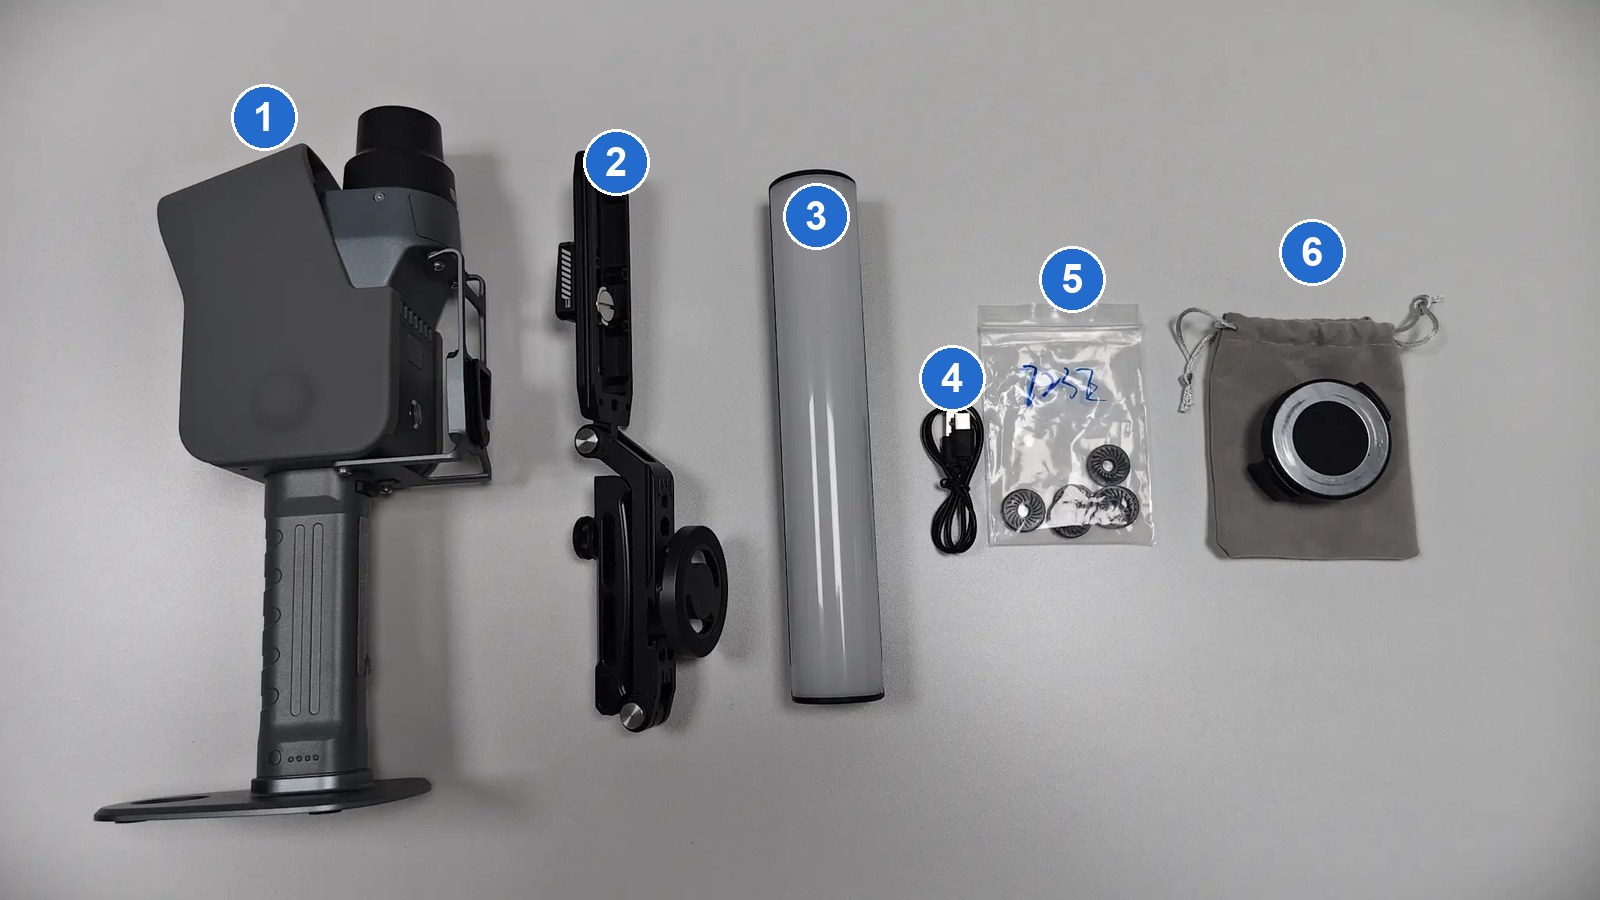
From left to right, the numbered circles correspond to:
- Lixel K2 device (the device itself, not an accessory)
- Folding U-shaped bracket
- Stick Light body
- USB-C charging cable
- Base screw rubber pads
- Storage bag and magnetic phone holder
Installation steps
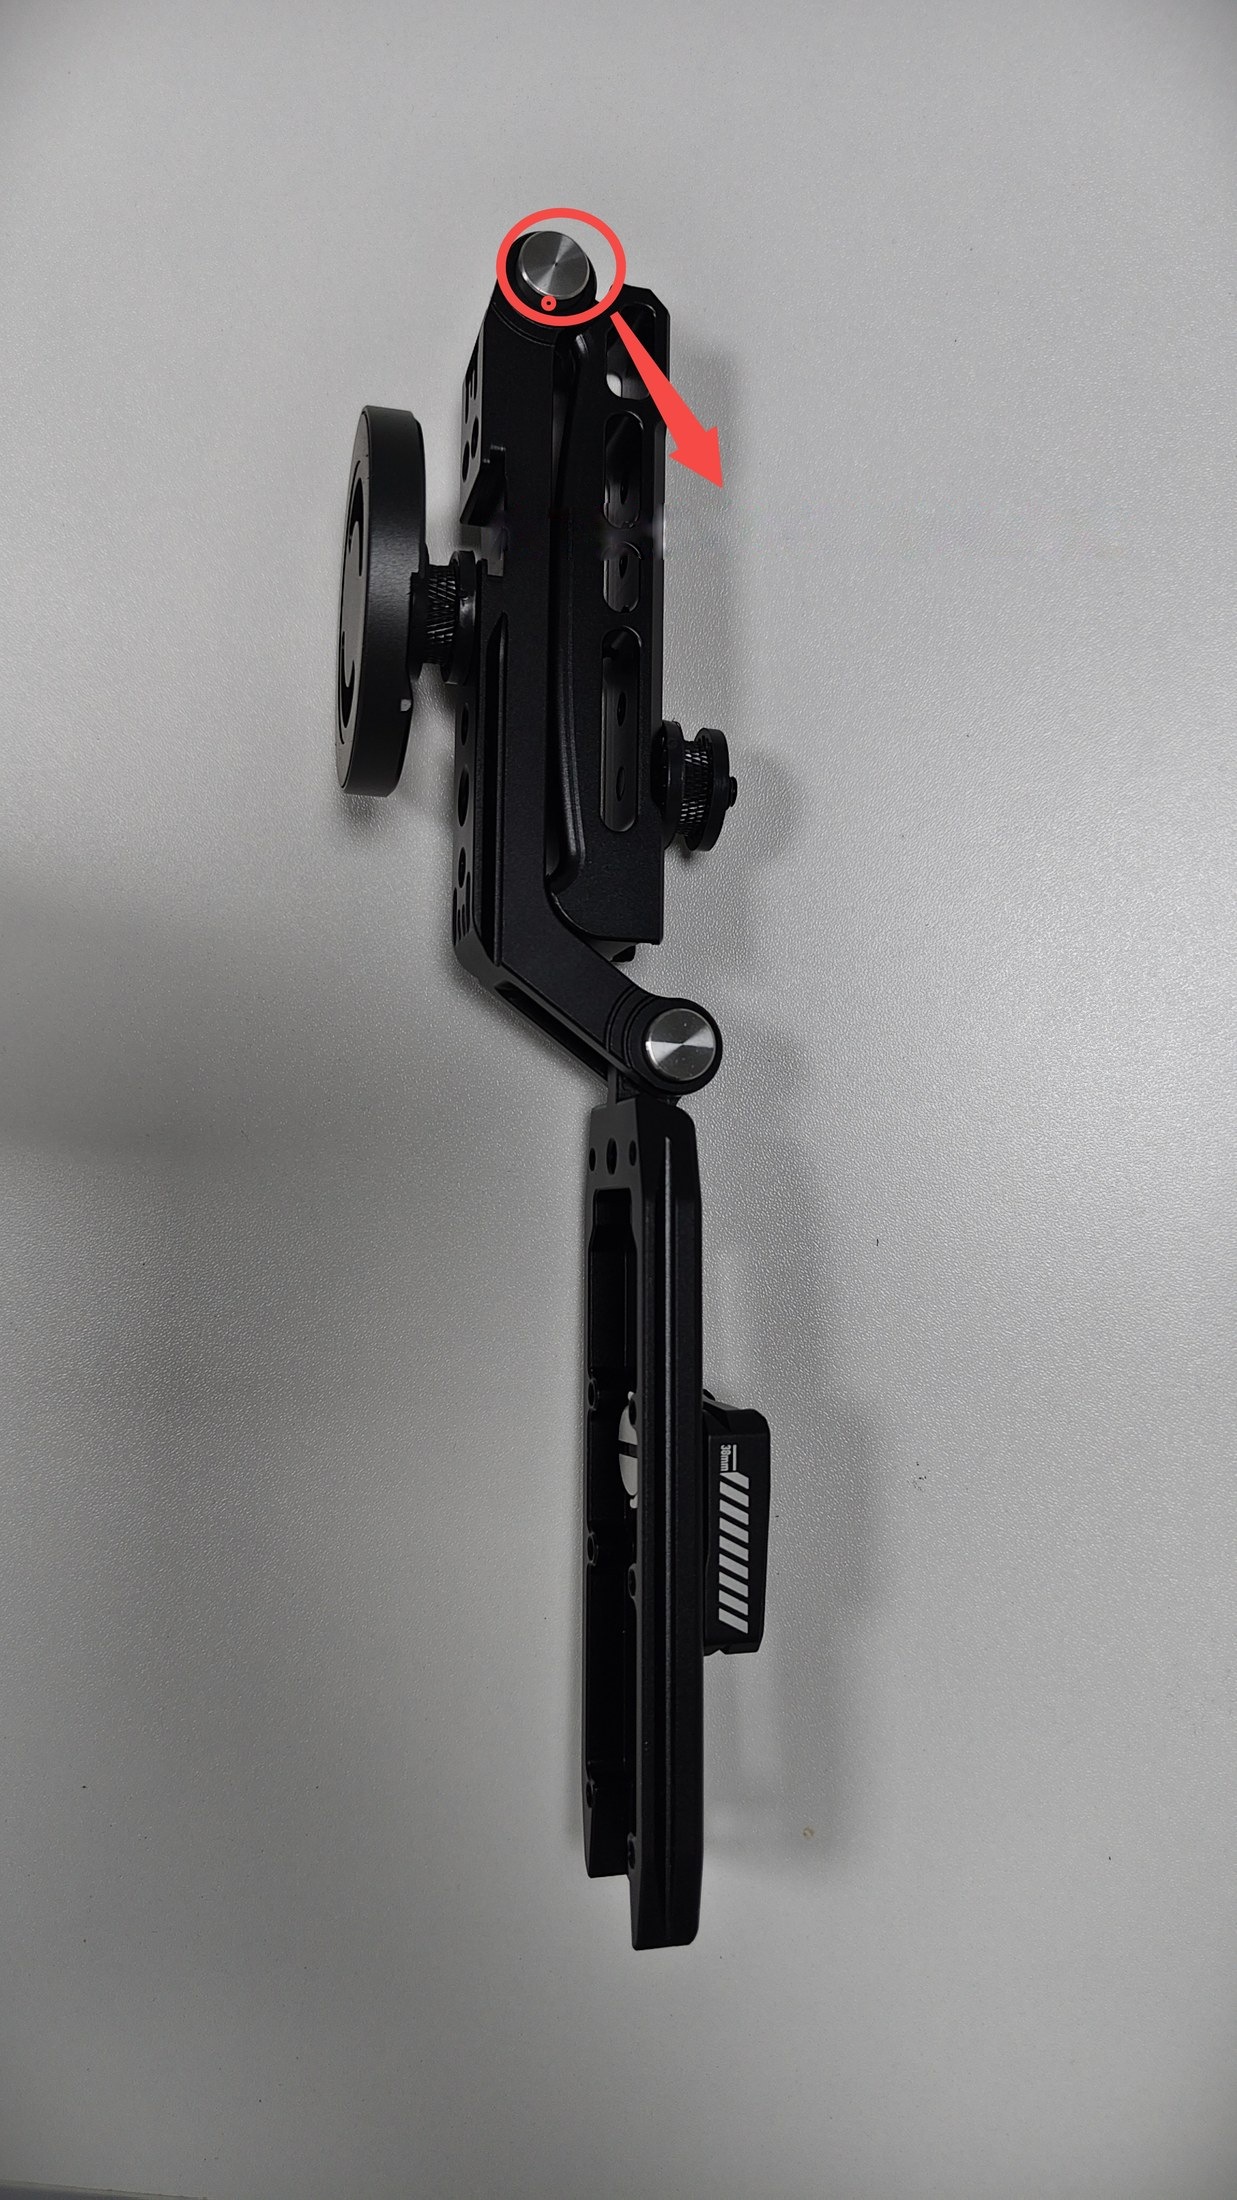
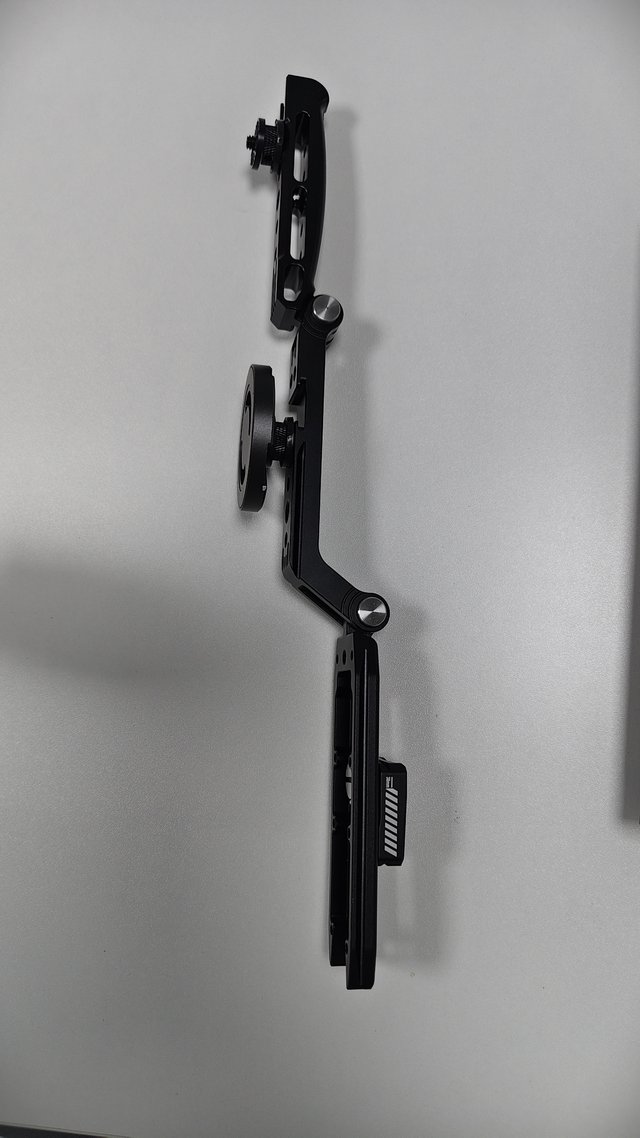
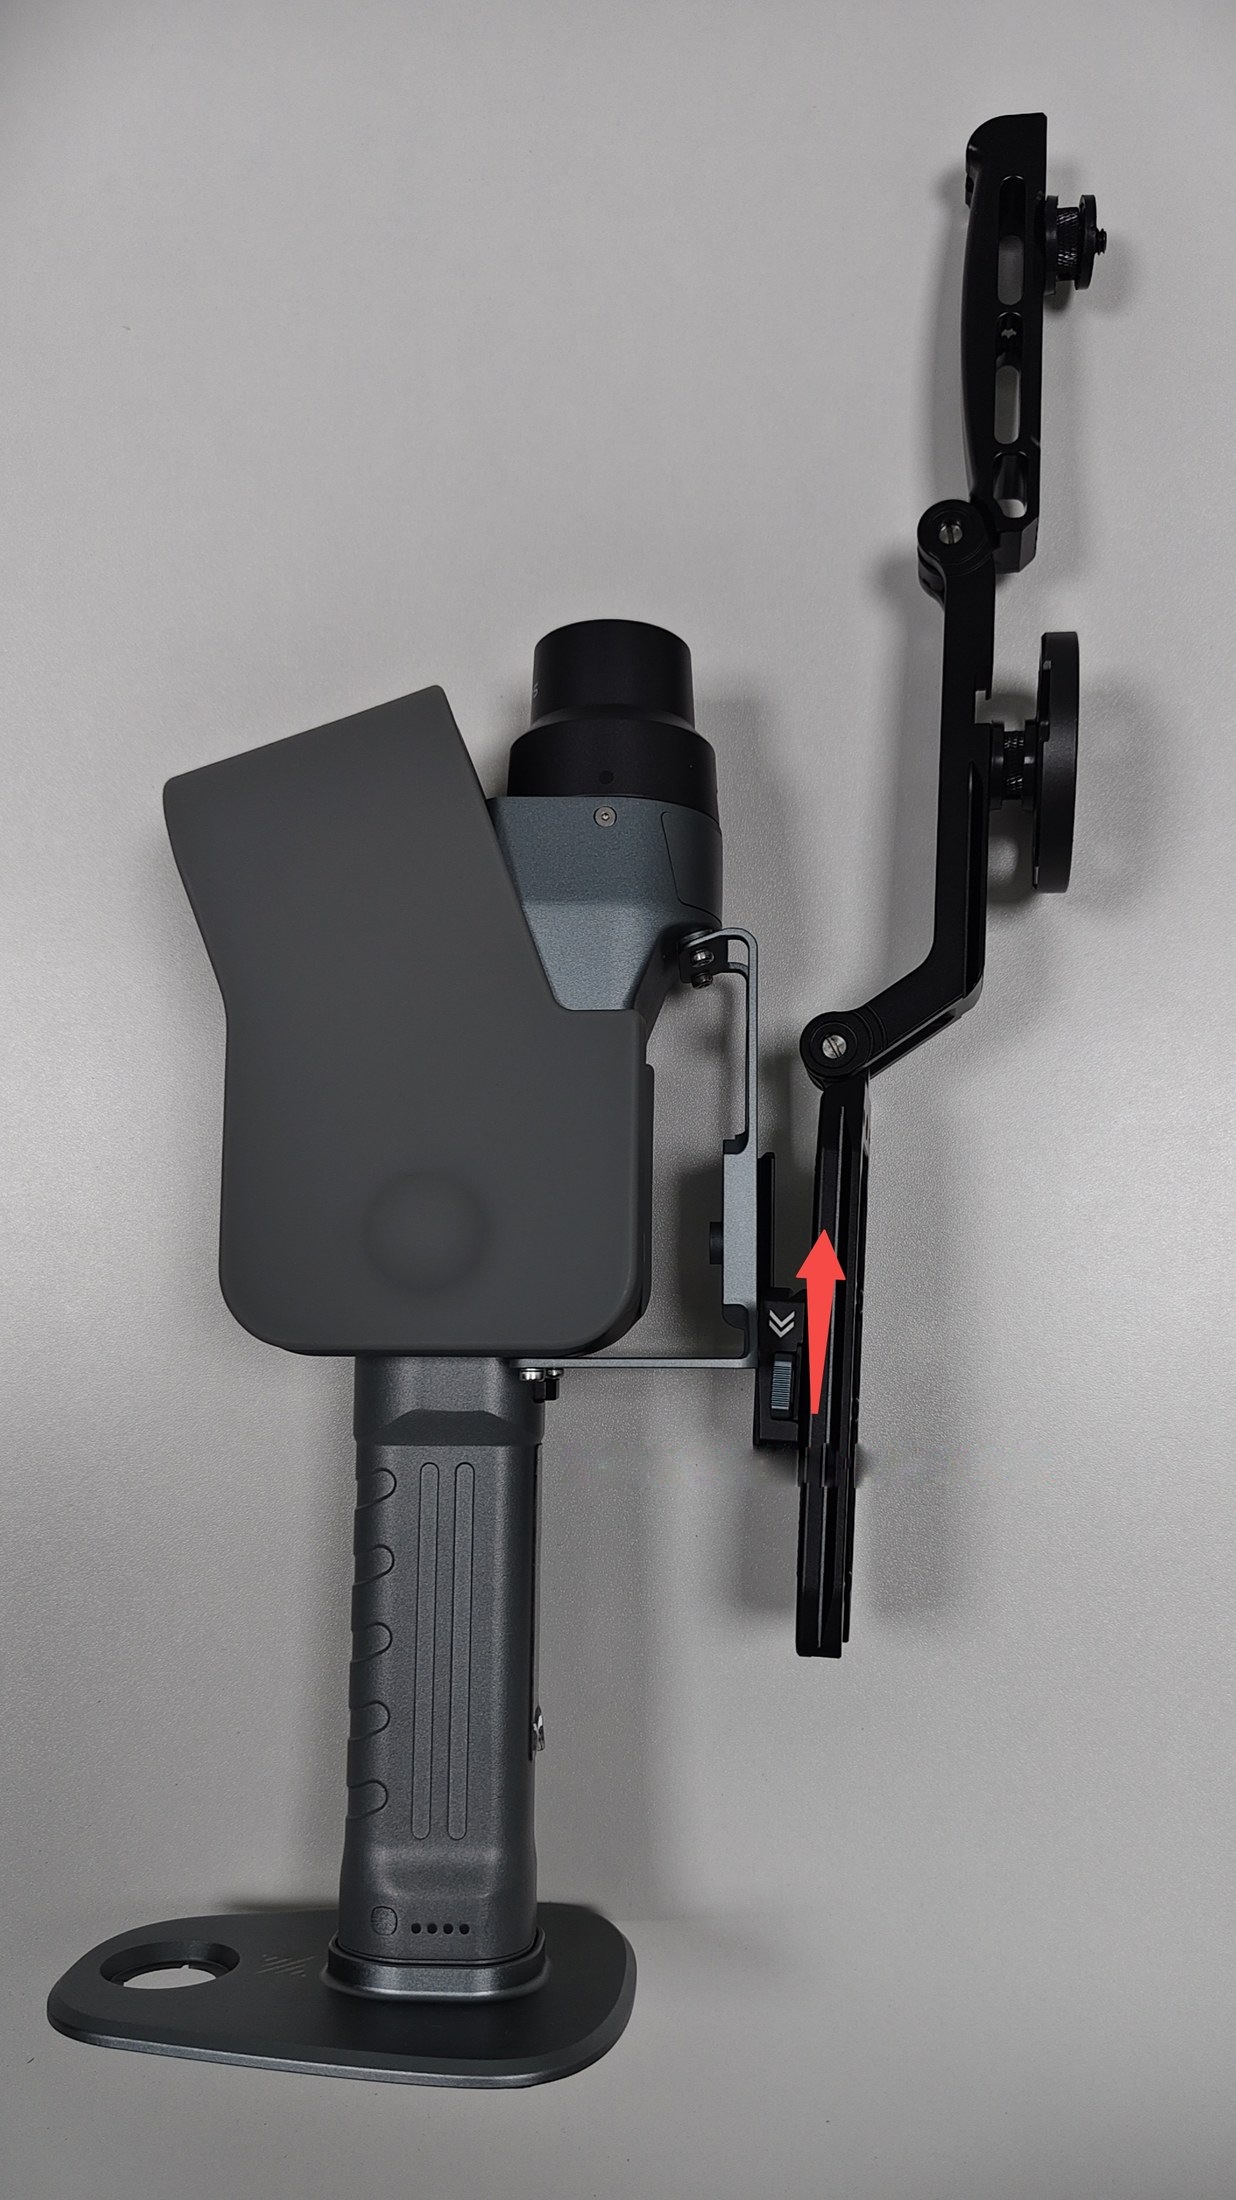
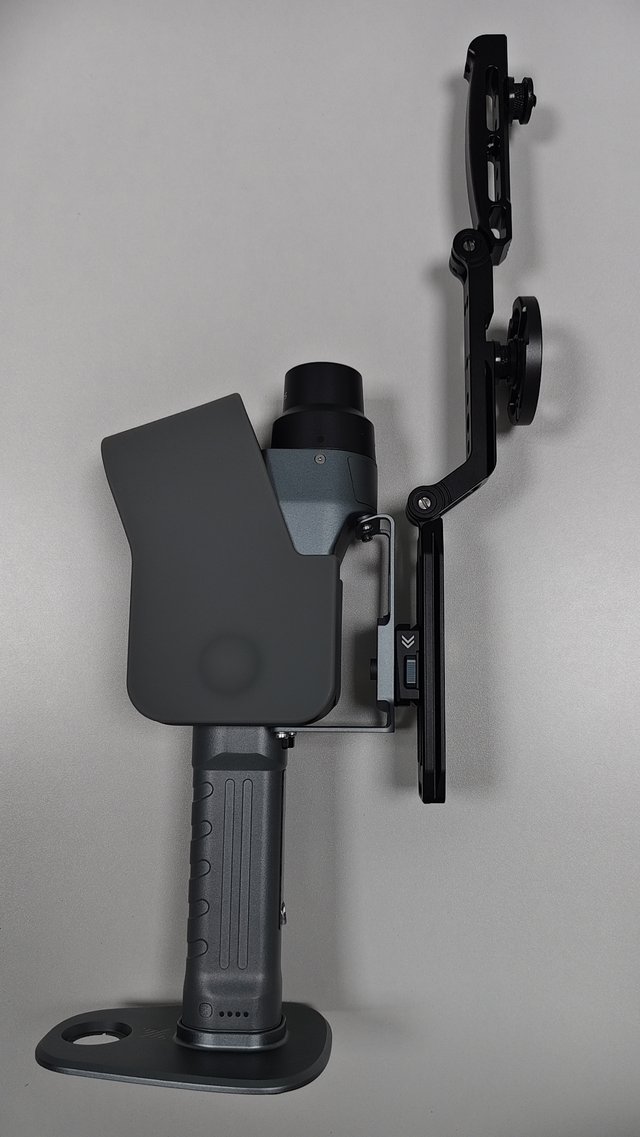
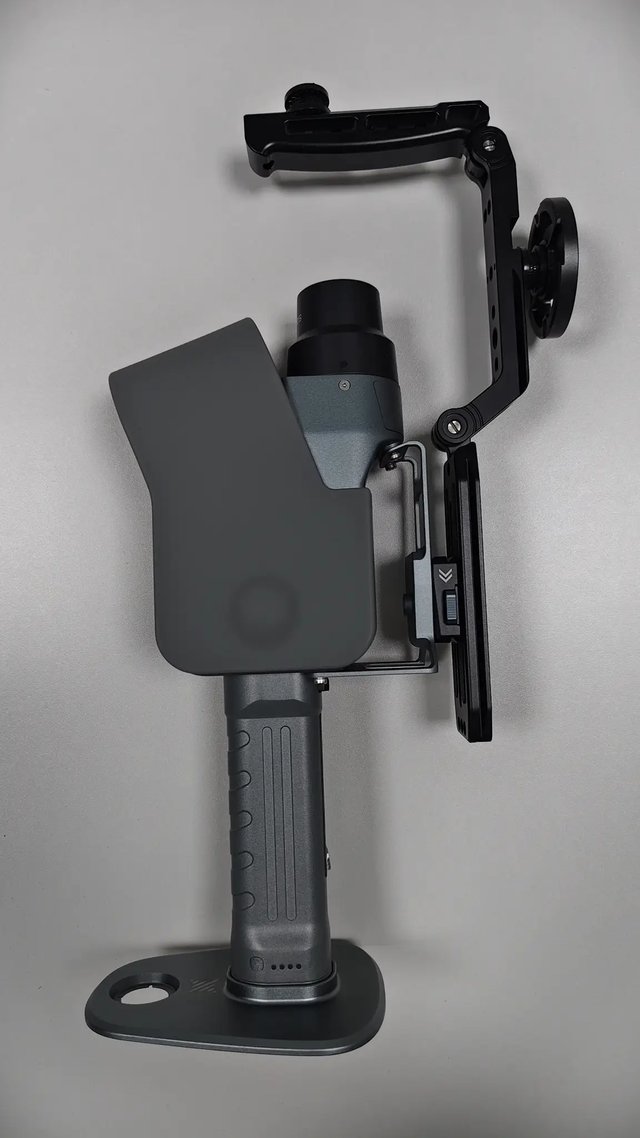
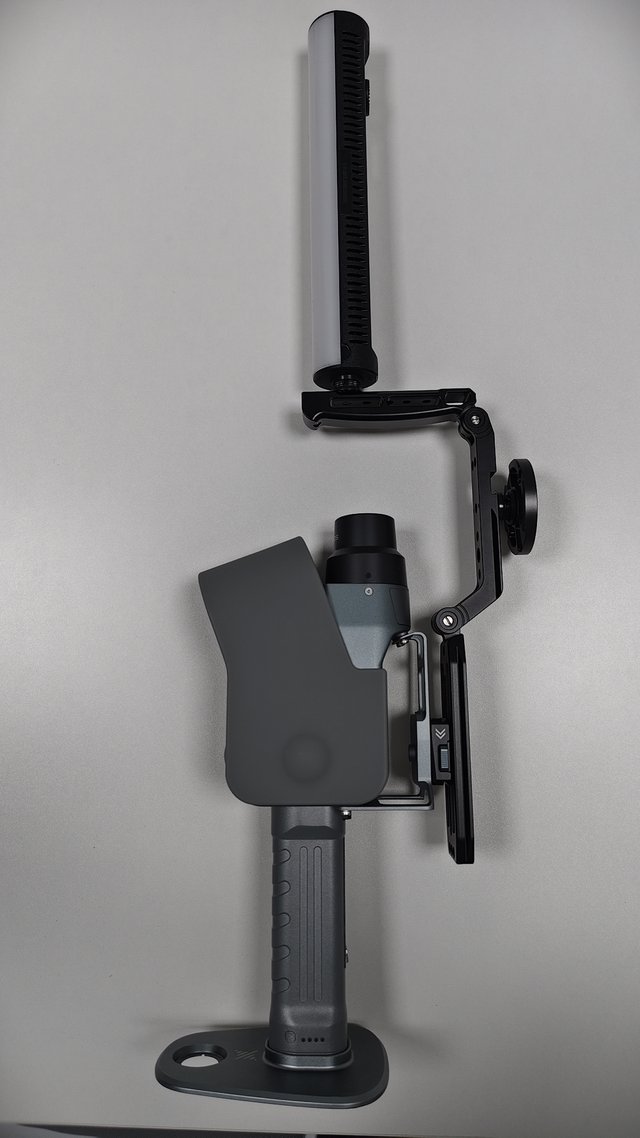
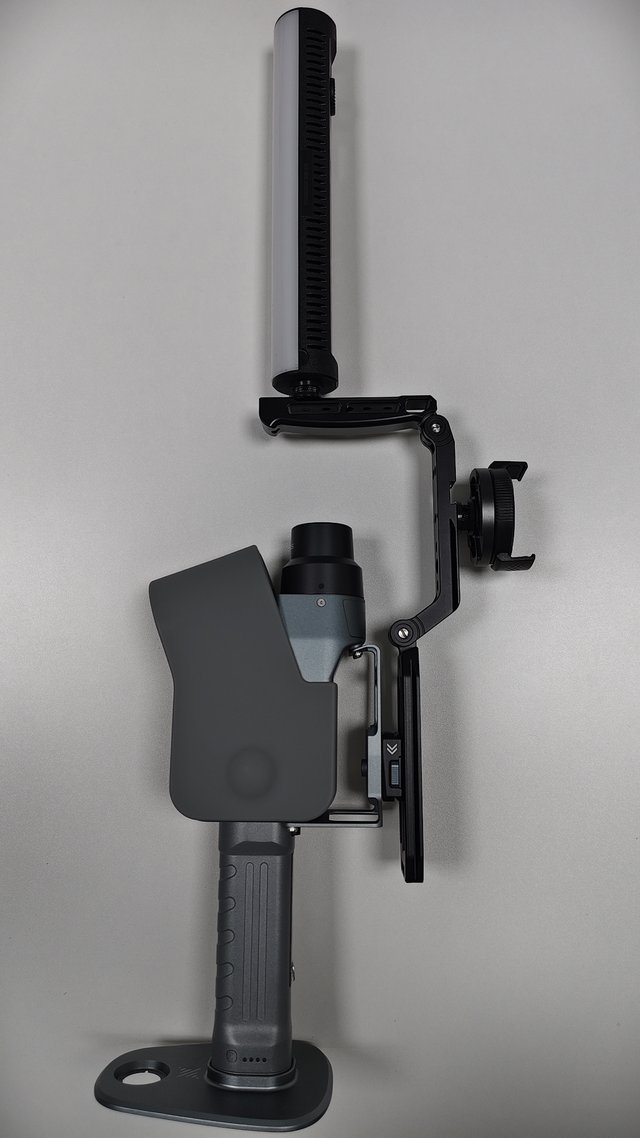
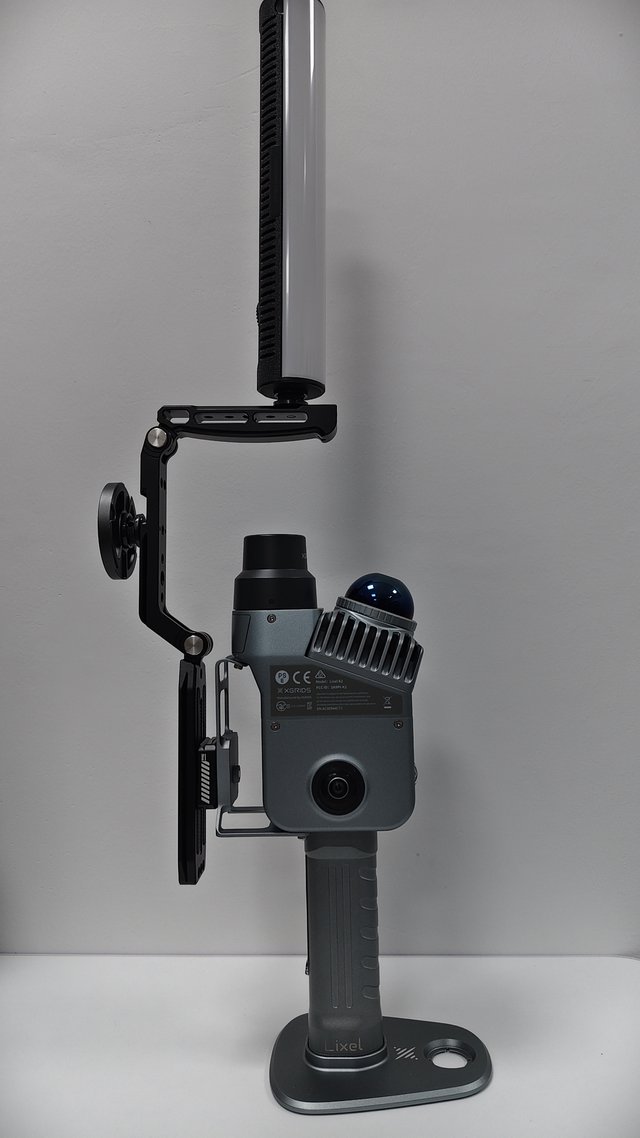
Step details
- Adjust the hinge angle
- How to: Press and hold the silver hinge button and turn the arm to unfold the U-shaped bracket to a position that makes it easy to slot in.
- Note: Do not force the arm when the button is not pressed.
- Confirm the bracket orientation
- How to: Point the rail toward the K2 body slot, with the magnetic phone holder on the outer side of the device and kept unfolded.
- Note: Before installing, confirm there are no foreign objects in the rail or slot.
- Slide the bracket into the K2 slot
- How to: Align the rail parallel with the slot and push it up in the direction of the arrow in the image until it is fully seated.
- Note: Push straight along the slot only; do not insert at an angle or pry.
- Confirm the bracket is seated
- How to: Check how tightly the bracket sits against the body and gently pull to recheck.
- Note: If there is obvious looseness, remove it and slot it in again; do not use it while loose.
- Unfold the upper arm
- How to: Press the hinge buttons and adjust the arm in turn so that the 1/4-inch screw on top sits above the K2.
- Note: The arm must not press on ports or enter the scanning field of view.
- Install the Stick Light
- How to: Screw the light body onto the top 1/4-inch screw, keep the buttons facing up and the diffuser facing forward, and lock it; add the supplied base screw rubber pads if needed.
- Note: Keep the buttons facing up for easy operation; clean the mating surface before adding the pads, and confirm the light body does not rotate after locking.
- Adjust the phone holder and light body
- How to: Install the magnetic phone holder as needed, and adjust the light body, arm, and phone holder to avoid interfering with each other or blocking the lens and operating area.
- Note: The arm must not enter the scanning field of view, and the phone holder must not block the lens or ports.
- Final check
- How to: Gently shake the light body and bracket to confirm the slot, hinge, 1/4-inch threads, and magnetic bracket are all stable.
- Note: Start capturing only after everything is secure.
Removal and storage
Turn off the device and the Stick Light and wait for them to cool. Remove the light body first, then hold the U-shaped bracket and slide it out smoothly in the direction opposite to the installation arrow. Do not twist or pry the slot. Press the hinge buttons to fold it and store it.
Check before moving
Move the device only after the slot, hinge, threads, and magnetic bracket are all secure. If you find any looseness or the parts cannot be locked, stop using it immediately.
Lixel L2 Pro
Note
The Stick Light bracket is installed through the slot on the device body. When purchasing the device, choose a model with this slot. Models without the slot cannot mount the Stick Light accessory.
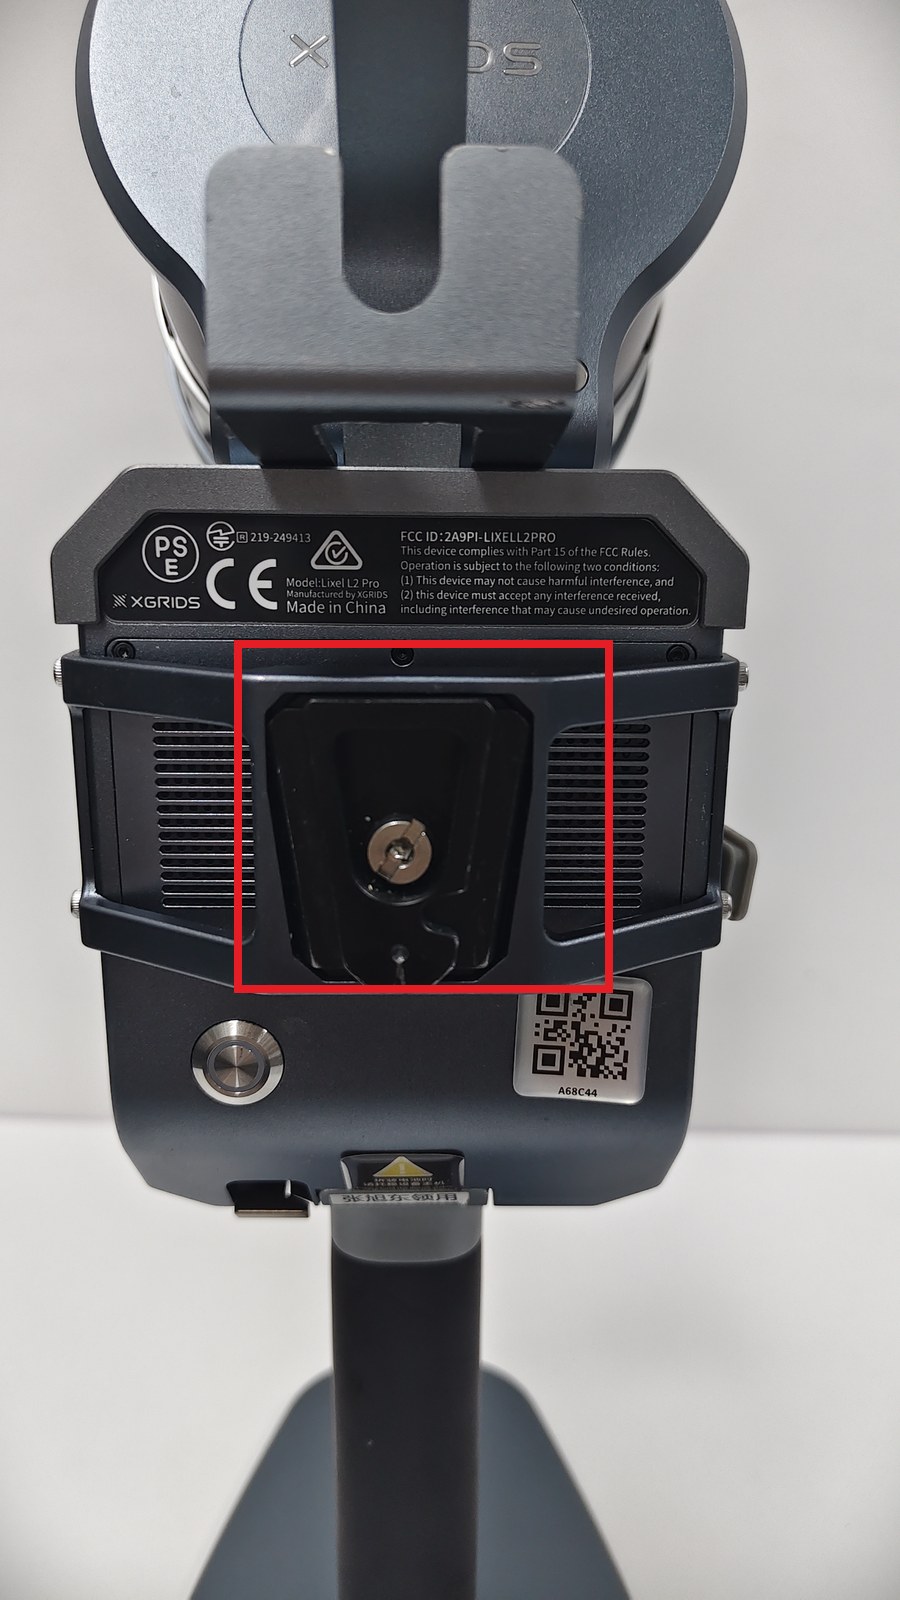
Before installation
Turn off the device and the Stick Light, and place the device on a stable surface. Check and clean the bracket, threads, rail, and slot. Do not lift the device until all connections are tightened.
Parts checklist
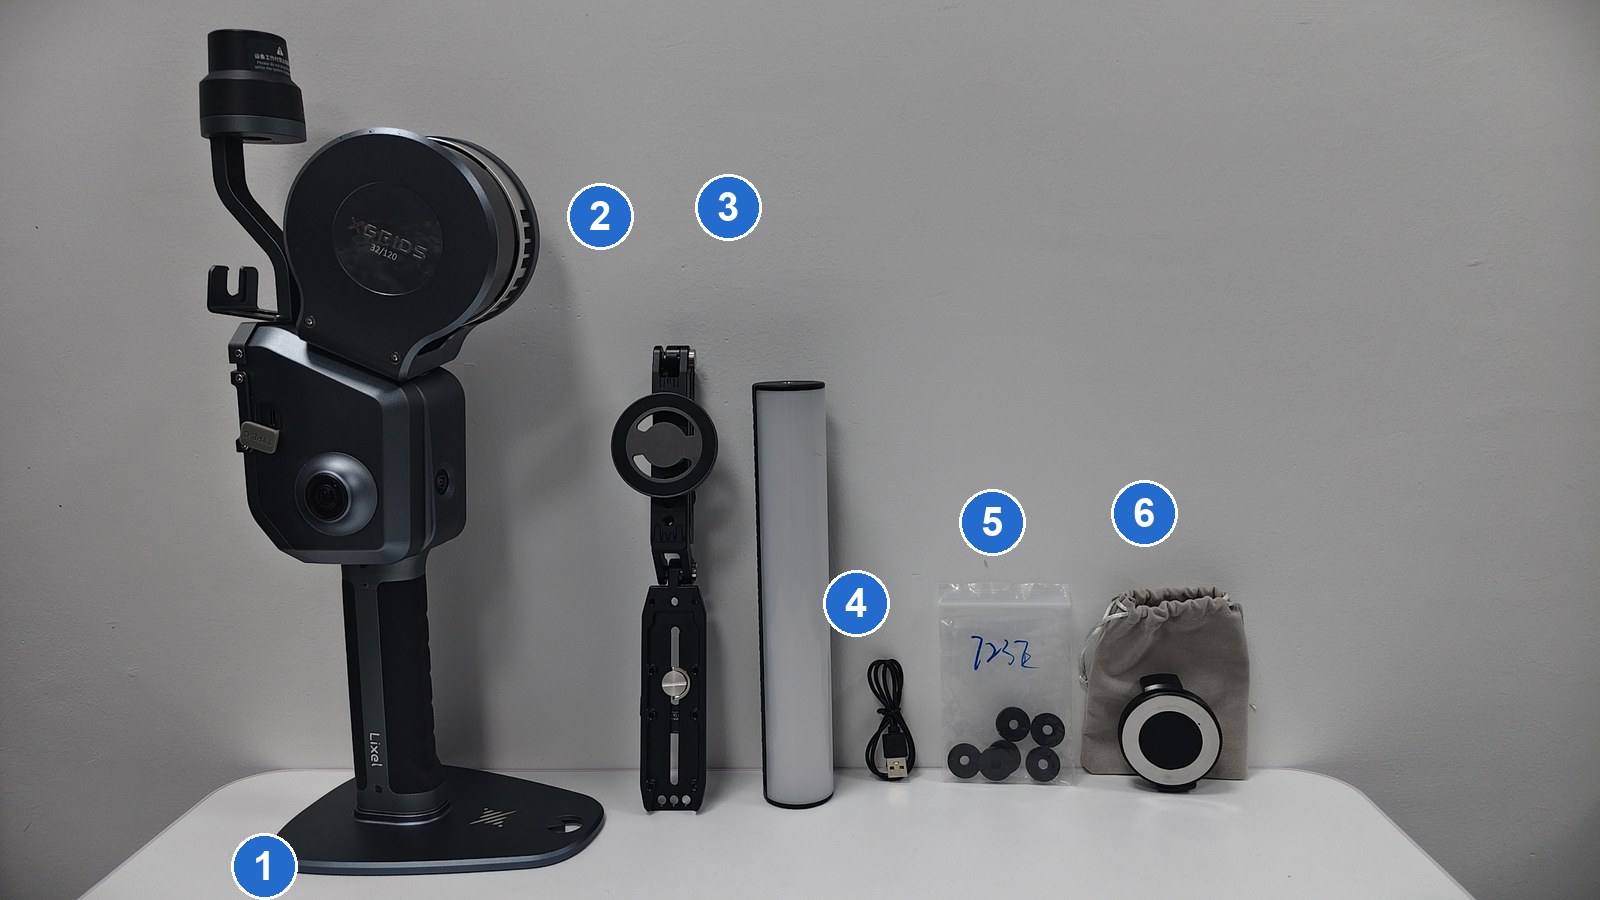
From left to right, the numbered circles correspond to:
- Lixel L2 Pro device (the device itself, not an accessory)
- Folding U-shaped bracket
- Stick Light body
- Base screw rubber pads
- USB-C charging cable
- Storage bag and magnetic phone holder
Installation steps
Step details
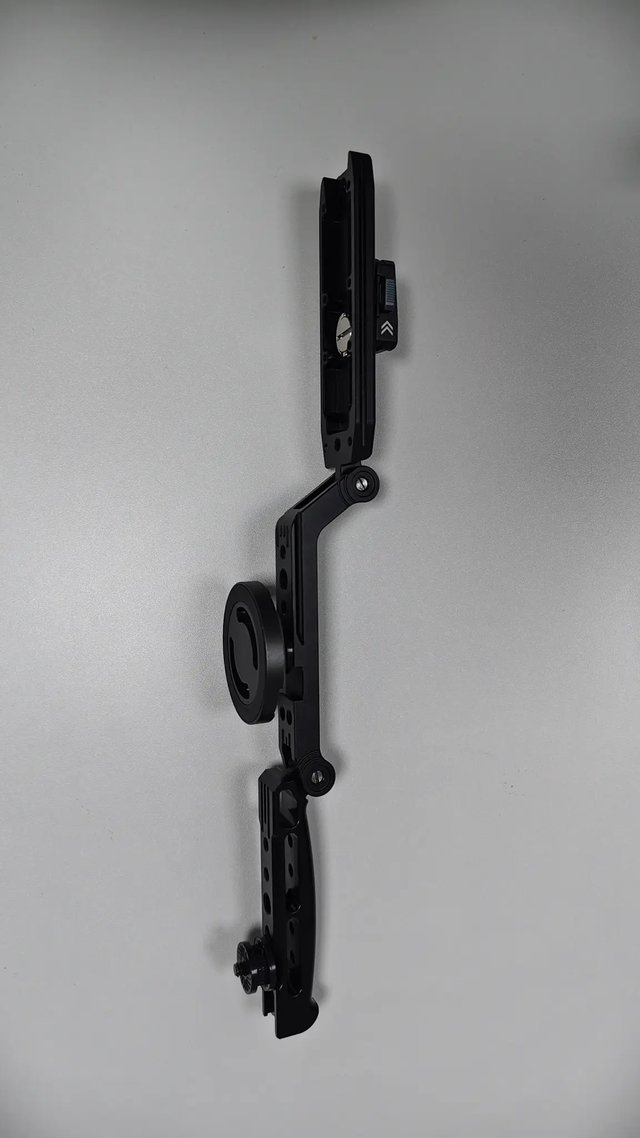
- Adjust the hinge angle
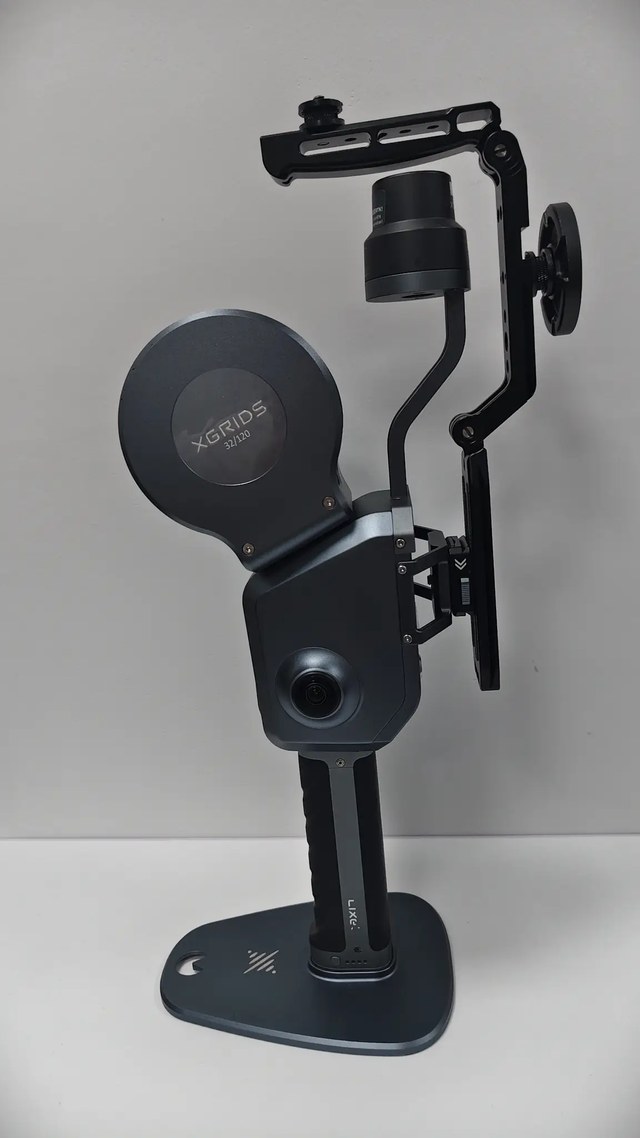
- How to: Press and hold the silver hinge button and adjust the angle of the upper and lower arms to unfold the U-shaped bracket to a position that makes it easy to install.
- Note: Do not force the arm when the button is not pressed.
- Confirm the bracket orientation
- How to: Point the rail toward the L2 Pro body slot, with the magnetic phone holder on the outer side of the device.
- Note: Before installing, confirm there are no foreign objects in the rail or slot.
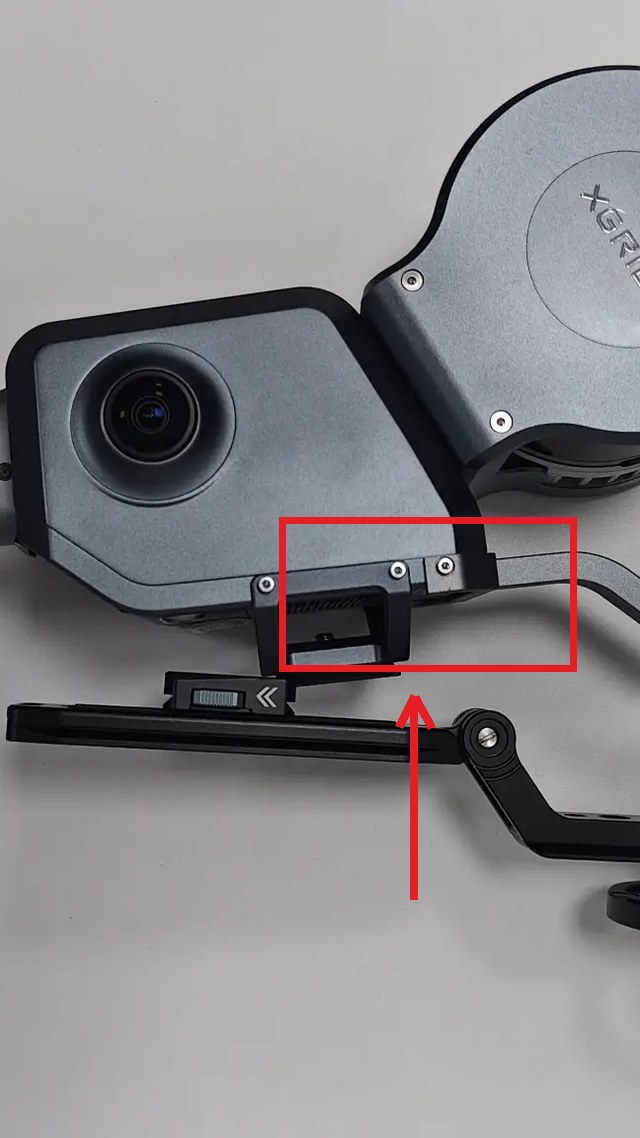
- Slide the bracket into the L2 Pro slot
- How to: Align the rail parallel with the body slot and push it up in the direction of the arrow in the image until it is fully seated.
- Note: Do not insert at an angle or pry.
- Confirm the bracket is seated
- How to: Check how tightly the bracket sits against the body and gently pull to recheck.
- Note: If it is not fully seated, remove it in the opposite direction and reinstall.
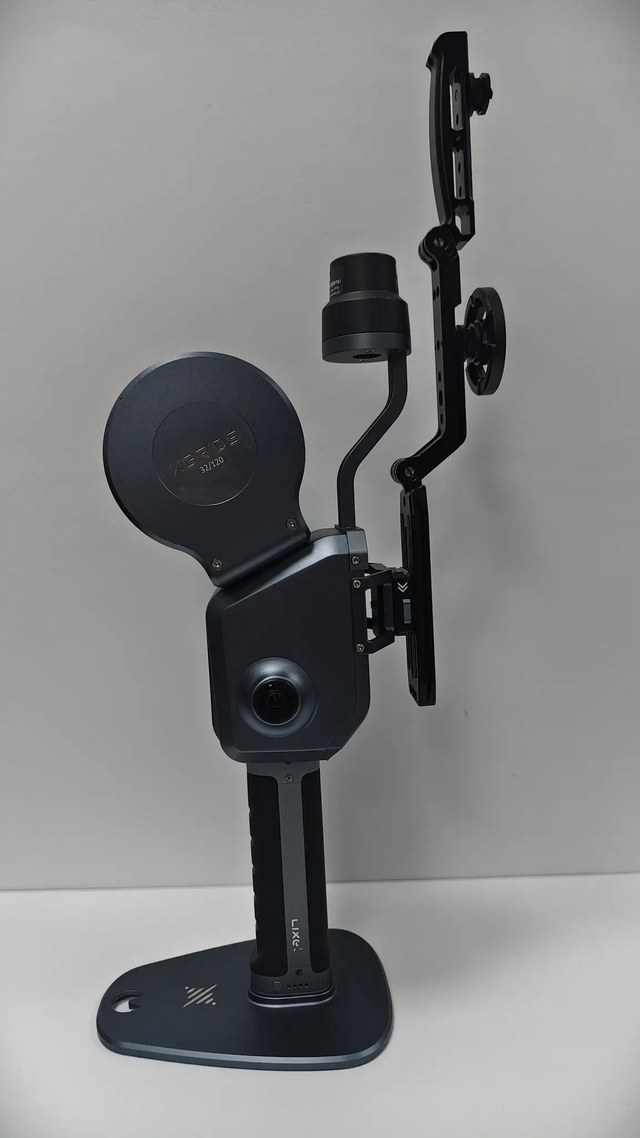
- Adjust the arm position
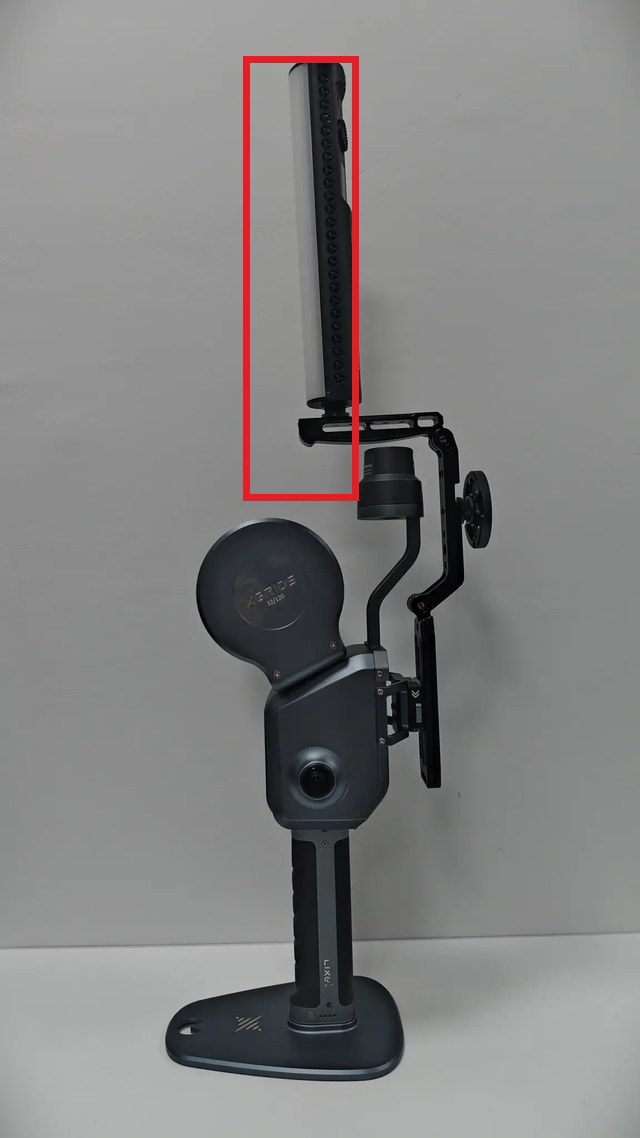
- How to: Press the hinge button and adjust the upper arm so that the 1/4-inch screw on top sits above the device.
- Note: The arm must not enter the LiDAR rotation range or block the lens.
- Install the Stick Light
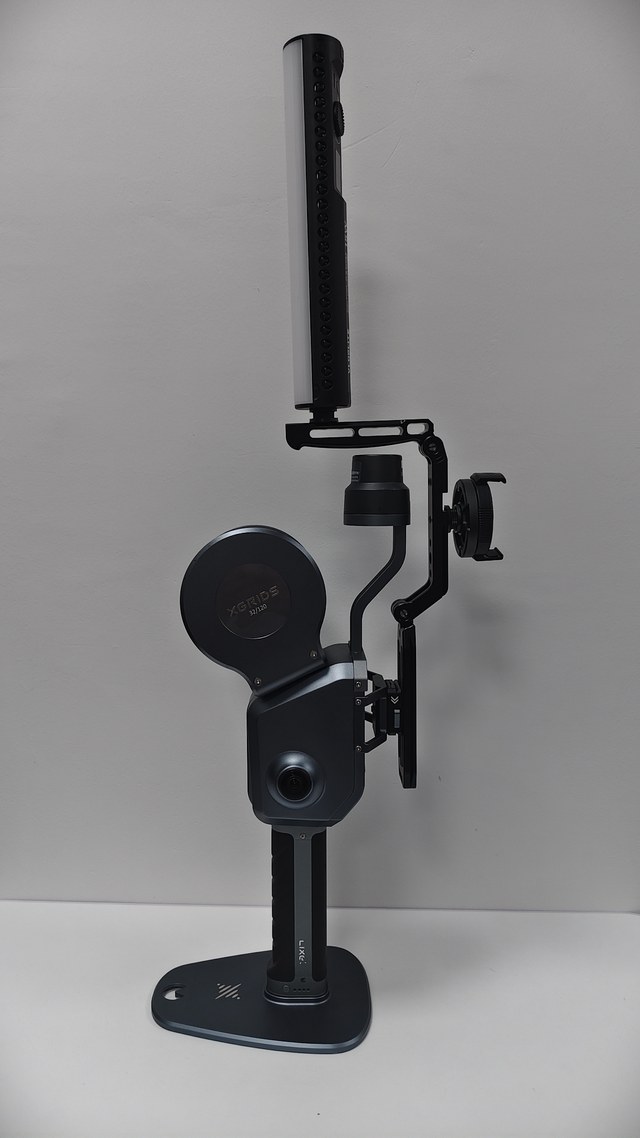
- How to: Screw the light body onto the top 1/4-inch screw, keep the buttons facing up and the diffuser facing forward, and lock it; add the supplied base screw rubber pads if needed.
- Note: Keep the buttons facing up for easy operation; clean the mating surface before adding the pads, and confirm the light body does not rotate after locking.
- Final check
- How to: Install the magnetic phone holder as needed, gently shake the light body and bracket, and confirm the slot, hinge, threads, and magnetic bracket are all stable.
- Note: The light body and phone holder must not enter the LiDAR rotation range; lift the device and start capturing only after all checks pass.
Removal and storage
Turn off the device and the Stick Light and wait for them to cool. Remove the light body first, then hold the U-shaped bracket and slide it out smoothly in the direction opposite to the installation arrow. Do not twist or pry the slot. Press the hinge buttons to fold it and store it.
Check before moving
Move the device only after the slot, hinge, threads, and magnetic bracket are all secure. If you find any looseness or the parts cannot be locked, stop using it immediately.