XGRIDSDocs
  • 简体中文
  • English
  • 繁體中文
  • 日本語
  • Deutsch
  • Español
  • Italiano
  • 简体中文
  • English
  • 繁體中文
  • 日本語
  • Deutsch
  • Español
  • Italiano
  • PortalCam

    • Product Overview
    • Basic Operation
    • Using the LCC Scan App
    • Maintenance and Care
    • FAQ
  • Lixel K Series

    • Lixel K1

      • Product Overview
      • Basic Operation
      • Device Activation and Connection
      • Scanning Workflow
      • Acquire Point Cloud Data with Absolute Coordinate
      • Map Fusion
      • Route Planning Suggestions for Typical Scenes
      • Precautions
      • FAQ
    • Lixel K2

      • Product Overview
      • Basic Operation
      • Device Activation and Connection
      • Scanning Workflow
      • Acquire Point Cloud Data with Absolute Coordinate
      • Map Fusion
      • Route Planning Suggestions for Typical Scenes
      • Precautions
      • FAQ
  • Lixel L Series

    • Lixel L2 Pro

      • Product Overview
      • Basic Operation
      • Device Activation and Connection
      • Scanning Workflow
      • Acquire Point Cloud Data with Absolute Coordinate
      • Measure Point
      • Appendix
      • FAQ
  • Lixel Studio

    • Version and Copyright
    • Installation and Activation
    • Software Interface
    • File Operations
    • Project Processing
    • Tools
    • 2D Drawing
    • Applications
    • Settings
    • Device Connection
    • FAQ
  • Lixel CyberColor

    • LCC Studio

      • Getting Started
      • Version and Updates
      • Download and Installation
      • Interface Overview and Navigation
      • Before Reconstruction
      • Model Reconstruction
      • Single Model Reconstruction
      • Map Fusion
      • Aerial-Ground Fusion
      • Aerial Reconstruction
      • My Models
      • Other Features
      • Settings and Account
      • Converter
      • Video Reconstruction
      • FAQ
    • LCC Scene Editor

      • Version & Updates
      • Account & Login
      • Product Overview & Home
      • Editor Interface
      • Scene Navigation Modes
      • File
      • Settings
      • Edit Operations
      • Window
      • Global Toolbar
      • Assets & Properties
      • Left Toolbar
      • Viewpoints
      • Portal
      • Skybox
      • Annotations
      • Measurement
      • Flythrough
      • Scene Report
      • 3D Layout
      • Mini-Map
      • Preview Mode (Viewer)
      • Help
      • FAQ
      • Spawn Point
    • LCC Model Editor

      • Version and Updates
      • User Guide
      • Overview and Interface
      • File Operations
      • Selectors
      • Editing Models
      • Measurement
      • Color Grading
      • Asset Management
      • Settings and Help
      • FAQ
    • Capture Guide

      • Overview
      • Capture Devices Overview
      • General Capture Principles
      • Indoor Scene Capture
      • Outdoor Scene Capture
      • Large-Scale Capture (Map Fusion)
      • Aerial-Ground Map Fusion Capture
      • Object Capture
      • People Capture
      • Video Reconstruction Capture
      • HD Enhancement
      • Control Points (Lixel P1)
      • FAQ and Troubleshooting
    • Version History

File

Use the File menu to open, save, save as, import, export, export project, publish, configure settings, and quit.
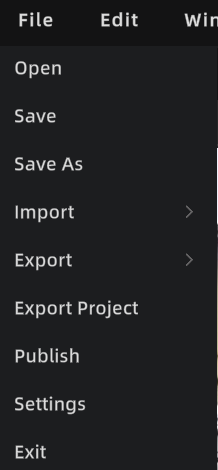
File Menu

File Menu

Open

Open a project file or model file from your local storage.

  • Open Project: Resume editing the same work (models, assets, annotations, measurements, etc.).
  • Open Model (e.g., .lcc / .ply): For temporary viewing or editing. For long-term maintenance, use Save to generate a project.

Steps: Menu Bar → File → Open → Select file → Confirm

Save

Save the current project's editing state.

Steps: Press Ctrl + S, or Menu Bar → File → Save → Choose save location → Confirm

Auto-save:

  • Auto-save only applies to "projects"; temporary projects are not auto-saved
  • Auto-save copies are stored in the autosave folder within the project directory
  • Only the latest auto-save is retained; it expires after one month
  • Auto-save triggers every 10 minutes after 3 minutes of inactivity

If the current session is a "temporary project", the first save will prompt you to enter a project name and select a storage path.

Save As

Save the current project as a new version, keeping the original unchanged.

Import

Import external assets into the current scene.

Path: Menu Bar → File → Import

Import 3DGS Model

Starting from V2.2, importing LCC automatically associates the corresponding floor plan data, and spawn point data is read alongside the LCC. See 3D Layout and Spawn Point.

Supported formats:

FormatNotes
LCC2Loaded directly, no conversion needed
LCC (LCC1)A format conversion prompt appears on import; select a storage path and it converts to LCC2 automatically
PLYSilently converted to LCC2 in the background on import

Import Mesh Model

Supported formats: FBX / OBJ / GLB

Import Other Assets

Supported: Collision mesh, 3D Layout, developer data, AI recognition data

Export

Export editing results as deliverable files or data.

  • 3DGS model: Supports LCC, LCC2, and PLY formats (each exported separately; combined export is not supported)

Export Project

Export the current project as a complete project file for other Editor users to continue editing.

Path: Menu Bar → File → Export Project

Export contents: Includes all model data, scene structure, annotations, measurements, viewpoints, and other editing data. Other users can load the exported project via "Open Project" to continue editing.

Note: "Export Project" is for team collaboration or backup, and is different from "Export" (export a single model file) and "Publish" (generate an online viewing link).

Publish

Publish the project as a Web Viewer link for online sharing and viewing.

Path: Menu Bar → File → Publish

After editing is complete, the model is automatically synced back to the main editor. Click Publish directly — no need to manually export and re-import.

Steps:

  1. Click "Publish" to start the publishing flow
  2. Wait for publishing to complete (progress is shown)
  3. After successful publishing, a dialog displays the link:
    • Click to copy the link

Settings

Open the settings panel to manage editor configurations. See Settings.

Quit

Close the application.

Prev
Scene Navigation Modes
Next
Settings