XGRIDSDocs
  • 简体中文
  • English
  • 繁體中文
  • 日本語
  • Deutsch
  • Español
  • Italiano
  • 简体中文
  • English
  • 繁體中文
  • 日本語
  • Deutsch
  • Español
  • Italiano
  • PortalCam

    • Product Overview
    • Basic Operation
    • Using the LCC Scan App
    • Maintenance and Care
    • FAQ
  • Lixel K Series

    • Lixel K1

      • Product Overview
      • Basic Operation
      • Device Activation and Connection
      • Scanning Workflow
      • Acquire Point Cloud Data with Absolute Coordinate
      • Map Fusion
      • Route Planning Suggestions for Typical Scenes
      • Precautions
      • FAQ
    • Lixel K2

      • Product Overview
      • Basic Operation
      • Device Activation and Connection
      • Scanning Workflow
      • Acquire Point Cloud Data with Absolute Coordinate
      • Map Fusion
      • Route Planning Suggestions for Typical Scenes
      • Precautions
      • FAQ
  • Lixel L Series

    • Lixel L2 Pro

      • Product Overview
      • Basic Operation
      • Device Activation and Connection
      • Scanning Workflow
      • Acquire Point Cloud Data with Absolute Coordinate
      • Measure Point
      • Appendix
      • FAQ
  • Lixel Studio

    • Version and Copyright
    • Installation and Activation
    • Software Interface
    • File Operations
    • Project Processing
    • Tools
    • 2D Drawing
    • Applications
    • Settings
    • Device Connection
    • FAQ
  • Lixel CyberColor

    • LCC Studio

      • Getting Started
      • Version and Updates
      • Download and Installation
      • Interface Overview and Navigation
      • Pre-Reconstruction Work
      • Model Reconstruction
      • Single Model Reconstruction
      • Map Fusion
      • Aerial-Ground Map Fusion
      • Aerial Reconstruction
      • My Models
      • Other Features
      • Settings and Account
      • Video Reconstruction
      • FAQ
    • LCC Scene Editor

      • Version and Updates
      • Account and Sign In
      • Product Overview and Home
      • Editor Interface
      • Three Navigation Modes
      • File
      • Settings
      • Edit
      • Window
      • Global Toolbar
      • Assets and Properties
      • Left Toolbar
      • Viewpoint
      • Skybox
      • Annotation
      • Measurement
      • Flythrough
      • Scene Report
      • 3D Layout
      • Preview Mode (Viewer)
      • Help
      • FAQ
    • LCC Model Editor

      • Version and Updates
      • User Guide
      • Overview and Interface
      • File Operations
      • Selectors
      • Editing Models
      • Measurement
      • Color Grading
      • Asset Management
      • Settings and Help
      • FAQ
    • Version History

Measurement

The Measurement tool is used to obtain coordinate, distance, or area data in the scene. It supports real-time calculation, unit switching, and professional measurement information display.
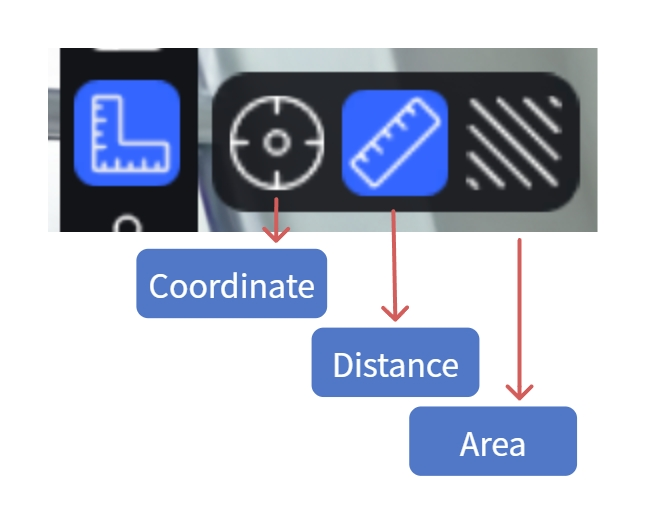
Measurement

Measurement tool

Workflow

1. Activate Measurement Mode

Click the "Measurement" button in the left toolbar to open the measurement tool.

2. Select Measurement Type

Measure Coordinate:

  1. Click the "Coordinate" button
  2. Click a point on the model surface
  3. Displays the spatial coordinates (X/Y/Z) of that point

Note: When the scene contains RTK positioning data, absolute coordinates are displayed.

Measure Distance:

  1. Click the "Measure Distance" button
  2. Click the first measurement point
  3. Click the second measurement point; the distance between them is displayed in real time
  4. Double-click to finish
  5. Right-click to cancel

Measure Area:

  1. Click the "Measure Area" button
  2. Click multiple measurement points sequentially (at least 3)
  3. Click the first point to close, or double-click to close
  4. Right-click to cancel

3. Delete Measurement

  • Hover over the measurement data and click the delete button
  • Or select the entry in the Assets list, then press Delete or right-click → Delete

4. Text Note

Add a note next to the measurement result. The note text will be displayed when exporting measurement data as PDF.

  1. Hover over the measurement result value
  2. A "T" icon appears; click to start typing
  3. Enter note text (≤50 characters)

5. Export Measurement

  • Select measurement entries in the Assets list (multi-select supported), right-click → Export, and choose .csv or .pdf format
  • You can also include measurement data in a report via the Scene Report tool: Check measurement data in the Scene Report tool, click confirm, and export the report PDF in Preview Mode.
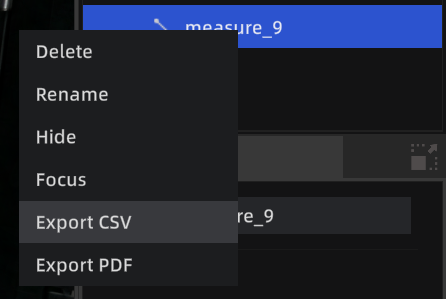
Measurement export

Measurement export

Auxiliary Features

Auxiliary features can be customized and saved as preferences in Settings, or toggled quickly during measurement via shortcut keys.

Auxiliary Axis

Automatically displays X/Y/Z axis guide lines during measurement. Point selection snaps to axis directions for precise horizontal or vertical distance measurement.

  • Shortcut: Ctrl to enable/disable

Corner Detection

Automatically detects model surface edges and corners. When detected, a "□" marker appears for precise edge and corner selection.

  • Shortcut: Tab to enable/disable

Unit Settings

In Settings → General Settings, you can switch the measurement unit (Metric/Imperial). Enabling "Professional Measurement" additionally displays X/Y/Z component values.

Prev
Annotation
Next
Flythrough